Specifying Workflows
Users of cloudmesh cc must follow a certain configuration style to best specify how a workflow should be run. Customization options include specifying the job types, the order of how the jobs should be run, and the portrayal of the graph.
Workflow YAML format
A workflow yaml file with three Shell script
jobs a, b, and c is as follows:
workflow:
  nodes:
    a:
       name: a
       user: gregor
       host: localhost
       kind: local
       status: ready
       label: '{name}\nprogress={progress}'
       script: test-a.sh
    b:
       name: b
       user: gregor
       host: localhost
       kind: local
       status: ready
       label: '{name}\nprogress={progress}'
       script: test-b.sh
    c:
      name: c
      user: gregor
      host: localhost
      kind: local
      status: ready
      label: '{name}\nprogress={progress}'
      script: test-c.sh
  dependencies:
    - a,b,c
Example Workflows
Sample yaml files can be found at the following link:
https://github.com/cloudmesh/cloudmesh-cc/blob/main/tests/workflow-example/workflow-example.yaml
Defining nodes in the workflow
Nodes can be customized in various ways within the
workflow configuration YAML file, including their
job types (python, sh, jupyter, or slurm), their
virtual Python environment (by specifying venv),
their appearance on the graph, and other characteristics.
Defining labels for the workflow
These variables must be in curly braces when defining the labels inside the yaml workflow files.
For example, a label could be defined as follows:
workflow:
  nodes:
    start:
      label: 'start\nCreated={created.%Y/%m/%d, %H--%M--%S}\nWorkflow Started={t0.%Y/%m/%d, %H--%M--%S}\nNow={now.%Y/%m/%d, %H--%M--%S}\nElapsed={dt0.%M--%S}'
This creates a node on the graph that looks similar to the following example:
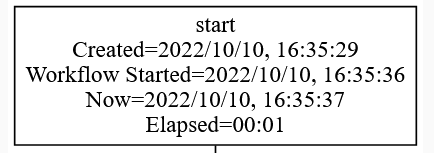
Initially, the created and elapsed labels are N/A if the workflow
has not yet started, but they are replaced during runtime. This
can be observed by running a workflow in graph view in the web interface.
Colons must be replaced with -- and the years, months,
days, hours, minutes, and seconds can be arranged as desired,
as long as the corresponding letters remain consistent
(%Y %m %d %H %M %S respectively). Also, the
format of the time must come immediately following the period.
namename of jobprogressprogress of job from 0-100time labels:
now.current timenow.%Y/%m/%d, %H--%M--%Snow in particular format (this can be used for other times as well)created.time when workflow was createdt0.workflow start timet1.workflow end timedt0.elapsed time since workflow begandt1.total time of workflow once completetstart.job start timetend.job end timemodified.job modified time
os.operating system environment variable (like os.HOME)cm.cloudmesh variable that is read fromcms set
Defining format for timestamp labels
Various formats can be used for the timestamps, such as
the American datetime format %m/%d/%Y, %H--%M--%S
or the international datetime format %Y/%m/%d, %H--%M--%S.
As long as the letters stay consistent
(%Y %m %d %H %M %S for year, month, day, hour, minute,
and second, respectively), any format can be created.
If no format is specified following the period after the variable, the datetime defaults to American format.
Defining graphviz shapes and styles
Any shape and style for the nodes in the graph can be chosen, as long as they are taken from the graphviz documentation:
https://graphviz.org/doc/info/shapes.html
https://graphviz.org/docs/attr-types/style/
The following is an example of a node in YAML format
that uses a box shape and an empty style. The empty style
defaults to filled, which allows the node to change color
when the job status is changed.
workflow:
  nodes:
    start:
      label: 'start\nCreated={created.%Y/%m/%d, %H--%M--%S}\nWorkflow Started={t0.}\nElapsed={dt0.}'
      kind: local
      user: grey
      host: local
      status: ready
      exec: 'echo hello'
      name: start
      shape: box
      style: ''
Defining dependencies in the workflow
Dependencies are specified in the order which jobs should be run, from left to right. They are listed under the workflow in the yaml file.
workflow:
  nodes:
    a:
       name: a
    b:
       name: b
    c:
       name: c
  dependencies:
    - a,b,c
Reporting Progress
When running scripts/jobs inside a workflow, the scripts must leverage some format of cloudmesh.progress to run successfully. Otherwise, the Workflow class cannot tell if the scripts are done, breaking the progress functionality.
The examples that are provided with cloudmesh-cc are already augmented with cloudmesh.progress. Thus, if a user is running self-made jobs and workflows, they must adhere to the guidelines as follows.
Shell and Slurm Scripts
For shell and Slurm scripts .sh, the script must contain:
echo "# cloudmesh status=running progress=1 pid=$$"
at the beginning of the script, and
echo "# cloudmesh status=done progress=100 pid=$$"
at the end of the script.
Python Scripts and Jupyter Notebooks
For Python scripts .py and Jupyter notebooks .ipynb,
the script must contain an import module from
cloudmesh.common and calls to the progress function.
py_script.py
from cloudmesh.common.StopWatch import progress
from cloudmesh.common.Shell import Shell
filename = Shell.map_filename('./py_script.log').path
progress(progress=1, filename=filename)

# your script does what you want it to do here...

progress(progress=100, filename=filename)
The statements do not need to be at the absolute beginning or end of the script, but the progress must:
be written to a filename with the same name as the script, ending in
.logbegin at progress=1
and end at progress=100