Ansible III: Ansible Galaxy
By finishing the first two chapters, you should be able to compose
Ansible projects to install, configure or do other maintenances on
your software packages. We introduced the powerful component Roles
in the previous chapters, and emphasized the concepts of modularize
and re-usability. With these preparations, we are ready to start
working on Ansible Galaxy.
Think Ansible Galaxy as of an marketplace, where developers can share Ansible Roles to complete their system administration tasks. Roles exchanged in Ansible Galaxy community need to follow common conventions so that all participants know what to expect. We will illustrate details in this chapter.
It is good to follow the Ansible Galaxy standard during your development assignment as much as possible, however, you will submit your assignments to this class’s repository not the global Galaxy community.
Ansible Galaxy helloworld
Let us start with a simplest case: We will build an Ansible Galaxy project. This project will install the Emacs software package on your localhost as the target host. It is a “helloworld” project only meant to get us familiar with Ansible Galaxy project structures.
create the directory
Setup your submission directory after you clone and rebased with https://github.com/cloudmesh/sp17-i524:
$ git rebase upstream/master
$ ./setup galaxy <your HID>
It will create a folder named after your HID inside directory
galaxy/. Your Galaxy related assignments will be completed and
submitted there. Go ahead and create files README.md,
playbook.yml, inventory and a subdirectory roles/
then. playbook.yml is your project playbook. It should perform the
Emacs installation task by executing the corresponding role you will
develop in the folder ‘roles/’. The only difference is that we will
construct the role with the help of ansible-galaxy this time.
Now, let ansible-galaxy initialize the directory structure for you:
$ cd roles
$ ansible-galaxy init <to-be-created-role-name>
The naming convention is to concatenate your name and the role name by a dot. Here is how it looks like:
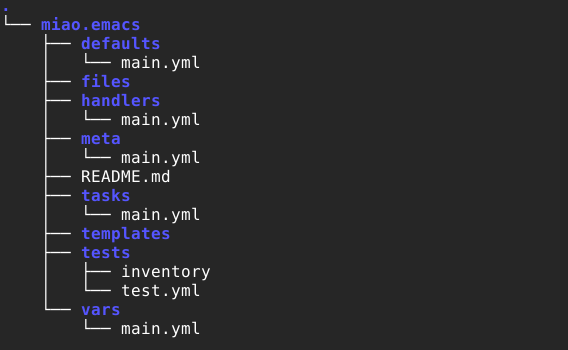
fill in information
Let us fill in information to our project. There are several
main.yml files in different folders, and we will illustrate their
usages.
- defaults and vars:
- These folders should hold variables key-value pairs for your playbook scripts. We will leave them empty in this example.
- files:
- This folder is for files need to be copied to the target hosts. Data files or configuration files can be specified if needed. We will leave it empty too.
- templates:
- Similar missions to files/, templates is allocated for template files. Keep empty for a simple Emacs installation.
- handlers:
- This is reserved for services running on target hosts. For example, to restart a service under certain circumstance.
tasks:
This file is the actual script for all tasks. You can use the role you built previously for Emacs installation here:
---
- name: install Emacs on Ubuntu 16.04
  become: yes
  package: name=emacs state=present
- meta:
Provide necessary metatdata for our Ansible Galaxy project for shipping:
---
galaxy_info:
  author: <you name>
  description: emacs installation on Ubuntu 16.04
  license:
    - MIT
  min_ansible_version: 2.0
  platforms:
    - name: Ubuntu
      versions:
        - xenial
  galaxy_tags:
    - development

dependencies: []
Test it out
You have your Ansible Galaxy role ready now. To test it as a user, go
to your HID directory and edit the other two files inventory and
playbook.yml, which are already generated for you in directory
tests by the script:
$ ansible-playbook -i ./hosts playbook.yml
After running this playbook, you should have Emacs installed on localhost.
A Complete Ansible Galaxy Project
We are going to use ansible-galaxy to setup a sample project. This sample project will:
- use a cloud cluster with multiple VMs
- deploy Apache Spark on this cluster
- install a particular HPC application
- prepare raw data for this cluster to process
- run the experiment and collect results