1.5. Contributing
Note
We assume you are using a Linux or OSX operating system. If you use Windows, you can use virtualbox and install for example ubuntu 16.04. An alternative is to use gitbash
Contributing content to this web page is easy. First, you have to fork the repository while going to the link:
And press the fork icon. Now you can clone or directly manipulate your fork from the web browser. If you clone, you need to make sure you clone from your fork.
We assume you use Python 3.6.2. If not please find instructions on how to install it. We recommend that you use pyenv so you can install multiple python environments.
Next, you can cd to the classes directory and make the modifications. Check them locally with:
pip install -r requirements.txt
make
make view
To change things you can simply edit files in the docs/source directory. Commit the changes and push them into your local fork. Now you can create on the web page for the classes a pull request.
If accepted the request will be merged and you will be credited via your github account. Make sure you use git config to set your name and e-mail. Please remember that pull requests are merged by a human and it will take time. This is not an instantaneous action.
1.5.1. MD vs. RST
If you see an .md file and an .rst file in the same directory, never edit the rst file. This file will be automatically created. In a future version we will remove the rst file and only have the md file in the directory.
1.5.2. Using GitHub
These instructions assume that you are using git from the commandline. For Linux or OSX, please follow our instructions on how to install it which is provided as part of the lessons.
If you use windows you can install :ref:`git for windows <https://git-for-windows.github.io/>`_ and than you can open up Gitbash in your classes directory.
First you need to initialize your directory for use with Git:
git init
Next you need to set your user name and email to get credit for your work:
git config --global user.name "Firstname Lastname"
it config --global user.email yourusername@iu.edu
Next you need to pull the information down from your forked repository. You will need to enter your Github username and password when prompted:
git pull https://github.com/username/classes
With all the files downloaded to your local directory, you can begin editing the rst files with a plain text editor.
When you have changes to commit to the repository, you will first have to set the origin for the changes. You only need to do this the first time you commit changes, so do not worry about this step every time you push your changes:
git remote add origin https://github.com/username/classes.git
Now you are ready to add the files you changed:
git add -A
Then commit the changes with a meaningful comment explaining what you did:
git commit -m "A message indicating what you changed"
Finally you can push your changes up to Github:
git push -u origin master
Once you have done that, open up a browser and go to your forked project on Github. When you have verified that the changes are there, you can issue a pull request for your work to be integrated into the original repository by clicking the Pull Request field in the right hand corner beneath the topics.
1.5.3. Creating a Pull Request in GitHub
Create a pull request to propose and collaborate on changes to a repository. These changes are proposed in a branch, which ensures that the master branch only contains finished and approved work. Pull requests can only be opened if there are differences between your branch and the upstream branch. You can specify which branch you’d like to merge your changes into when you create your pull request.
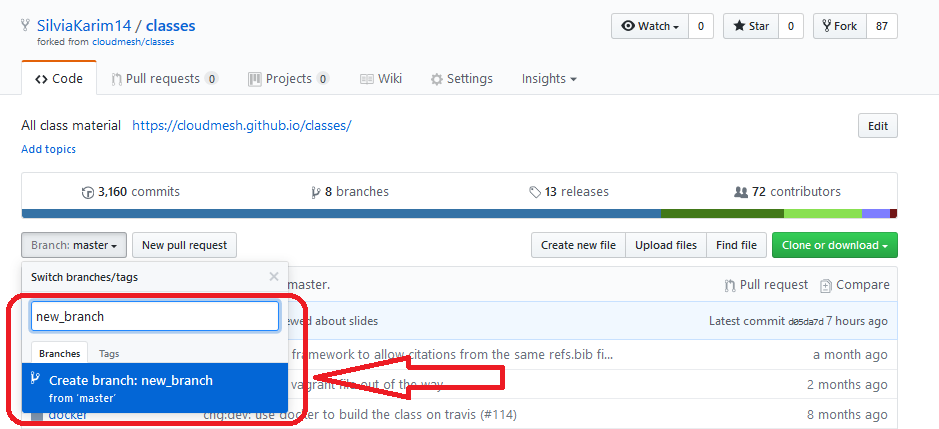
1.5.3.1. Create a branch
Branching is the way to work on different versions of a repository at one time. When you create a branch off the master branch, you’re making a copy, or snapshot, of master as it was at that point in time. If someone else made changes to the master branch while you were working on your branch, you could pull in those updates. When a change is ready, they merge their branch into master. You can follow the steps for creating a branch:
- Click the drop down at the top of the file list that says branch: master on your repository.
- Type a branch name, for example: new_branch, into the text box.
- Select the blue Create branch box or press “Enter” on the keyboard.
title
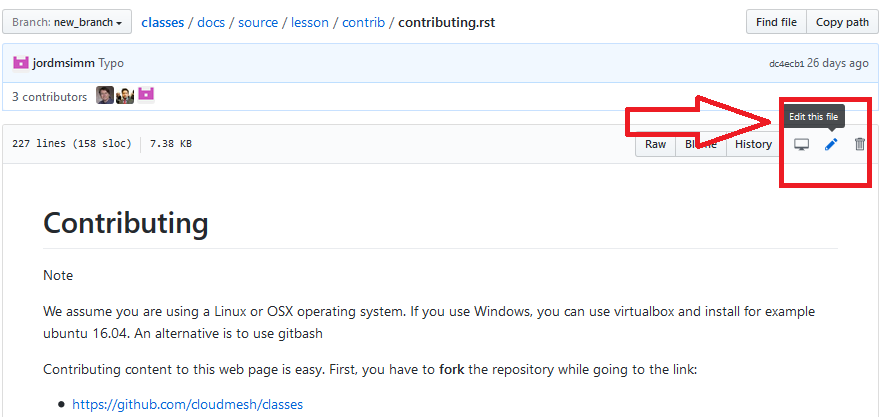
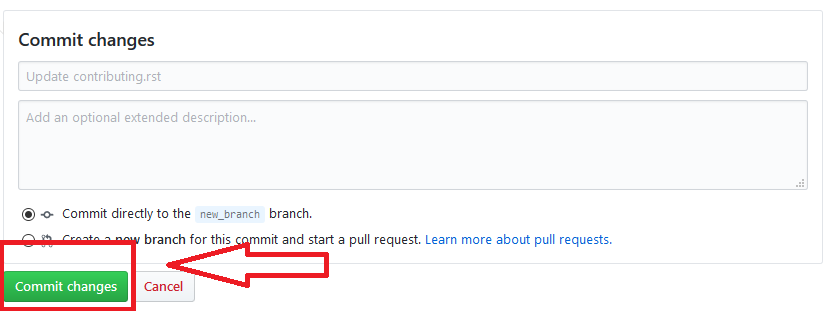
1.5.3.2. Make and commit changes
- pencil icon in the upper right corner of the file view to edit.
- Write a commit message that describes your changes.
- Click Commit changes button.
title
title
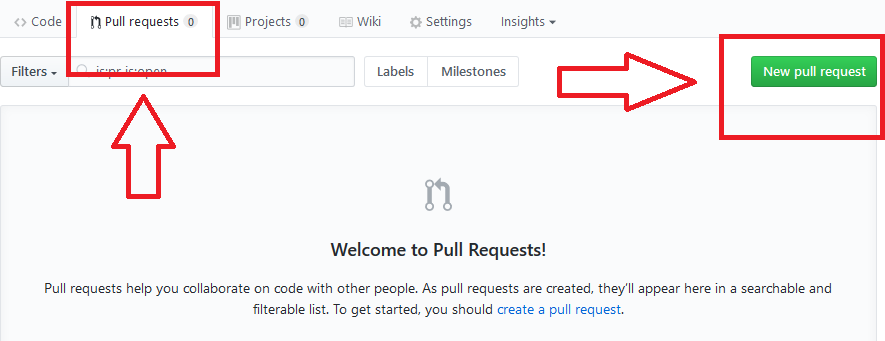
1.5.3.3. Pull Request
As soon as you make a commit, you can open a pull request and start a discussion, even before the code is finished. * Click the Pull Request tab, then from the Pull Request page, click the green New pull request button. * Look over your changes in the diffs on the Compare page, make sure they’re what you want to submit. * When you think that you are ready to submit, click the big green Create Pull Request button. * Give your pull request a title and write a brief description of your changes.
title
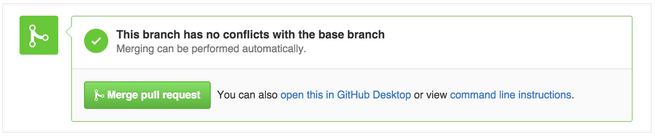
1.5.3.4. Merge your Pull Request
In this final step, it’s time to bring your changes together – merging your edited branch into the master branch.
- Click the green Merge pull request button to merge the changes into master.
- Click Confirm merge.
- Go ahead and delete the branch, since its changes have been incorporated, with the Delete branch button in the purple box.
title
1.5.4. Adding bibligraphic references
We use a single refrence file formated in bibtex. The file is located in docs/source/refs.bib. We use sphinx-bibtex to manage the refernces in rst pages. However, it has the disadvantage that we can only have on refrence section per bib file. In order to simplify management as we may cite the same refernces in differnt files it is not useful to develop a bib file for each rst file. INstead we developed the following pragmatic approach.
Here is the process that we automatically apply in the Makefile
- We identify all rst files that have the cite command in it.
- We copy the refs.bib file into the same directory as the originating rst file. Lets assume the file is called filename.rst
- We than rename in the file for this directory to filename-tmp.bib indicating it is not checked into github
- In gitignore we have a rule that excludes them
The only thing you have to do in order to use refernces is to make the index unique and to add a section such as the following to your document:
References
----------

.. bibliography:: filename-tmp.bib
   :style: unsrt
   :cited:
   :labelprefix: filename
Please note the unique filename. To properly geberate the citations we remommend you use:
make clean; make
1.5.5. Exercise
To do this assignment you need to learn about making small changes and how to document them with gitchangelog:
if you fix a spelling error: your commit message must:
chg:dev: corrected spelling error
if you try to add a larger text you added real content, you can use “chg:usr: added section about how to do this and that and the other” where you replace this and that and the other with what you actually contributed
Warning
do always create small pull request. They are easier to accept. If you create many different changes in many different locations in files the likelihood is that we reject the pull request and you have to split it up and redu, costing time on your side. This is part of learning how we use git.
- EContrib.0:
- If you find an md file and an rst file with the same prefix, which filed should you edit?
- EContrib.1:
- Identify a spelling error on the web page or another item to improve. Fork the Web page, fix the error and create a pull request.
- EContrib.2:
- Identify a section that is not covered by this material, but could be useful. Add such a section and create a pull request so your contribution can be added. Work with others that review your section before submitting so we make sure no one else is working on this already. If they do we bring you in contact with them.
- EContrib.3:
- How do you clone from your fork? What is the difference between your fork and the main repository? How do you identify it is your fork you clone from?
- EContrib.4:
We use the creation of the class Web site on your computer to benchmark your machine. This benchmark will be used as part of some class assignments. To do so execute the following and write down/copy the times you get:
make clean
time make
You will see something like:
real       2m36.662s
user       2m34.473s
sys        0m1.467s
Now we want you to run it again after you touched a file:
touch docs/source/faq.rst
Now rerun the timed make. You will see an output such as:
real       0m27.853s
user       0m27.394s
sys        0m0.334s
The only thing we are interested in is the time behind real, as well as some information about your computer, e.g.:
computer: MacBook Pro, 15-in, 2016, 2.9GHz, 16GB, 2133Mhz, LPDDR3
make clean: 2m36.662s
make update: 0m27.853s
python: 3.6.2
We will post a form in which you can enter your information. We found that we can use this information to check if you may have an issue with your computer or your setup.
- EContrib.5:
- Why do we ask you to do multiple pull requests? What could be the consequence if you make hundrets of changes in one pull request?