Burning a set of Ubuntu Server Cards for Raspberry Pis with Internet Access

In this tutorial, we explain how to easily set up a cluster of Pis with pre-configured Ubuntu cards initialized with custom cloud-init configurations.
Learning Objectives
- Learn how to use cloudmesh-burn to create an ubuntu cluster
- Test the cluster after burning
Topics covered
1. Introduction
Cloud-init provides powerful tools for configuring an Ubuntu Server. It allows users to configure network information, add authorized keys, run commands on boot, and other useful tasks to set up the operating system. While cloud-init is a very powerful tool, it requires knowledge to use it properly and therefore has a high learning curve when it comes to cluster-specific tasks such as using user data and network configurations to get a cluster operational.
For this reason, we provide a simple set of commands to not only burn SD Cards with ubuntu server but to augment them with configurations for cloud-init to set up a cluster correctly.
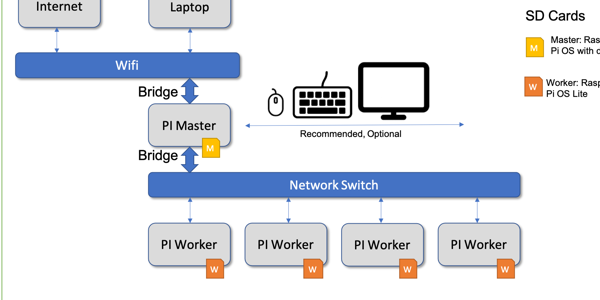
In this tutorial, we will burn a cluster of Raspberry Pis with Ubuntu Server per a user-friendly configuration. This cluster will have wifi access from the manager, and the manager will act as a router for the workers (in that all internet traffic is routed through the manager). This type of setup is useful for those with restricted internet access (no access to modem), especially those that are required to register the MAC addresses of their devices. With a cluster of 10 or more nodes, this can be quite tedious to do.
2. Pre-requisites
- Computer/Laptop with MacOS or Linux. (Windows not supported yet)
python3 --version> 3.8- 5 Raspberry Pis and 5 SD Cards with power cables
- WiFi SSID and Password
- 5 Ethernet Cables
- An (un)managed ethernet switch
3. Notation
In our tutorial we define the manager hostname to be red, while each
worker has a number in it red01, red02, red03, red04
The following image shows our cluster configuration:
4. Installing cloudmesh and Setup
It is best practice to create virtual environments when you do not envision needing a python package consistently. We also want to
place all source code in a common directory called cm.
Let us set up this create one for this tutorial.
On your Linux/Mac, open a new terminal.
you@yourlaptop $ python3 -m venv ~/ENV3
The above will create a new python virtual environment. Activate it with the following.
you@yourlaptop $ source ~/ENV3/bin/activate
First, we update pip and verify your python and pip are correct
(ENV3) you@yourlaptop $ pip install --upgrade pip
(ENV3) you@yourlaptop $ which python
~/ENV3/bin/python

(ENV3) you@yourlaptop $ which pip
~/ENV3/bin/pip
4.1 Install from Pip for Regular Users
(ENV3) you@yourlaptop $ pip install cloudmesh-pi-cluster
4.2 Install from Source (for Developers)
If you are a developer that likes to add new features we recommend our source set up. We start after you have created the virtual env with the install of our convenient cloudmesh-installer and creating a directory called cm in which we download the sources
(ENV3) you@yourlaptop $ pip install cloudmesh-installer
(ENV3) you@yourlaptop $ mkdir ~/cm
(ENV3) you@yourlaptop $ cd ~/cm
(ENV3) you@yourlaptop $ cloudmesh-installer get pi
(ENV3) you@yourlaptop $ ls
This directory will now contain all source code. It will also have the needed installed cms command.
4.3 Initializing the cms Command
It is very important to initialize the cms command and test if it is properly installed. You do this simply with the command
(ENV3) you@yourlaptop $ cms help
You will see a list of subcommands that are part of the cms if your installation succeeded.
4.3 Create an SSH key
It is important that we can easily access the manager and worker nodes from the laptop/desktop. Hence we create a keypair in ~/.ssh. You can create one as follows by accepting the default location in ~/.ssh/id_rsa
(ENV3) you@yourlaptop $ ssh-keygen
Please use a unique and strong passphrase. We will use this default key to access our cluster after burning.
5. Burning the Cluster
We are now ready to burn our cluster. Start by plugging in your first SD Card into your card writer. Check your writer’s path with the following:
(ENV3) you@yourlaptop $ cms burn info
# ----------------------------------------------------------------------
# SD Cards Found
# ----------------------------------------------------------------------

+----------+------------------------+-------------+------------------+--------------+------------+---------+----------+-------------+-------------+
| Path     | Info                   | Formatted   | Size             | Plugged-in   | Readable   | Empty   | Access   | Removable   | Writeable   |
|----------+------------------------+-------------+------------------+--------------+------------+---------+----------+-------------+-------------|
| /dev/sdb | Generic STORAGE DEVICE | True        | 64.1 GB/59.7 GiB | True         | True       | False   | True     | True        | True        |
+----------+------------------------+-------------+------------------+--------------+------------+---------+----------+-------------+-------------+
Record the path for the SDCard. In this case, it is /dev/sdb
Note we omit some output of
cms burn infofor clarity. On MacOS, you may get anERROR: We could not find your USB reader in the list of known readers. This can be ignored. Additionally,cms burn infowill list the partitions as well. For example, if you see the path/dev/disk2s1and/dev/disk2s2, then your device is/dev/disk2.
This command will autodetect the SSID, locale, and country of your laptop.
We recommend not to use the password flags for the wifipassword and sudo
password as they will be stored in the command history and logs. When not
supplied as command line arguments, they will be asked for interactively.
The wifi setup will only be enabled on the manager (red).
(ENV3) you@yourlaptop $ cms burn ubuntu "red,red0[1-4]" --device=/dev/sdb -f
Note the
-fflag instructscms burnto build a default cloudmesh inventory for the names provided. To see the contents of this file you can use the commandcms inventory list --inventory=inventory-red.yaml
After each card is burned, cms burn ubuntu will prompt you to swap the SD
card to burn the next host.
After all the cards have been burned, we can now plug them in our raspberry pis and boot. Ensure that your workers and manager are connected to the same network switch via the ethernet cables. Ensure this network switch does not have internet access in itself, e.g. do not connect the switch to the internet router. We will use the manager as the sole point of internet access here. This we do deliberately to be able to disconnect all nodes from the network via the Master in case this is needed.
6. Burn Verification and Post-Process Steps
After you boot, we recommend waiting 2-3 minutes for the boot process to complete.
6.1 Setting up a Proxy Jump with cms host
While we are waiting for the Pis to boot, we can set up proxy jump on our laptop/desktop while adding it to the ssh config file. This will make it easier to access our workers. Use the following command to set this up:
(ENV3) you@yourlaptop $ cms host config proxy ubuntu@red.local "red0[1-4]"
It will do the appropriate modifications.
6.2 Verifying Manager and Worker Access
First verify that you can reach the manager (red).
(ENV3) you@yourlaptop $ ssh red
...
pi@red:~ $ exit
Note: If this does not work, it is likely that the wifi configuration was incorrect, or there is an RF block on the Pi that could not be removed due to an unknown locale of the burning machine. 2.4GHz wifi is more likely to work without explicit country configuration than 5 GHz bands.
We can use a simple cms commands to verify connection to our Pis. First we
reboot the cluster to activate the libraspberrypi-bin tools that were
installed on the first boot.
(ENV3) you@yourlaptop $ cms host reboot "red,red0[1-4]"
host reboot red,rede0[1-4]
INFO: Executing `sudo reboot` for ['red01', 'red02', 'red03', 'red04']
INFO: Executing `sudo reboot` for red
Wait for the reboot to complete. Then we use our built in temperature command that reads the temperature values from each of the Pis.
(ENV3) you@yourlaptop $ cms pi temp "red,red0[1-4]"
pi temp red,red0[1-4]
+--------+--------+-------+----------------------------+
| host   |    cpu |   gpu | date                       |
|--------+--------+-------+----------------------------|
| red    | 47.712 |  47.2 | 2021-03-27 19:52:56.674668 |
| red01  | 37.485 |  37.4 | 2021-03-27 19:52:57.333300 |
| red02  | 38.946 |  38.9 | 2021-03-27 19:52:57.303389 |
| red03  | 38.946 |  39.4 | 2021-03-27 19:52:57.440690 |
| red04  | 38.936 |  39.4 | 2021-03-27 19:52:57.550690 |
+--------+--------+-------+----------------------------+
By receiving this information from our devices we have confirmed our access.
6.3 Gather and Scatter Authorized Keys
Each of the nodes only has our laptop’s ssh-key in its respective authorized_keys file. We can use the cms command to gather all keys in our cluster and then distribute them so that each node can ssh into each other.
We first create ssh-keys for all the nodes in our cluster.
(ENV3) you@yourlaptop $ cms host key create "red,red0[1-4]"
host key create red,red0[1-4]
+-------+---------+--------------------------------------------------+
| host  | success | stdout                                           |
+-------+---------+--------------------------------------------------+
| red   | True    | ssh-rsa AAAAB3NzaC1yc2EAAAADAQABAAABAQC99RR79UTQ |
|       |         | JznOPRN/FI6MqNsZ5Eirqs7JXA4UYfnMx8LVaD/ZcI6Sajr0 |
|       |         | 2nw2ucec8OMxtdzPrpWX5B+Hxz3GZWNKCbh2yHhMDIrf/Ohn |
|       |         | QGJrBx1mtAbqy4gd7qljEsL0FummdYmPdtHFBy7t2zkVp0J1 |
|       |         | V5YiLEbbrmX9RXQF1bJvHb4VNOOcwq47qX9h561q8qBxgQLz |
|       |         | F3iHmrMxmL8oma1RFVgZmjhnKMoXF+t13uZrf2R5/hVO4K6T |
|       |         | +PENSnjW7OX6aiIT8Ty1ga74FhXr9F5t14cofpN6QwuF2SqM |
|       |         | CgpVGfRSGMrLI/2pefszU2b5eeICWYePdopkslML+f+n     |
|       |         | ubuntu@red                                       |
| red01 | True    | ssh-rsa AAAAB3NzaC1yc2EAAAADAQABAAABAQDRN/rGGF+e |
|       |         | dZ9S2IWX4P26F7T2H+nsbw7CfeJ6df9oX/npYuM9BPDzcEP7 |
|       |         | +2jNIZtZVehJj5zHiodjAspCxjg+mByQZye1jioa3MBmgO3j |
|       |         | VwxCOPA7x0Wc2Dm9/QOg1kMMMlnNT2NHs+SeQMDXoUkpaLCQ |
|       |         | 108VQxaTclJ67USC1e/9B7OtjhsVm5kGA7Eamyd5PgtANT7G |
|       |         | jHERXSnGzFnbqqsZEBvCLWLSbaSq3adWR1bVvDblu11nyitE |
|       |         | x7YKZA9RK0A7rTBzrZa70SfG65dSbpqQFxmQYSrgiwVSBokk |
|       |         | 0vvk5l7NhBDrrrxWYWd9dm/SrDrInjcuDsCsjOVuccx7     |
|       |         | ubuntu@red01                                     |
... # Ommitted some output for brevity
+-------+---------+--------------------------------------------------+
We can subsequently gather these keys into a file.
(ENV3) you@yourlaptop $ cms host key gather "red,red0[1-4]" ~/.ssh/cluster_red_keys
And then Scatter them to the authorized_keys of our nodes.
(ENV3) you@yourlaptop $ cms host key scatter "red,red0[1-4]" ~/.ssh/cluster_red_keys
host key scatter red,red0[1-4] /Users/richie/.ssh/cluster_red_keys
+-------+---------+--------+
| host  | success | stdout |
+-------+---------+--------+
| red   | True    |        |
| red01 | True    |        |
| red02 | True    |        |
| red03 | True    |        |
| red04 | True    |        |
+-------+---------+--------+
All nodes should now have ssh access to each other.
6.4 Installing cms on a Pi
Some cloudmesh commands offered can be very useful on the Pis. You can install cms on all Pis in this fashion, but
we will only demonstrate this for the manager pi.
For the production version pleas use
(ENV3) you@yourlaptop $ ssh red
pi@red $ curl -Ls http://cloudmesh.github.io/get/pi | sh -
However, to get the newest development version please use
(ENV3) you@yourlaptop $ ssh red
pi@red $ curl -Ls https://raw.githubusercontent.com/cloudmesh/get/main/pi/index.html | sh -
This will not only install cms, but will also upgrade your system, install the dependencies for cms, and create a
virtual environment. Because a system upgrade takes place, this command may take several minutes to run.
After a reboot, we can verify the success of the script with the following:
(ENV3) pi@red $ cms help
help

Documented commands (type help <topic>):
========================================
EOF     check     default  help       pause     quit   start      test
admin   clear     diagram  host       pi        set    stop       var
banner  commands  dryrun   info       provider  shell  stopwatch  version
bridge  config    echo     inventory  py        sleep  sys
burn    debug     gui      man        q         ssh    term
7. Appendix
7.1 Writing our cluster configuration
Cloudmesh has a simple system for managing cluster configurations as an inventory.
We do this management for you, but you can control it also from the command line.
We can first add a manager with cluster subnet IP 10.1.1.1. We also add the bridge service which is
recognized by cms as the Wifi bridge service connecting devices on eth0 to the internet.
We also set the timezone and locale here. You may want to change them as you wish.
7.2 Default Cluster Creation
As we want to make the cluster very easy to create we demonstrated in Section 5 how to create a default cluster directly from the burn command. As a future feature, this behavior will also be implemented into the inventory command. To make a default inventory named inventory-red.yaml:
you@yourlaptop $ cms inventory add cluster "red,red[01-04]"
This command will find your current WiFi SSID, your current locale and set up a simple network as depicted in Figure 1 on your cluster. In case you have more or fewer nodes, the command will make appropriate updates.
7.3 Custom Cluster Creation
For a custom cluster, you can inspect the parameters of the inventory command. Here are the commands to use for the previous setup while writing them out. You can modify the parameters to your liking:
you@yourlaptop $ cms inventory add red --service=manager --ip=10.1.1.1 --tag="ubuntu-20.10-64-bit" --timezone="America/Indiana/Indianapolis" --locale="us" --inventory="inventory-red.yaml"
you@yourlaptop $ cms inventory set red services to "bridge,wifi" --listvalue --inventory="inventory-red.yaml"
We can then add the workers
you@yourlaptop $ cms inventory add "red0[1-4]" --service=worker --ip="10.1.1.[2-5]" --router=10.1.1.1 --tag="ubuntu-20.10-64-bit"  --timezone="America/Indiana/Indianapolis" --locale="us" --inventory="inventory-red.yaml"
you@yourlaptop $ cms inventory set "red0[1-4]" dns to "8.8.8.8,8.8.4.4" --listvalue --inventory="inventory-red.yaml"
Note we are using Google’s DNS here [8.8.8.8, 8.8.4.4]
7.4 Inspect the Cluster Configuration
Our cluster configuration is now complete. You may run the following to list your configuration. We include ours for a sanity check:
you@yourlaptop $ cms inventory list --inventory="inventory-red.yaml"
+-------+---------------------+---------+---------+--------------------+----------+------------------------+----------+--------+------------------------------+--------+---------+-------------+-------------------+
| host  | tag                 | cluster | service | services           | ip       | dns                    | router   | locale | timezone                     | owners | comment | description | keyfile           |
+-------+---------------------+---------+---------+--------------------+----------+------------------------+----------+--------+------------------------------+--------+---------+-------------+-------------------+
| red   | ubuntu-20.10-64-bit |         | manager | ['bridge', 'wifi'] | 10.1.1.1 |                        |          | us     | America/Indiana/Indianapolis |        |         |             | ~/.ssh/id_rsa.pub |
| red01 | ubuntu-20.10-64-bit |         | worker  |                    | 10.1.1.2 | ['8.8.8.8', '8.8.4.4'] | 10.1.1.1 | us     | America/Indiana/Indianapolis |        |         |             | ~/.ssh/id_rsa.pub |
| red02 | ubuntu-20.10-64-bit |         | worker  |                    | 10.1.1.3 | ['8.8.8.8', '8.8.4.4'] | 10.1.1.1 | us     | America/Indiana/Indianapolis |        |         |             | ~/.ssh/id_rsa.pub |
| red03 | ubuntu-20.10-64-bit |         | worker  |                    | 10.1.1.4 | ['8.8.8.8', '8.8.4.4'] | 10.1.1.1 | us     | America/Indiana/Indianapolis |        |         |             | ~/.ssh/id_rsa.pub |
| red04 | ubuntu-20.10-64-bit |         | worker  |                    | 10.1.1.5 | ['8.8.8.8', '8.8.4.4'] | 10.1.1.1 | us     | America/Indiana/Indianapolis |        |         |             | ~/.ssh/id_rsa.pub |
+-------+---------------------+---------+---------+--------------------+----------+------------------------+----------+--------+------------------------------+--------+---------+-------------+-------------------+
7.5 Burning a Custom Cluster
You can now specify your inventory as you burn your cluster or specific machines from the cluster with the burn command. All hosts data found in the inventory will be written to the machines, regardless if they are in the burn command or not.
Burn the whole cluster.
(ENV3) you@yourlaptop $ cms burn ubuntu "red,red0[1-4]" --device=/dev/sdb --inventory="inventory-red.yaml"
Burn a specific machine.
(ENV3) you@yourlaptop $ cms burn ubuntu "red03" --device=/dev/sdb --inventory="inventory-red.yaml"