Burning a pre-configured Raspberry PI OS Cluster
In this tutorial, we explain how to easily set up a preconfigured cluster of Pis using Raspberry PI OS while burning SD Cards from either a Windows 10 desktop/Laptop or a PI 4 using Raspberry PI OS 64 bit. The cluster is ready to boot after all cards have been burned. No other configuration is needed. You can choose to use 64-bit or 32-bit on the nodes for the cluster.
Learning Objectives
- Learn how to use cloudmesh-burn to create a RaspberryOS cluster
- Test the cluster after burning
- Use either Windows 10 or use a PI4 to conduct the burning
Topics covered
Info
Disclaimer
As this tool formats disks, we hold no responsibility for this tool to properly function or if you lose any data by using it. A best practice is to create a backup of your system before trying this. In cas you do not want to run it on your computer, you can always run it on a Raspberry PI. If something goes wrong, you just have to reburn the PI. We recommend a PI4 as this has a faster USB port and allows faster burn time than previous generations of PI’s.
1. Introduction
With the release of Pi Imager
1.6,
it is possible to configure a Raspberry Pi from any operating system
while using RaspberryOS. While pi-imager only uses a limited number of
parameters, our system adds network configurations to create a
cluster. In addition to a static network configuration, it is also
possible to use the tool to burn a cluster that you add to a mesh
network. The system works while executing configurations automatically
after the first boot. Supportd opertaning systems this program include
Raspberry OS, Ubuntu 20.04, macOS, Windows 10, and (Windows 11 under
development). On http://piplanet.org we are providing additional
tutorials that are particularly designed for a specific OS.
Our tutorials are beneficial as, typically, many steps are involved in setting up a cluster. This requires either the replication of time-consuming tasks that can be automated or the knowledge of DevOps frameworks that you may not be familiar with.
We avoid this by simply burning a card for each of the PIs. No more hours wasted on setting up your initial cluster.
We developed a special command called cms burn to facilitate this,
which allows us to create preconfigured cards with the necessary
information. The features this command supports include:
- Setting the hostname,
- Enabling SSH,
- Configuring WiFi,
- Setting the locale,
- Changing the password,
- Adding authorized keys,
- Configuring static IPs for wired ethernet along with routing preferences,
- Configuring a WiFi bridge for a manager Pi to act as a router between the worker PIs and the internet, and
- Automating the configuration on the first boot.
- Support for either static networks or mesh networks
We demonstrate the usage of the cms burn command by creating a
cluster of 5 pis (1 manager, 4 workers) where we connect the manager
to the internet via Wifi and configure the workers to access the
internet through the manager via ethernet connection. This is useful
for those with restricted internet access where devices must be
registered by MAC Address or through browser login as the internet
connection is tunneled through the manager PI
In addition, we alternatively showcase how to set up the cluster in a mesh network
2. Pre-requisites
- Computer/Laptop with Windows10 or PI 4 with Raspberry PI OS 64-bit
python3 --version> 3.9.2- WiFi SSID and password
- 5 Raspberry Pis and 5 SD Cards with power cables. (However, you only need a minimum of 2 is needed, one manager and 1 worker if you do not have 4 Pis. You can adapt our tutorial accordingly)
- 5 Ethernet Cables
- An unmanaged ethernet switch
For parts for different pi cluster configurations, please see our links at piplanet.org
3. Notation
3.1 Naming of the Compute Nodes
In our tutorial, we define the manager hostname to be red, while each
worker has a number in it red01, red02, red03, red04. Our tool
specifically identifies the manager node to be the one without the
number. Naturally, you can use a different name than using
red. This can also come in handy if you want to create
multiple clusters to create a distributed cluster environment for use
or development purposes.
3.2 Naming of the Device for the SD Card
The naming of the location for the device representing the SD Card is
different between Windows and Linux, Rasberry OS, and macOS. While on
Windows, the device is called a disk that has a number; on the other
operating systems, it is specified with a device location such as
/dev/sdX where X is typically a lower case letter.
4. Network Configuration Choices
Therea are multiple ways on how we can configure a cluster. Within this tutorial we provide two different ways dependent on what network router you have. This includes a classical network router or a mesh network router.
We provide for both the following illustrations. YOu will have to determine which network type fits for you as there will be a slight difference during the burn task that we point out later.
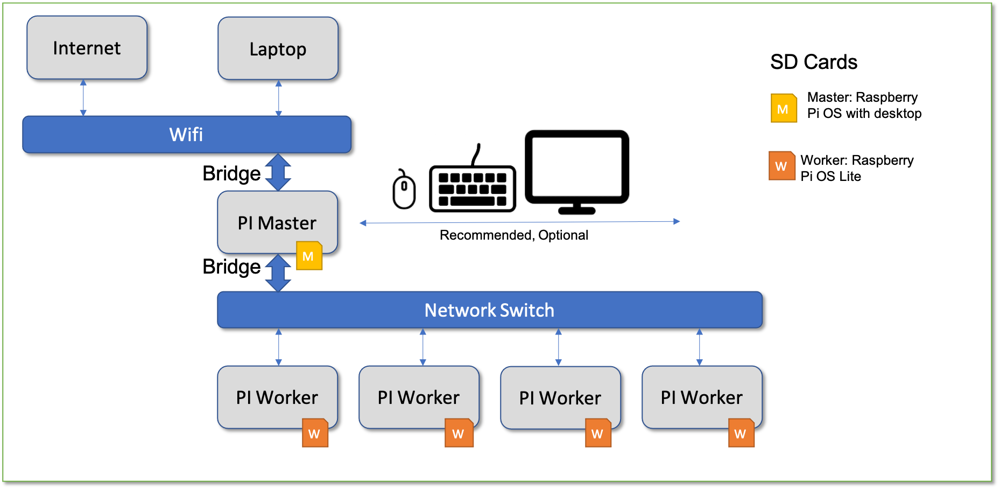
The following image shows our cluster configuration for a static network setup:
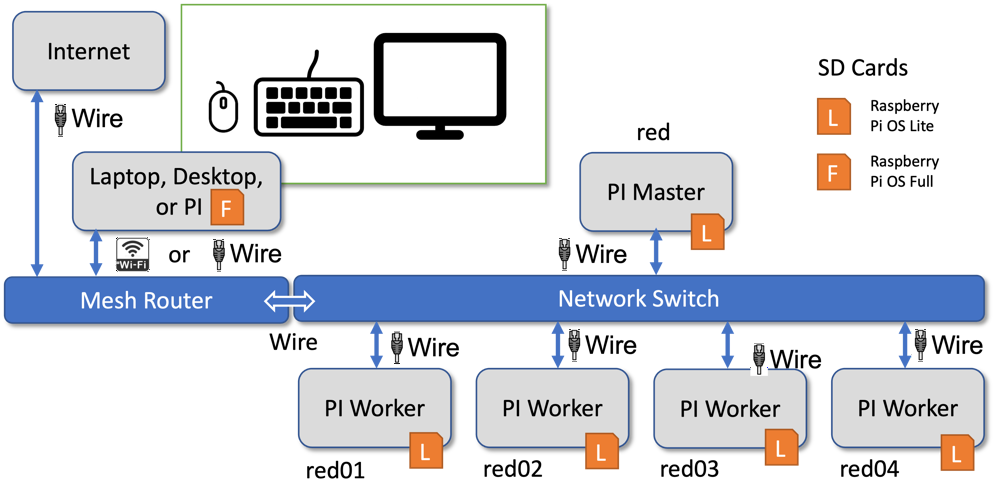
The alternative is to use a mesh network in which we have the following setup
5. Installing Python
Cloudmesh burn runs an many different versions of Python. This includes Python either installed with conda or python.org as it can be easily installed with pip which is supported on both. We recommend typically to use the python version installed from python.org if you are unsure which to chose and you are not using conda.
First, we update pip and verify your python and pip are correct.
| |
5.1 Install from Pip for Regular Users
The pip install is not yet suported!!. So please use
the Install from source installation documentation. Once we officially
release this code the install from pip can be used.
bash~~ ~~(ENV3) you@yourlaptop $ pip install cloudmesh-pi-cluster~~ ~~
5.2 Install from Source (for Developers)
If you are a developer that likes to add new features, we recommend our
source setup. We start after you have created the virtualenv with the
install of our convenient cloudmesh-installer and the creation of a
cm directory in which we download the sources
| |
This directory will now contain all source code. It will also have
installed the needed cms command.
5.4 Create an SSH key
We use ssh to easily log in to the manager and worker nodes from the
laptop/desktop. Hence we create a keypair in ~/.ssh. You can create
one as follows by accepting the default location in ~/.ssh/id_rsa
| |
Please use a unique and strong passphrase. We will use this default key to access our cluster after burning.
In case you do not always want to type in your passphrase, you can use ssh-agent in your terminal.
6. Burning the Cluster
We are now ready to burn our cluster. Start by making sure you have the latest images to burn. Please choose the 64-bit or the 32-bit image tab to see details. For our example, we will be choosing the 64-bit image. First, we need to download it.
This command will create a cached version of the information related to the download URLs and a specifically created version tag that we will use for downloading the image. It is also possible to define different images for manager and workers, while adding them to the images list in a comma-separated parameter using the tags.
To choose a different image, you can inspect the versions and tags as well as the originating URLs with
| |
To just see the latest versions type in
| |
which returns an output similar to
+--------------------+------------+-------------+-------------+-----------------------------------------+
| Tag                | Date       | OS          | Type        | Version                                 |
|--------------------+------------+-------------+-------------+-----------------------------------------|
| latest-lite        | 2022-04-07 | raspberryos | lite        | raspios_lite_armhf-2022-04-07           |
| latest-full        | 2022-04-07 | raspberryos | full        | raspios_full_armhf-2022-04-07           |
| latest-lite-32     | 2022-04-07 | raspberryos | lite-32     | raspios_lite_armhf-2022-04-07           |
| latest-full-32     | 2022-04-07 | raspberryos | full-32     | raspios_full_armhf-2022-04-07           |
| latest-lite-64     | 2022-04-07 | raspberryos | lite-64     | raspios_lite_arm64-2022-04-07           |
| latest-full-64     | 2022-04-07 | raspberryos | full-64     | raspios_arm64-2022-04-07                |
| latest-lite-legacy | 2022-04-07 | raspberryos | lite-legacy | raspios_oldstable_lite_armhf-2022-04-07 |
| latest-full-legacy | 2022-04-07 | raspberryos | full-legacy | raspios_oldstable_armhf-2022-04-07      |
+--------------------+------------+-------------+-------------+-----------------------------------------+
6.1 Get Burn Info
Next, plug in your first SD Card into your card writer. Check your writer’s path with the following command.
`Note we omitted some output of
cms burn infofor clarity.
Dependent on your system, this command will take a minute to complete.
In case you receive a warning, inspect it carefully. One reason could
be that the warning occurs as your reader may be too new, and we do
not have it in our database of recognized readers. As long as you see
Removable Media and GENERIC STORAGE DEVICE it will be fine.
6.2 Executing Burn Command
To burn the latest 64 bit OS, use the following command. If you like
to burn other images identified by tags, you can receive them from the
command cms burn versions --refresh. The --tag can take multiple
comma-separated arguments. The tag can be specified for each SD Card
you want to specify individually. A special form is to use
–tag=latest-full-64,latest-lite-64 in which the full image is burned
on the manager and the lite burned on the workers. As mentioned
before, we will, however, just burn the lite 64-bit image on all.
Timezones can be found at https://en.wikipedia.org/wiki/List_of_tz_database_time_zones. Timezones are typically defined with forward slashes in the string identifying them. However, as we use Python forward slashes have a specific meaning in Python and would interfere with our implementation.
Therefore we use - instead of /.
Hence, when entering timezones for the --timezone parameter, please
replace forward slashes with hyphens, as shown in the example
next:
America/Indiana/Indianapolis
must be replaced with ‘-’ in the --timezone parameter:
--timezone="America-Indiana-Indianapolis
If the network name has a space in it, please use two sets of quotes
(with backslashes on Windows Git Bash):
\"'--ssid='Net Work'\". In general, we recommend not to use any spaces
in network names.
# ----------------------------------------------------------------------
#  _____                 _                           ____   _____
# |  __ \               | |                         / __ \ / ____|
# | |__) |__ _ ___ _ __ | |__   ___ _ __ _ __ _   _| |  | | (___
# |  _  // _` / __| '_ \| '_ \ / _ \ '__| '__| | | | |  | |\___ \
# | | \ \ (_| \__ \ |_) | |_) |  __/ |  | |  | |_| | |__| |____) |
# |_|  \_\__,_|___/ .__/|_.__/ \___|_|  |_|   \__, |\____/|_____/
#                 | |                          __/ |
#                 |_|                         |___/
#  ____
# |  _ \
# | |_) |_   _ _ __ _ __
# |  _ <| | | | '__| '_ \
# | |_) | |_| | |  | | | |
# |____/ \__,_|_|  |_| |_|
#
#
# ----------------------------------------------------------------------

INFO: No inventory found or forced rebuild. Building inventory with defaults.
+-------+----------------+---------+---------+--------------------+----------+------------------------+----------+-------------+----------------------------+--------+---------+-------------+-------------------+
| host  | tag            | cluster | service | services           | ip       | dns                    | router   | locale      | timezone                   | owners | comment | description | keyfile           |
+-------+----------------+---------+---------+--------------------+----------+------------------------+----------+-------------+----------------------------+--------+---------+-------------+-------------------+
| red   | latest-lite-64 |         | manager | ['bridge', 'wifi'] | 10.1.1.1 |                        |          | en_US.UTF-8 | AmericaIndianaIndianapolis |        |         |             | ~/.ssh/id_rsa.pub |
| red01 | latest-lite-64 |         | worker  |                    | 10.1.1.2 | ['8.8.8.8', '8.8.4.4'] | 10.1.1.1 | en_US.UTF-8 | AmericaIndianaIndianapolis |        |         |             | ~/.ssh/id_rsa.pub |
| red02 | latest-lite-64 |         | worker  |                    | 10.1.1.3 | ['8.8.8.8', '8.8.4.4'] | 10.1.1.1 | en_US.UTF-8 | AmericaIndianaIndianapolis |        |         |             | ~/.ssh/id_rsa.pub |
| red03 | latest-lite-64 |         | worker  |                    | 10.1.1.4 | ['8.8.8.8', '8.8.4.4'] | 10.1.1.1 | en_US.UTF-8 | AmericaIndianaIndianapolis |        |         |             | ~/.ssh/id_rsa.pub |
| red04 | latest-lite-64 |         | worker  |                    | 10.1.1.5 | ['8.8.8.8', '8.8.4.4'] | 10.1.1.1 | en_US.UTF-8 | AmericaIndianaIndianapolis |        |         |             | ~/.ssh/id_rsa.pub |
+-------+----------------+---------+---------+--------------------+----------+------------------------+----------+-------------+----------------------------+--------+---------+-------------+-------------------+
Note the
--newflag instructscms burnto build a new inventory and overwrites it if it already exists (the -f flag does the same, but we have not yet tested it). To see the contents of this file, you can use the commandcms inventory list --inventory=inventory-red.yaml
After each card is burned, cms burn raspberry will prompt you to
swap the SD card to burn the next host.
After all the cards have been burned, we can now plug them in our Raspberry PI’s and boot. Ensure that your workers and manager are connected to the same network switch via the ethernet cables. Ensure this network switch does not have internet access in itself, e.g., do not connect the switch to the internet router. We will use the manager as the sole point of internet access here. This we do deliberately to be able to disconnect all nodes from the network via the Master in case this is needed.
7. Burn Verification and Post-Process Steps
After you boot, we recommend waiting 2-3 minutes for the boot process to complete. You will notice that the red LED will be on and that the green LED is off. If this is not the case, please wait. If it does not work after a long while, please reboot the PI that has issues and see if it works after the reboot. Also, make sure you check your hardware and network.
One of the important issues is how the PIs are named in your network.
Some networks require that a .local be added to the hostname.
To find that out you can use on amchines where arp is available the command
| |
In case you use a mesh network, it will print out all Raspberry PI 4s in your
network and indicate if they can be found with the .local
extension to the hostname. In case you use a static network it will return
the manager node and indicate if the nodename needs to be appended with .local
or not.
7.1 Setting up a Proxy Jump with cms host
Before we start we make sure that you entered your ssh key. Naturally you need to have your ssh-agent running as discussed before.
| |
The next command depends on if you can use the .local extension or not.local network.
Next, we need to identify if you need to use the manager as a proxy machine to the
worker nodes and if your host names need to be appended with .local which is
the case for a network that uses mDNS such as on a macOS. If you do not know
these values you can try out different combinations of the
flags and use the one that succeds.
Let us assume you are not using a mesh network, then you can set up proxy jump on our laptop/desktop while adding it to the ssh config file. This will make it easier to access our workers. Use the following command to set this up:
| |
This assumes that hosts in your network are appended with .local. If this is not the case you can switch it off by using the following command:
| |
If you are on a mesh network, it is simpler to not use a proxy machine and use the followng
| |
However some mesh networks still require the addition of .local. In which case
you can use
| |
To view the modifications use the command
| |
Optionally you can add the following to the top of your
~/.ssh/config file. As you may have done this before, we do not
automatically do it, and we ask you to add it with your favorite
editor.
Host *
     ServerAliveInterval 30
     ServerAliveCountMax 5
This will keep the connections alive and avoids that you get disconnected.
7.2 Verifying Manager and Worker Access
First, verify that you can reach the manager (red).
| |
Next we want to execute a more advanced program that retrieves the
temperature of the PIs. We can use a simple cms command to verify the connection to our Pis.
For this purpose, we use our build-in temperature command that reads the
temperature values from each of the Pis.
| |
Which returns output in a table recording the temperatures
+--------+--------+-------+----------------------------+
| host   |    cpu |   gpu | date                       |
|--------+--------+-------+----------------------------|
| red    | 47.712 |  47.2 | 2022-04-27 19:52:56.674668 |
| red01  | 37.485 |  37.4 | 2022-04-27 19:52:57.333300 |
| red02  | 38.946 |  38.9 | 2022-04-27 19:52:57.303389 |
| red03  | 38.946 |  39.4 | 2022-04-27 19:52:57.440690 |
| red04  | 38.936 |  39.4 | 2022-04-27 19:52:57.550690 |
+--------+--------+-------+----------------------------+
By receiving this information from our devices, we have confirmed our access.
If you receive the error ERROR: not enough values to unpack (expected 2, got 0)
then delete the proxy config inside ~/.ssh/config file (either with nano,
Notepad++, or even delete the file with rm ~/.ssh/config if you do not have any
other important preexisting configs done outside the scope of this project).
Then, try the different cms host config commands individually as shown in section
7.1, until temp returns all the nodes' temperatures (instead of 0 which indicates
missing/offline node or that host cannot connect).
7.3 Setting up keys on each PI worker
To set up keys on each PI so we can login from one PI to another, we
can use our create/gather/scatter/access commands. First, we need to
create a key on the workers and manager. Then we gather all keys and
scatter them on all PIs. We also set up a configuration file located at
.ssh/config on each one of the hosts. The sequence of commands is as
follows:
We describe each step in more detail next, or if you are impatient, you can skip to the next section.
Each of the nodes only has our laptop’s ssh-key in its respective
authorized_keys file. We can use the cms command to gather all
keys in our cluster and then distribute them so that each node can ssh
into each other.
We first create ssh-keys for all the nodes in our cluster.
| |
+-------+---------+--------------------------------------------------+
| host  | success | stdout                                           |
+-------+---------+--------------------------------------------------+
| red   | True    | ssh-rsa AAAAB3NzaC1yc2EAAAADAQABAAABAQC99RR79UTQ |
|       |         | JznOPRN/FI6MqNsZ5Eirqs7JXA4UYfnMx8LVaD/ZcI6Sajr0 |
|       |         | 2nw2ucec8OMxtdzPrpWX5B+Hxz3GZWNKCbh2yHhMDIrf/Ohn |
|       |         | QGJrBx1mtAbqy4gd7qljEsL0FummdYmPdtHFBy7t2zkVp0J1 |
|       |         | V5YiLEbbrmX9RXQF1bJvHb4VNOOcwq47qX9h561q8qBxgQLz |
|       |         | F3iHmrMxmL8oma1RFVgZmjhnKMoXF+t13uZrf2R5/hVO4K6T |
|       |         | +PENSnjW7OX6aiIT8Ty1ga74FhXr9F5t14cofpN6QwuF2SqM |
|       |         | CgpVGfRSGMrLI/2pefszU2b5eeICWYePdopkslML+f+n     |
|       |         | pi@red                                           |
| red01 | True    | ssh-rsa AAAAB3NzaC1yc2EAAAADAQABAAABAQDRN/rGGF+e |
|       |         | dZ9S2IWX4P26F7T2H+nsbw7CfeJ6df9oX/npYuM9BPDzcEP7 |
|       |         | +2jNIZtZVehJj5zHiodjAspCxjg+mByQZye1jioa3MBmgO3j |
|       |         | VwxCOPA7x0Wc2Dm9/QOg1kMMMlnNT2NHs+SeQMDXoUkpaLCQ |
|       |         | 108VQxaTclJ67USC1e/9B7OtjhsVm5kGA7Eamyd5PgtANT7G |
|       |         | jHERXSnGzFnbqqsZEBvCLWLSbaSq3adWR1bVvDblu11nyitE |
|       |         | x7YKZA9RK0A7rTBzrZa70SfG65dSbpqQFxmQYSrgiwVSBokk |
|       |         | 0vvk5l7NhBDrrrxWYWd9dm/SrDrInjcuDsCsjOVuccx7     |
|       |         | pi@red01                                         |
... # Ommitted some output for brevity
+-------+---------+--------------------------------------------------+
We can subsequently gather these keys into a file.
| |
And then Scatter them to the authorized_keys of our nodes.
| |
host key scatter red,red0[1-4]
+-------+---------+--------+
| host  | success | stdout |
+-------+---------+--------+
| red   | True    |        |
| red01 | True    |        |
| red02 | True    |        |
| red03 | True    |        |
| red04 | True    |        |
+-------+---------+--------+
All nodes should now have ssh access to each other.
We like to be able to login to each of the nodes in a convenient fashion, without needing
to add the host to knownhosts. To do this we have developed a command that switches off
StrictHostKeyChecking for all hosts. Before being able to issue the command, the user may
have to switch to the windows branch of cloudmesh-inventory by cd to cloudmesh-inventory
and then using git checkout windows and git pull. You invoke the command with
(ENV3) you@yourlaptop $ cms host key access red,red0[1-4]
You will see an output similar to
+-------+---------+--------+--------------------------------------------------+
| host  | success | stdout | stderr                                           |
+-------+---------+--------+--------------------------------------------------+
| red   | True    |        | b"Warning: Permanently added 'red.local'         |
|       |         |        | (...) to the list of known hosts.\r\n"           |
| red01 | True    |        | b"Warning: Permanently added 'red01' (...)       |
|       |         |        | to the list of known hosts.\r\n"                 |
| red02 | True    |        | b"Warning: Permanently added 'red02' (...)       |
|       |         |        | to the list of known hosts.\r\n"                 |
| red03 | True    |        | b"Warning: Permanently added 'red03' (...)       |
|       |         |        | to the list of known hosts.\r\n"                 |
| red04 | True    |        | b"Warning: Permanently added 'red04' (...)       |
|       |         |        | to the list of known hosts.\r\n"                 |
+-------+---------+--------+--------------------------------------------------+
In order for you to be able to successfully disable StrictHostKeyChecking, you can pass along filename that includes a customization. Here is an example on how to disable StrictHostKeyChecking on the subnet 10.1.1.1 We assume you have the following in the file subnet.conf:
Host 10.1.1.*
    StrictHostKeyChecking no
Now you can invoke the command with:
(ENV3) you@yourlaptop $ cms host key access red,red0[1-4] subnet.conf
7.4 Installing cms on a Pi
Cloudmesh provides some very useful commands. Hence it can be of advantage to install it on the PIs. This is very simple with a onle line curl command
| |
This will not only install cms, but will also upgrade your system,
install the dependencies for cms, and create a virtual
environment. Because a system upgrade takes place, this command may
take several minutes to run.
After a reboot, we can verify the success of the script with the following:
| |
Documented commands (type help <topic>):
========================================
EOF     check     default  help       pause     quit   start      test
admin   clear     diagram  host       pi        set    stop       var
banner  commands  dryrun   info       provider  shell  stopwatch  version
bridge  config    echo     inventory  py        sleep  sys
burn    debug     gui      man        q         ssh    term
8. Appendix
8.1 Writing our cluster configuration
This feature is implicitly included in the burn command, and you will have an inventory created automatically.
Cloudmesh has a simple system for managing cluster configurations as
an inventory. We do this management for you, but you can control it
also from the command line. We can first add a manager with cluster
subnet IP 10.1.1.1. We also add the bridge service, which is
recognized by cms as the WIFI bridge service connecting devices on
eth0 to the internet. We also set the timezone and locale here. You
may want to change them as you wish.
8.2 Default Cluster Creation
As we want to make the cluster very easy to create, we demonstrated in Section 5 how to create a default cluster directly from the burn command. As a future feature, this behavior will also be implemented into the inventory command. To make a default inventory named inventory-red.yaml:
you@yourlaptop $ cms inventory add cluster "red,red[01-04]"
This command will find your current WiFi SSID, and your current locale and set up a simple network as depicted in Figure 1 on your cluster. In case you have more or fewer nodes, the command will make appropriate updates.
8.3 Custom Cluster Creation
For a custom cluster, you can inspect the parameters of the inventory command. Here are the commands to use for the previous setup while writing them out. You can modify the parameters to your liking:
you@yourlaptop $ cms inventory add red --service=manager --ip=10.1.1.1 --tag="latest-lite" --timezone="America/Indiana/Indianapolis" --locale="us" --inventory="inventory-red.yaml"
you@yourlaptop $ cms inventory set red services to "bridge,wifi" --listvalue --inventory="inventory-red.yaml"
We can then add the workers
you@yourlaptop $ cms inventory add "red0[1-4]" --service=worker --ip="10.1.1.[2-5]" --router=10.1.1.1 --tag="latest-lite"  --timezone="America/Indiana/Indianapolis" --locale="us" --inventory="inventory-red.yaml"
you@yourlaptop $ cms inventory set "red0[1-4]" dns to "8.8.8.8,8.8.4.4" --listvalue --inventory="inventory-red.yaml"
Note we are using Google’s DNS here [8.8.8.8, 8.8.4.4]
8.4 Inspect the Cluster Configuration
Our cluster configuration is now complete. You may run the following to list your configuration. We include ours for a sanity check:
you@yourlaptop $ cms inventory list --inventory="inventory-red.yaml"
+-------+-------------+---------+---------+--------------------+----------+------------------------+----------+--------+------------------------------+--------+---------+-------------+-------------------+
| host  | tag         | cluster | service | services           | ip       | dns                    | router   | locale | timezone                     | owners | comment | description | keyfile           |
+-------+-------------+---------+---------+--------------------+----------+------------------------+----------+--------+------------------------------+--------+---------+-------------+-------------------+
| red   | latest-lite |         | manager | ['bridge', 'wifi'] | 10.1.1.1 |                        |          | us     | America/Indiana/Indianapolis |        |         |             | ~/.ssh/id_rsa.pub |
| red01 | latest-lite |         | worker  |                    | 10.1.1.2 | ['8.8.8.8', '8.8.4.4'] | 10.1.1.1 | us     | America/Indiana/Indianapolis |        |         |             | ~/.ssh/id_rsa.pub |
| red02 | latest-lite |         | worker  |                    | 10.1.1.3 | ['8.8.8.8', '8.8.4.4'] | 10.1.1.1 | us     | America/Indiana/Indianapolis |        |         |             | ~/.ssh/id_rsa.pub |
| red03 | latest-lite |         | worker  |                    | 10.1.1.4 | ['8.8.8.8', '8.8.4.4'] | 10.1.1.1 | us     | America/Indiana/Indianapolis |        |         |             | ~/.ssh/id_rsa.pub |
| red04 | latest-lite |         | worker  |                    | 10.1.1.5 | ['8.8.8.8', '8.8.4.4'] | 10.1.1.1 | us     | America/Indiana/Indianapolis |        |         |             | ~/.ssh/id_rsa.pub |
+-------+-------------+---------+---------+--------------------+----------+------------------------+----------+--------+------------------------------+--------+---------+-------------+-------------------+
8.5 Burning a Custom Cluster
You can now specify your inventory as you burn your cluster or specific machines from the cluster with the burn command. All hosts data found in the inventory will be written to the machines, regardless if they are in the burn command or not.
Burn the whole cluster.
(ENV3) (admin) you@yourlaptop $ cms burn raspberry "red,red0[1-4]" --device=/dev/sdX
--inventory="inventory-red.yaml"
Burn a specific machine.
(ENV3) (admin) you@yourlaptop $ cms burn raspberry "red03" --device=/dev/sdX --inventory="inventory-red.yaml"
8.6 Managing known_hosts
In case you reburn a SDCard and use it in your cluster, you will get a warning once you try to ssh into the machine. To remove the error simply execute the command
you@yourlaptop $ ssh-keygen -R HOSTNAME
where hostname is either the hostname or the ip address of your machine. that is registered in known hosts. To see the list, please use
you@yourlaptop $ cat ~/.ssh/known_hosts
8.7 Get the OS Image
Note that the lite tag is the same as lite-32 and full the same
as full-32. We added them for increased consistency and visibility.
We may drop in the future the lite and full tag so users are
forced to be aware of the 32 and 64 bit versions with
you@yourlaptop  $ cms burn image versions --refresh

+---------------------------+------------+-------------+-------------+-----------------------------------------+
| Tag                       | Date       | OS          | Type        | Version                                 |
|---------------------------+------------+-------------+-------------+-----------------------------------------|
| lite-2020-05-28           | 2020-05-28 | raspberryos | lite        | raspios_lite_armhf-2020-05-28           |
| lite-2020-08-24           | 2020-08-24 | raspberryos | lite        | raspios_lite_armhf-2020-08-24           |
| lite-2020-12-04           | 2020-12-04 | raspberryos | lite        | raspios_lite_armhf-2020-12-04           |
| lite-2021-01-12           | 2021-01-12 | raspberryos | lite        | raspios_lite_armhf-2021-01-12           |
| lite-2021-03-25           | 2021-03-25 | raspberryos | lite        | raspios_lite_armhf-2021-03-25           |
| lite-2021-05-28           | 2021-05-28 | raspberryos | lite        | raspios_lite_armhf-2021-05-28           |
| lite-2021-11-08           | 2021-11-08 | raspberryos | lite        | raspios_lite_armhf-2021-11-08           |
| lite-2022-01-28           | 2022-01-28 | raspberryos | lite        | raspios_lite_armhf-2022-01-28           |
| lite-2022-04-07           | 2022-04-07 | raspberryos | lite        | raspios_lite_armhf-2022-04-07           |
| latest-lite               | 2022-04-07 | raspberryos | lite        | raspios_lite_armhf-2022-04-07           |
| full-2020-05-28           | 2020-05-28 | raspberryos | full        | raspios_full_armhf-2020-05-28           |
| full-2020-08-24           | 2020-08-24 | raspberryos | full        | raspios_full_armhf-2020-08-24           |
| full-2020-12-04           | 2020-12-04 | raspberryos | full        | raspios_full_armhf-2020-12-04           |
| full-2021-01-12           | 2021-01-12 | raspberryos | full        | raspios_full_armhf-2021-01-12           |
| full-2021-03-25           | 2021-03-25 | raspberryos | full        | raspios_full_armhf-2021-03-25           |
| full-2021-05-28           | 2021-05-28 | raspberryos | full        | raspios_full_armhf-2021-05-28           |
| full-2021-11-08           | 2021-11-08 | raspberryos | full        | raspios_full_armhf-2021-11-08           |
| full-2022-01-28           | 2022-01-28 | raspberryos | full        | raspios_full_armhf-2022-01-28           |
| full-2022-04-07           | 2022-04-07 | raspberryos | full        | raspios_full_armhf-2022-04-07           |
| latest-full               | 2022-04-07 | raspberryos | full        | raspios_full_armhf-2022-04-07           |
| lite-2020-05-28           | 2020-05-28 | raspberryos | lite-32     | raspios_lite_armhf-2020-05-28           |
| lite-2020-08-24           | 2020-08-24 | raspberryos | lite-32     | raspios_lite_armhf-2020-08-24           |
| lite-2020-12-04           | 2020-12-04 | raspberryos | lite-32     | raspios_lite_armhf-2020-12-04           |
| lite-2021-01-12           | 2021-01-12 | raspberryos | lite-32     | raspios_lite_armhf-2021-01-12           |
| lite-2021-03-25           | 2021-03-25 | raspberryos | lite-32     | raspios_lite_armhf-2021-03-25           |
| lite-2021-05-28           | 2021-05-28 | raspberryos | lite-32     | raspios_lite_armhf-2021-05-28           |
| lite-2021-11-08           | 2021-11-08 | raspberryos | lite-32     | raspios_lite_armhf-2021-11-08           |
| lite-2022-01-28           | 2022-01-28 | raspberryos | lite-32     | raspios_lite_armhf-2022-01-28           |
| lite-2022-04-07           | 2022-04-07 | raspberryos | lite-32     | raspios_lite_armhf-2022-04-07           |
| latest-lite-32            | 2022-04-07 | raspberryos | lite-32     | raspios_lite_armhf-2022-04-07           |
| full-2020-05-28           | 2020-05-28 | raspberryos | full-32     | raspios_full_armhf-2020-05-28           |
| full-2020-08-24           | 2020-08-24 | raspberryos | full-32     | raspios_full_armhf-2020-08-24           |
| full-2020-12-04           | 2020-12-04 | raspberryos | full-32     | raspios_full_armhf-2020-12-04           |
| full-2021-01-12           | 2021-01-12 | raspberryos | full-32     | raspios_full_armhf-2021-01-12           |
| full-2021-03-25           | 2021-03-25 | raspberryos | full-32     | raspios_full_armhf-2021-03-25           |
| full-2021-05-28           | 2021-05-28 | raspberryos | full-32     | raspios_full_armhf-2021-05-28           |
| full-2021-11-08           | 2021-11-08 | raspberryos | full-32     | raspios_full_armhf-2021-11-08           |
| full-2022-01-28           | 2022-01-28 | raspberryos | full-32     | raspios_full_armhf-2022-01-28           |
| full-2022-04-07           | 2022-04-07 | raspberryos | full-32     | raspios_full_armhf-2022-04-07           |
| latest-full-32            | 2022-04-07 | raspberryos | full-32     | raspios_full_armhf-2022-04-07           |
| lite_arm64-2020-08-24     | 2020-08-24 | raspberryos | lite-64     | raspios_lite_arm64-2020-08-24           |
| lite_arm64-2021-04-09     | 2021-04-09 | raspberryos | lite-64     | raspios_lite_arm64-2021-04-09           |
| lite_arm64-2021-05-28     | 2021-05-28 | raspberryos | lite-64     | raspios_lite_arm64-2021-05-28           |
| lite_arm64-2021-11-08     | 2021-11-08 | raspberryos | lite-64     | raspios_lite_arm64-2021-11-08           |
| lite_arm64-2022-01-28     | 2022-01-28 | raspberryos | lite-64     | raspios_lite_arm64-2022-01-28           |
| lite_arm64-2022-04-07     | 2022-04-07 | raspberryos | lite-64     | raspios_lite_arm64-2022-04-07           |
| latest-lite-64            | 2022-04-07 | raspberryos | lite-64     | raspios_lite_arm64-2022-04-07           |
| arm64-2020-05-28          | 2020-05-28 | raspberryos | full-64     | raspios_arm64-2020-05-28                |
| arm64-2020-08-24          | 2020-08-24 | raspberryos | full-64     | raspios_arm64-2020-08-24                |
| arm64-2021-04-09          | 2021-04-09 | raspberryos | full-64     | raspios_arm64-2021-04-09                |
| arm64-2021-05-28          | 2021-05-28 | raspberryos | full-64     | raspios_arm64-2021-05-28                |
| arm64-2021-11-08          | 2021-11-08 | raspberryos | full-64     | raspios_arm64-2021-11-08                |
| arm64-2022-01-28          | 2022-01-28 | raspberryos | full-64     | raspios_arm64-2022-01-28                |
| arm64-2022-04-07          | 2022-04-07 | raspberryos | full-64     | raspios_arm64-2022-04-07                |
| latest-full-64            | 2022-04-07 | raspberryos | full-64     | raspios_arm64-2022-04-07                |
| oldstable_lite-2021-12-02 | 2021-12-02 | raspberryos | lite-legacy | raspios_oldstable_lite_armhf-2021-12-02 |
| oldstable_lite-2022-01-28 | 2022-01-28 | raspberryos | lite-legacy | raspios_oldstable_lite_armhf-2022-01-28 |
| oldstable_lite-2022-04-07 | 2022-04-07 | raspberryos | lite-legacy | raspios_oldstable_lite_armhf-2022-04-07 |
| latest-lite-legacy        | 2022-04-07 | raspberryos | lite-legacy | raspios_oldstable_lite_armhf-2022-04-07 |
| oldstable-2021-12-02      | 2021-12-02 | raspberryos | full-legacy | raspios_oldstable_armhf-2021-12-02      |
| oldstable-2022-01-28      | 2022-01-28 | raspberryos | full-legacy | raspios_oldstable_armhf-2022-01-28      |
| oldstable-2022-04-07      | 2022-04-07 | raspberryos | full-legacy | raspios_oldstable_armhf-2022-04-07      |
| latest-full-legacy        | 2022-04-07 | raspberryos | full-legacy | raspios_oldstable_armhf-2022-04-07      |
| ubuntu-20.04.2-64-bit     | 2021-02-01 | ubuntu      | ubuntu      | 20.04.2&architecture=server-arm64+raspi |
| ubuntu-20.04.2-32-bit     | 2021-02-01 | ubuntu      | ubuntu      | 20.04.2&architecture=server-armhf+raspi |
| ubuntu-20.10-64-bit       | 2021-02-01 | ubuntu      | ubuntu      | 20.10&architecture=server-arm64+raspi   |
| ubuntu-20.10-32-bit       | 2021-02-01 | ubuntu      | ubuntu      | 20.10&architecture=server-armhf+raspi   |
| ubuntu-desktop            | 2021-02-01 | ubuntu      | ubuntu      | 20.10&architecture=desktop-arm64+raspi  |
+---------------------------+------------+-------------+-------------+-----------------------------------------+
you@yourlaptop $ cms burn image get latest-lite
you@yourlaptop $ cms burn image get latest-fll
The images are stored in the .cloudmesh/cmburn/images directory
and can be removed with the command
you@yourlaptop $ rm -i ~/.cloudmesh/cmburn/images/*
8.7 Related tutorials
- TODO find the links, point to the medium.com once first.
We also provide a list of related tutorials for other operating systems. This includes
Cluster with RaspberryOS on it:
- Easy Raspberry PI Cluster Setup with Cloudmesh from MacOS
- [Burning A Cluster with RaspberryOS on it from a Raspberry Pi]
- TODO: Burning A Cluster with RaspberryOS on it from macOS
- TODO: Burning A Cluster with RaspberryOS on it from Ubuntu
- TODO: Burning A Cluster with RaspberryOS on it from Windows 10
Cluster with Ubuntu on it:
- TODO: Burning A cluster with Ubuntu on it from macOS
- TODO: Burning A cluster with Ubuntu on it from Ubuntu
- Please note that burning the cluster from Windows 10 with Ubuntu on the nodes has not yet been completed. If you like to help, contact us.
We have the following tutorials also on other web pages. Here is a list
Hackaday:
- Preconfigured SDCards for Raspberry Pi Clusters
- https://hackaday.io/project/177904-headless-rasbery-pi-cluster-from-macs
Piplanet:
Many tutorials are available at
Acknowledgement
We would like to thank Venkata (DK) Kolli github.com/dkkolli for his contributions to this project. The timezone preference was contributed by him. Note that the timezone preference is not working when burning is conducted from a PI. We are looking for contributors that fix this issue.