Create and Deploy a Container and OpenAPI Service with Docker and K3s
In this tutorial we will use a cms-burn created cluster to install Docker, create a Docker container for the cloudmesh-openapi service, deploy the container on Docker, install K3s, deploy the container on K3s, and enable access to the container from an external host. Finally, automatically deploy an OpenApi service onto a K3s cluster given only its python and yaml files.
This is currently (4/29/21) tested on a Raspberry pi using Ubuntu OS.
Learning Objectives
- Learn how to install Docker, create a docker container, deploy a docker container, install k3s, deploy a container on K3s, make K3s containers externally accessible.
Topics covered
1. Introduction
Many tutorials walk you through individual components of our learning objectives. This tutorial will walk you through step-by-step to create a service and deploy it on a cms-brun created cluster.
2. Prerequisites
This tutorial assumes a cluster burned using one of the following methods:
Burn a Raspberry OS Cluster (not currently tested)
Burn an Ubuntu Cluster (currently tested)
3. Install Docker
Access your cluster manager (red) and get the cloudmesh Docker installer.
laptop$ ssh red
red$ cd cm
red$ cloudmesh-installer get docker-command
red$ cd ..
Now we install Docker.
red$ cms docker deploy --host=localhost
Let us add our user to the Docker group so we can execute Docker comands without sudo.
red$ sudo usermod -aG docker ubuntu
Let us verify the install by checking the version.
red$ docker version
4. Create a Dockerfile
We will create a file named Dockerfile in a directory
cloudmesh-openapi-container. Substitute your prefered editor if you do not
like emacs.
red$ mkdir cloudmesh-openapi-container
red$ cd cloudmesh-openapi-container
red$ emacs Dockerfile
In Dockerfile add the following lines. This provides Docker the commands
needed to install cloudmesh-openapi
and the needed packages for our PipleLineAnovaSVM example into a Ubuntu
container.
# syntax=docker/dockerfile:1
FROM ubuntu:20.04
RUN mkdir cm
RUN apt update
RUN apt install python3-venv python3-wheel python3-dev python3-pip build-essential -y
RUN ln -s /usr/bin/pip3 /usr/bin/pip
RUN pip install pip -U
RUN pip install cloudmesh-installer
RUN apt install git -y
RUN cd cm; cloudmesh-installer get openapi
RUN pip install sklearn pandas
ARG DEBIAN_FRONTEND=noninteractive
ENV TZ=America/Indiana/Indianapolis
RUN apt install tzdata -y
RUN apt install emacs -y
CMD /bin/bash
5. Build a Docker Image
Now we build an image based on the instructions provided in Dockerfile. We
name the image cloudmesh-openapi. The . instructs Docker to use the
Dockerfile in the present working directory.
red$ docker build -t cloudmesh-openapi .
6. Start a Docker Container
Now we start a Docker containe using our cloudmesh-openapi image. The
-it provide an interactive terminal, the -p maps the container port 8080
to the host port 8080, and /bin/bash is the command to run in the container.
red$ docker run -it -p 8080:8080 cloudmesh-openapi /bin/bash
7. Generate and Start the Cloudmesh-Openapi PipelineAnovaSVM Service
Generate the service yaml.
container$ cms openapi generate PipelineAnovaSVM \
    --filename=./tests/Scikitlearn-experimental/sklearn_svm.py \
    --import_class \
    --enable_upload
Start the service (defaults to port 8080). Leave this running and go to a new terminal.
container$ cms openapi server start ./tests/Scikitlearn-experimental/sklearn_svm.yaml --host=0.0.0.0
8. Interact with the Running Service
In another terminal on your laptop you can now access the service from
red.local:8080 because we mapped the container port 8080 to the host port 8080.
In a web browser go to http://red.local:8080/cloudmesh/ui to access the
web UI of the service.
Alternatively, you can access the service directly from the command line of your laptop.
laptop$ curl -L -o iris.data "https://raw.githubusercontent.com/cloudmesh/cloudmesh-openapi/main/tests/Scikitlearn-experimental/iris.data"
laptop$ export CMSIP=red.local:8080
laptop$ curl -X POST "http://$CMSIP/cloudmesh/upload" -H "accept: text/plain" -H "Content-Type: multipart/form-data" -F "upload=@iris.data"
laptop$ curl -X GET "http://$CMSIP/cloudmesh/PipelineAnovaSVM/train?filename=iris.data" -H "accept: text/plain"
laptop$ curl -X GET "http://$CMSIP/cloudmesh/PipelineAnovaSVM/make_prediction?model_name=iris¶ms=5.1%2C%203.5%2C%201.4%2C%200.2" -H "accept: */*"
You can now ctrl-C and exit the running container to stop the service.
9. Save a Docker Image
We need to save the Docker image so we can provide it to our K3s cluster. alternatively you can upload it to a Docker registry like DockerHub.
We save our image in a tarfile named cloudmesh-openapi.tar.
red$ docker save --output cloudmesh-openapi.tar cloudmesh-openapi:latest
We will reference this file later to import it to our K3s cluster.
10. Install K3s on our Pi Cluster
Enable containers in the kernel, and wait for the cluster to reboot.
laptop$ cms pi k3 enable containers red,red[01-03]
Now install K3s
laptop$ cms pi k3 install cluster red,red0[1-3]
Verify all nodes show up.
laptop$ cms pi k3 cluster info
11. Import the cloudmesh-openapi Image into All K3s Nodes
As we are not using an image repository, we need to copy our
cloudmesh-openapi.tar file to all k3s nodes and import them image into
K3s.
red$ cms pi k3 import image red,red0[1-3] cloudmesh-openapi.tar /home/ubuntu

pi k3 import image red,red0[1-3] cloudmesh-openapi.tar /home/ubuntu
INFO: Copying image to ['red', 'red01', 'red02', 'red03'] using source: cloudmesh-openapi.tar and destination: /home/ubuntu
INFO: This may take a few minutes depending on the file size and number of destinations
+---------+---------+--------+
| host    | success | stdout |
+---------+---------+--------+
| red     | True    |        |
| red01   | True    |        |
| red02   | True    |        |
| red03   | True    |        |
+---------+---------+--------+
INFO: Import image on ['red', 'red01', 'red02', 'red03'] using filepath:/home/ubuntu/cloudmesh-openapi.tar
+---------+---------+--------------------------------------------------+
| host    | success | stdout                                           |
+---------+---------+--------------------------------------------------+
| red     | True    | unpacking docker.io/library/cloudmesh-           |
|         |         | openapi:latest (sha256:829d62dafbb8c3335804517d6 |
|         |         | 00313e64be1983b93286328f6c0f66f7c4781ad)...done  |
| red01   | True    | unpacking docker.io/library/cloudmesh-           |
|         |         | openapi:latest (sha256:829d62dafbb8c3335804517d6 |
|         |         | 00313e64be1983b93286328f6c0f66f7c4781ad)...done  |
| red02   | True    | unpacking docker.io/library/cloudmesh-           |
|         |         | openapi:latest (sha256:829d62dafbb8c3335804517d6 |
|         |         | 00313e64be1983b93286328f6c0f66f7c4781ad)...done  |
| red03   | True    | unpacking docker.io/library/cloudmesh-           |
|         |         | openapi:latest (sha256:829d62dafbb8c3335804517d6 |
|         |         | 00313e64be1983b93286328f6c0f66f7c4781ad)...done  |
+---------+---------+--------------------------------------------------+
Validate the container is present.
red$ sudo k3s ctr images list
12. Create a Kubernetes Pod Manifest YAML
To create Pod in Kubernetes, you need to define a YAML file. We create one
named cloudmesh-openapi-pod.yaml. The pod is the smallest deployable unit
of computing in K8s, and is a group of one or more containers. In our case one.
Create cloudmesh-openapi-pod.yaml and paste the following lines in the
document.
apiVersion: v1
kind: Pod
metadata:
  name: cloudmesh-openapi-pod
  labels:
    app: cloudmesh-openapi-pod
spec:
  containers:
  - name: cloudmesh-openapi
    image: cloudmesh-openapi:latest
    imagePullPolicy: Never
    command:
      - "sleep"
      - "604800"
This will define a pod named cloudmesh-openapi-pod, containing
one container named cloudmesh-openapi based on our
cloudmesh-openapi:latest image, running the command sleep 604800. This
will essentially keep our container running for 7 days and then it will
close and restart based on the default restart policy: ALWAYS. The . metadata.label.app is important as it allows us to select our pod in our
in our following load-balancer service. The .spec.imagePullPolicy: Never
is also important as it prevents K8s from trying to download our image from
any repository and instead use the local copy.
13. Deploy a Pod
Deploy your pod by applying the cloudmesh-openapi-pod.yaml configuration.
red$ sudo kubectl apply -f ./cloudmesh-openapi-pod.yaml
Check that the pod is running.
red$ sudo kubectl get pods
14. Start a Shell in the Pod
We need to start a shell in our Pod so we can generate and run the cloudmesh-openapi service.
red$ sudo kubectl exec --stdin --tty cloudmesh-openapi-pod -- /bin/bash
We can now run our serice generate and start command.
container$ cms openapi generate PipelineAnovaSVM \
    --filename=./tests/Scikitlearn-experimental/sklearn_svm.py \
    --import_class \
    --enable_upload
container$ cms openapi server start ./tests/Scikitlearn-experimental/sklearn_svm.yaml --host=0.0.0.0
You can now exit and the container and the service will continue running.
15. Create a Kubernetes Service Manifest to Start a K3s Load-Balancer
Kubernetes services expose your cluster Pods to external networks. K3s comes with a build int load balancer that watches for Kubernetes LoadBalancer services, and then deploys the necessary network infrastructure to make your service accessible.
Create a file names cloudmesh-openapi-lb-service.yaml and paste the
following lines.
apiVersion: v1
kind: Service
metadata:
  name: cloudmesh-openapi-lb-service
spec:
  selector:
    app: cloudmesh-openapi-pod
  ports:
    - protocol: TCP
      port: 8080
      targetPort: 8080
      nodePort: 30000
  type: LoadBalancer
It is important that the .spec.selector.app matches that defined in your
pod yaml. The port is the port accessible on cluster internal nodes, the
targetPort is the port in the container to which traffic will be forwarded,
and the nodePort is the port on cluster external networks can access the
service. This must match a predefined range.
16. Deploy the LoadBalancer Service
Deploy the loadbalancer.
red$ sudo kubectl apply -f ./cloudmesh-openapi-lb.service.yaml
Check to ensure it deployed.
red$ sudo kubectl get services -o wide
Check to see the load balancer pods are deployed on all agent nodes.
red$ sudo kubectl get pods
17. Interact with the cloudmesh-openapi Pod
Because the loadbalancer is running on all nodes and forwarding traffic to
the existing pod, we can now reach our service from our laptop at red.local:30000. For some
reason red.local:8080 works as well, I can’t explain that yet.
On your laptop web browser browse to http://red.local:30000/cloudmesh/ui
Alternatively, interact with the service from the command line.
laptop$ curl -L -o iris.data "https://raw.githubusercontent.com/cloudmesh/cloudmesh-openapi/main/tests/Scikitlearn-experimental/iris.data"
laptop$ export CMSIP=red.local:30000
laptop$ curl -X POST "http://$CMSIP/cloudmesh/upload" -H "accept: text/plain" -H "Content-Type: multipart/form-data" -F "upload=@iris.data"
laptop$ curl -X GET "http://$CMSIP/cloudmesh/PipelineAnovaSVM/train?filename=iris.data" -H "accept: text/plain"
laptop$ curl -X GET "http://$CMSIP/cloudmesh/PipelineAnovaSVM/make_prediction?model_name=iris¶ms=5.1%2C%203.5%2C%201.4%2C%200.2" -H "accept: */*"
18. Automatically deploy an OpenApi Service
We have provided a command that can automatically deploy an OpenAPI service given the YAML file, python file, the server, and the ports you want it deployed on. We expect the user to have previously used cloudmesh-openapi to generate these files as needed.
cms pi k3 api deploy SERVER PORTS YAML PYTHON
Below is an example command invocation where whe deploy the Scikilearn Pipeline Anova SVM example as a service using the yaml file sklearn_svm.yaml and the python file sklearn_svm_upload-enabled.py
laptop$ cms pi k3 api deploy red 80[80-85] sklearn_svm.yaml sklearn_svm_upload-enabled.py

pi k3 api deploy red 80[80-85] sklearn_svm.yaml sklearn_svm_upload-enabled.py
INFO: Deploying cloudmesh openapi service based on yaml:sklearn_svm.yaml
python file: sklearn_svm_upload-enabled.py to ports: ['8080', '8081', '8082','8083', '8084', '8085'] on server red
INFO: Deploying service for port: 8080
INFO: Deploying service for port: 8081
INFO: Deploying service for port: 8082
INFO: Deploying service for port: 8083
INFO: Deploying service for port: 8084
INFO: Deploying service for port: 8085
INFO: Services are available at:
NAME                                                 TYPE           CLUSTER-IP      EXTERNAL-IP    PORT(S)          AGE
kubernetes                                           ClusterIP      10.43.0.1       <none>         443/TCP          39h
cloudmesh-openapi-sklearn-svm-port-8080-lb-service   LoadBalancer   10.43.157.137   192.168.1.16   8080:30988/TCP   89s
cloudmesh-openapi-sklearn-svm-port-8081-lb-service   LoadBalancer   10.43.105.151   192.168.1.16   8081:31733/TCP   69s
cloudmesh-openapi-sklearn-svm-port-8082-lb-service   LoadBalancer   10.43.66.0      192.168.1.16   8082:30442/TCP   55s
cloudmesh-openapi-sklearn-svm-port-8083-lb-service   LoadBalancer   10.43.212.54    192.168.1.16   8083:31632/TCP   33s
cloudmesh-openapi-sklearn-svm-port-8084-lb-service   LoadBalancer   10.43.52.81     192.168.1.16   8084:30334/TCP   22s
cloudmesh-openapi-sklearn-svm-port-8085-lb-service   LoadBalancer   10.43.238.192   192.168.1.16   8085:31442/TCP   8s
You can now access and interact with the service in the same manner as we conducted in section 17.
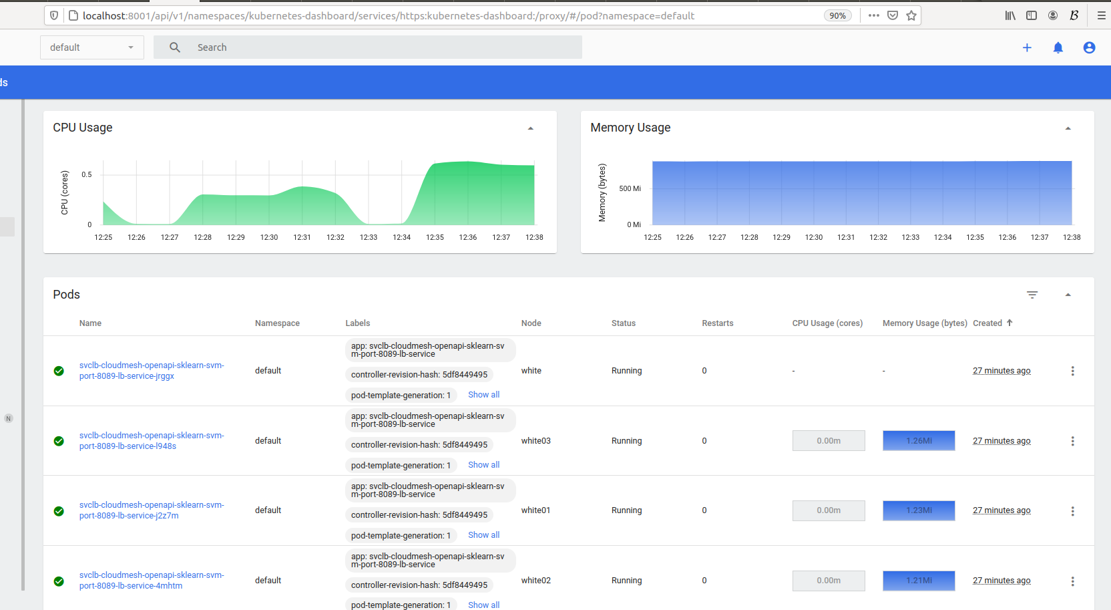
19. Creating a Kubernetes Dashboard to Monitor the Services.
Next we will install a Kubernetes Dashboard so we can monitor the resource consumption of our services.
If using Raspberry OS on the pis, run:
you@your-laptop:~$ cms pi k3 dashboard create red
If using Ubuntu Server on the pis, run:
you@your-laptop:~$ cms pi k3 dashboard create red --ubuntu
Both commands will automatically start the dashboard. However, on Ubuntu Server, cms pi k3 dashboard start red needs to be run when the pi is rebooted.
20. Accessing the Dashboard
We can easily access the Web UI Dashboard for easy management of our cluster.
First, let us connect to the new dashboard created above.
you@your-laptop:~$ cms pi k3 dashboard connect red
We should get a green “Connection created” message. We can now check on the status of our dashboard and obtain our token to log in.
you@your-laptop:~$ cms pi k3 dashboard info
pi k3 dashboard info
INFO: Finding running dashboards...
+---------------------+-------------+------------+------------------+-------+
| Server Access Point | Remote Port | Local Port | Dashboard Status | PID   |
+---------------------+-------------+------------+------------------+-------+
| red                 | 8001        | 8001       | Active           | 99240 |
+---------------------+-------------+------------+------------------+-------+
INFO: Dashboard Link:
http://localhost:8001/api/v1/namespaces/kubernetes-dashboard/services/https:kubernetes-dashboard:/proxy/
INFO: Fetching authentication token...
# A long token will go here
Note. If
Dasboard Statussays “Up but not ready”, the k3s dashboard is still likely in the process of coming online. Wait a few moments and try the info command again.
Take note of the authentication token given. To open the dashboard, you may click on the link provided by the info command or use the following command to automaticallly open in browser.
you@your-laptop:~$ cms pi k3 dashboard
pi k3 dashboard
Opening dashboard...
You can monitor your pods resources consumption on the Pods tab.
When ready, you can then disconnect from your dashboard with the following:
you@your-laptop:~$ cms pi k3 dashboard disconnect
21. Restarting an OpenAPI service after Reboot.
While hte containers will persist after a reboot, the services do not currently automatically restart.
To restart the service suse the command
cms pi k3 api start SERVER PORTS YAML PYTHON
The YAML and PYTHON require the base filename only, they are not re-copied.
Here is an example invocation.
laptopl$ cms pi k3 api start red 80[80-89] sklearn_svm.yaml sklearn_svm_upload-enabled.py
pi k3 api start red 80[80-89] sklearn_svm.yaml sklearn_svm_upload-enabled.py
INFO: Starting services in on ports ['8080', '8081', '8082', '8083', '8084', '8085']
INFO: Service on 8080 successfully started
INFO: Service on 8081 successfully started
INFO: Service on 8082 successfully started
INFO: Service on 8083 successfully started
INFO: Service on 8084 successfully started
INFO: Service on 8085 successfully started
22. Commands Useful for Debugging
Useful kubectl commands to debug a broken pod/service
sudo kubectl describe pod cloudmesh-openapi-pod
sudo kubectl logs --previous cloudmesh-openapi-pod cloudmesh-openapi
sudo kubectl logs cloudmesh-openapi-pod cloudmesh-openapi
sudo kubectl delete pod cloudmesh-openapi-pod
sudo kubectl delete service clodmesh-openapi-lb-service
sudo kubectl get pods --show-labels
sudo kubectl edit pod cloudmesh-openapi-pod
If you have trouble accessing the pod shell, like below. Try stopping and restarting the K3s services.
(ENV3) ubuntu@red:~/cloudmesh-openapi-container$ sudo kubectl exec --stdin --tty cloudmesh-openapi-pod -- /bin/bash
error: unable to upgrade connection: Authorization error (user=kube-apiserver, verb=create, resource=nodes, subresource=proxy)
Stop and restart the K3s services.
red$ cms pi k3 stop agent red,red0[1-3]
red$ cms pi k3 stop server red
red$ cms pi k3 start server red
ree$ cms pi k3 start agent red,red0[1-3]
23. Uninstall K3s
laptop$ cms pi k3 uninstall cluster red,red0[1-3]
24. Uninstall Docker
red$ sudo apt-get purge docker-ce docker-ce-cli containerd.io
red$ sudo rm -rf /var/lib/docker
red$ sudo rm -rf /var/lib/containerd