This is the blog section. It has two categories: News and Releases.
Files in these directories will be listed in reverse chronological order.
This the multi-page printable view of this section. Click here to print.
This is the blog section. It has two categories: News and Releases.
Files in these directories will be listed in reverse chronological order.

In this tutorial, we explain how to easily set up a preconfigured cluster of Pis using Raspberry PI OS while burning SD Cards from either a Windows 10 desktop/Laptop or a PI 4 using Raspberry PI OS 64 bit. The cluster is ready to boot after all cards have been burned. No other configuration is needed. You can choose to use 64-bit or 32-bit on the nodes for the cluster.
Learning Objectives
Topics covered
Info
Disclaimer
As this tool formats disks, we hold no responsibility for this tool to properly function or if you lose any data by using it. A best practice is to create a backup of your system before trying this. In cas you do not want to run it on your computer, you can always run it on a Raspberry PI. If something goes wrong, you just have to reburn the PI. We recommend a PI4 as this has a faster USB port and allows faster burn time than previous generations of PI’s.
With the release of Pi Imager
1.6,
it is possible to configure a Raspberry Pi from any operating system
while using RaspberryOS. While pi-imager only uses a limited number of
parameters, our system adds network configurations to create a
cluster. In addition to a static network configuration, it is also
possible to use the tool to burn a cluster that you add to a mesh
network. The system works while executing configurations automatically
after the first boot. Supportd opertaning systems this program include
Raspberry OS, Ubuntu 20.04, macOS, Windows 10, and (Windows 11 under
development). On http://piplanet.org we are providing additional
tutorials that are particularly designed for a specific OS.
Our tutorials are beneficial as, typically, many steps are involved in setting up a cluster. This requires either the replication of time-consuming tasks that can be automated or the knowledge of DevOps frameworks that you may not be familiar with.
We avoid this by simply burning a card for each of the PIs. No more hours wasted on setting up your initial cluster.
We developed a special command called cms burn to facilitate this,
which allows us to create preconfigured cards with the necessary
information. The features this command supports include:
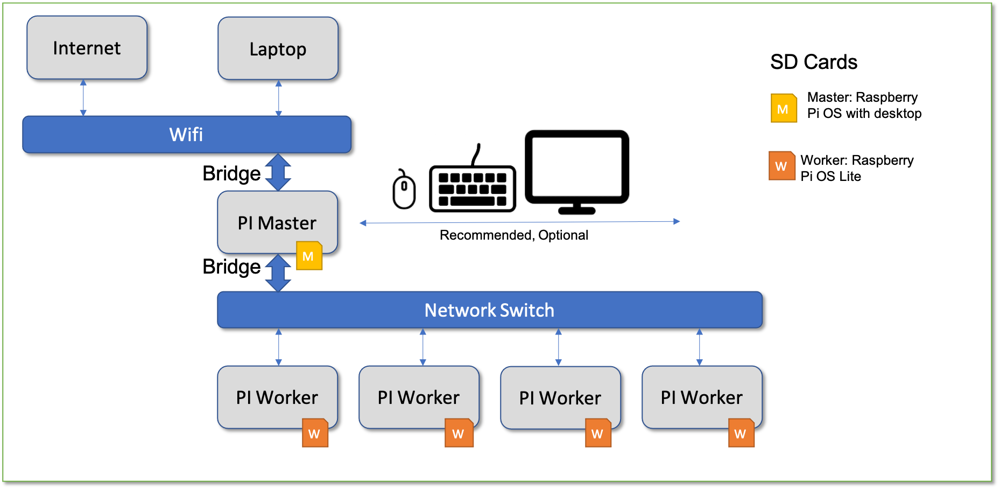
We demonstrate the usage of the cms burn command by creating a
cluster of 5 pis (1 manager, 4 workers) where we connect the manager
to the internet via Wifi and configure the workers to access the
internet through the manager via ethernet connection. This is useful
for those with restricted internet access where devices must be
registered by MAC Address or through browser login as the internet
connection is tunneled through the manager PI
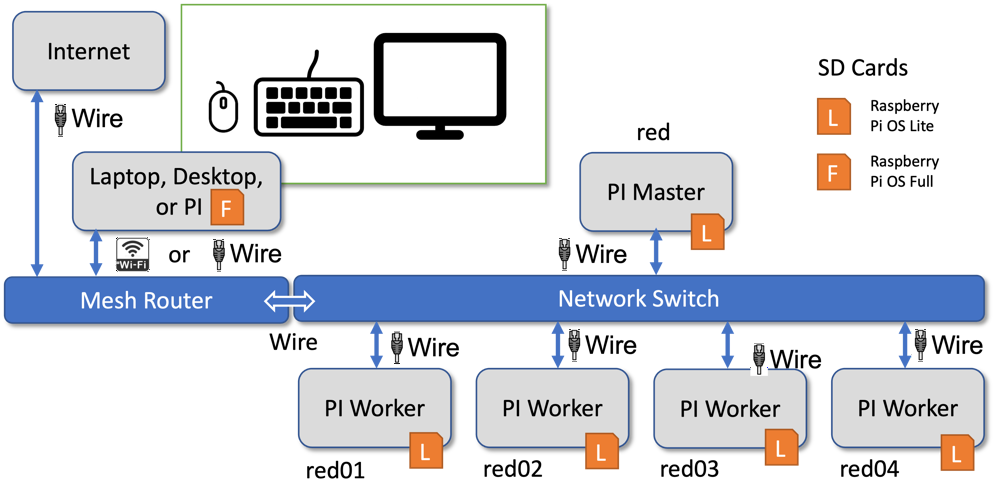
In addition, we alternatively showcase how to set up the cluster in a mesh network
python3 --version > 3.9.2For parts for different pi cluster configurations, please see our links at piplanet.org
In our tutorial, we define the manager hostname to be red, while each
worker has a number in it red01, red02, red03, red04. Our tool
specifically identifies the manager node to be the one without the
number. Naturally, you can use a different name than using
red. This can also come in handy if you want to create
multiple clusters to create a distributed cluster environment for use
or development purposes.
The naming of the location for the device representing the SD Card is
different between Windows and Linux, Rasberry OS, and macOS. While on
Windows, the device is called a disk that has a number; on the other
operating systems, it is specified with a device location such as
/dev/sdX where X is typically a lower case letter.
Therea are multiple ways on how we can configure a cluster. Within this tutorial we provide two different ways dependent on what network router you have. This includes a classical network router or a mesh network router.
We provide for both the following illustrations. YOu will have to determine which network type fits for you as there will be a slight difference during the burn task that we point out later.
The following image shows our cluster configuration for a static network setup:
The alternative is to use a mesh network in which we have the following setup
Cloudmesh burn runs an many different versions of Python. This includes Python either installed with conda or python.org as it can be easily installed with pip which is supported on both. We recommend typically to use the python version installed from python.org if you are unsure which to chose and you are not using conda.
First, we update pip and verify your python and pip are correct.
| |
The pip install is not yet suported!!. So please use
the Install from source installation documentation. Once we officially
release this code the install from pip can be used.
bash~~ ~~(ENV3) you@yourlaptop $ pip install cloudmesh-pi-cluster~~ ~~
If you are a developer that likes to add new features, we recommend our
source setup. We start after you have created the virtualenv with the
install of our convenient cloudmesh-installer and the creation of a
cm directory in which we download the sources
| |
This directory will now contain all source code. It will also have
installed the needed cms command.
We use ssh to easily log in to the manager and worker nodes from the
laptop/desktop. Hence we create a keypair in ~/.ssh. You can create
one as follows by accepting the default location in ~/.ssh/id_rsa
| |
Please use a unique and strong passphrase. We will use this default key to access our cluster after burning.
In case you do not always want to type in your passphrase, you can use ssh-agent in your terminal.
We are now ready to burn our cluster. Start by making sure you have the latest images to burn. Please choose the 64-bit or the 32-bit image tab to see details. For our example, we will be choosing the 64-bit image. First, we need to download it.
This command will create a cached version of the information related to the download URLs and a specifically created version tag that we will use for downloading the image. It is also possible to define different images for manager and workers, while adding them to the images list in a comma-separated parameter using the tags.
To choose a different image, you can inspect the versions and tags as well as the originating URLs with
| |
To just see the latest versions type in
| |
which returns an output similar to
+--------------------+------------+-------------+-------------+-----------------------------------------+
| Tag | Date | OS | Type | Version |
|--------------------+------------+-------------+-------------+-----------------------------------------|
| latest-lite | 2022-04-07 | raspberryos | lite | raspios_lite_armhf-2022-04-07 |
| latest-full | 2022-04-07 | raspberryos | full | raspios_full_armhf-2022-04-07 |
| latest-lite-32 | 2022-04-07 | raspberryos | lite-32 | raspios_lite_armhf-2022-04-07 |
| latest-full-32 | 2022-04-07 | raspberryos | full-32 | raspios_full_armhf-2022-04-07 |
| latest-lite-64 | 2022-04-07 | raspberryos | lite-64 | raspios_lite_arm64-2022-04-07 |
| latest-full-64 | 2022-04-07 | raspberryos | full-64 | raspios_arm64-2022-04-07 |
| latest-lite-legacy | 2022-04-07 | raspberryos | lite-legacy | raspios_oldstable_lite_armhf-2022-04-07 |
| latest-full-legacy | 2022-04-07 | raspberryos | full-legacy | raspios_oldstable_armhf-2022-04-07 |
+--------------------+------------+-------------+-------------+-----------------------------------------+
Next, plug in your first SD Card into your card writer. Check your writer’s path with the following command.
`Note we omitted some output of
cms burn infofor clarity.
Dependent on your system, this command will take a minute to complete.
In case you receive a warning, inspect it carefully. One reason could
be that the warning occurs as your reader may be too new, and we do
not have it in our database of recognized readers. As long as you see
Removable Media and GENERIC STORAGE DEVICE it will be fine.
To burn the latest 64 bit OS, use the following command. If you like
to burn other images identified by tags, you can receive them from the
command cms burn versions --refresh. The --tag can take multiple
comma-separated arguments. The tag can be specified for each SD Card
you want to specify individually. A special form is to use
–tag=latest-full-64,latest-lite-64 in which the full image is burned
on the manager and the lite burned on the workers. As mentioned
before, we will, however, just burn the lite 64-bit image on all.
Timezones can be found at https://en.wikipedia.org/wiki/List_of_tz_database_time_zones. Timezones are typically defined with forward slashes in the string identifying them. However, as we use Python forward slashes have a specific meaning in Python and would interfere with our implementation.
Therefore we use - instead of /.
Hence, when entering timezones for the --timezone parameter, please
replace forward slashes with hyphens, as shown in the example
next:
America/Indiana/Indianapolis
must be replaced with ‘-’ in the --timezone parameter:
--timezone="America-Indiana-Indianapolis
If the network name has a space in it, please use two sets of quotes
(with backslashes on Windows Git Bash):
\"'--ssid='Net Work'\". In general, we recommend not to use any spaces
in network names.
# ----------------------------------------------------------------------
# _____ _ ____ _____
# | __ \ | | / __ \ / ____|
# | |__) |__ _ ___ _ __ | |__ ___ _ __ _ __ _ _| | | | (___
# | _ // _` / __| '_ \| '_ \ / _ \ '__| '__| | | | | | |\___ \
# | | \ \ (_| \__ \ |_) | |_) | __/ | | | | |_| | |__| |____) |
# |_| \_\__,_|___/ .__/|_.__/ \___|_| |_| \__, |\____/|_____/
# | | __/ |
# |_| |___/
# ____
# | _ \
# | |_) |_ _ _ __ _ __
# | _ <| | | | '__| '_ \
# | |_) | |_| | | | | | |
# |____/ \__,_|_| |_| |_|
#
#
# ----------------------------------------------------------------------
INFO: No inventory found or forced rebuild. Building inventory with defaults.
+-------+----------------+---------+---------+--------------------+----------+------------------------+----------+-------------+----------------------------+--------+---------+-------------+-------------------+
| host | tag | cluster | service | services | ip | dns | router | locale | timezone | owners | comment | description | keyfile |
+-------+----------------+---------+---------+--------------------+----------+------------------------+----------+-------------+----------------------------+--------+---------+-------------+-------------------+
| red | latest-lite-64 | | manager | ['bridge', 'wifi'] | 10.1.1.1 | | | en_US.UTF-8 | AmericaIndianaIndianapolis | | | | ~/.ssh/id_rsa.pub |
| red01 | latest-lite-64 | | worker | | 10.1.1.2 | ['8.8.8.8', '8.8.4.4'] | 10.1.1.1 | en_US.UTF-8 | AmericaIndianaIndianapolis | | | | ~/.ssh/id_rsa.pub |
| red02 | latest-lite-64 | | worker | | 10.1.1.3 | ['8.8.8.8', '8.8.4.4'] | 10.1.1.1 | en_US.UTF-8 | AmericaIndianaIndianapolis | | | | ~/.ssh/id_rsa.pub |
| red03 | latest-lite-64 | | worker | | 10.1.1.4 | ['8.8.8.8', '8.8.4.4'] | 10.1.1.1 | en_US.UTF-8 | AmericaIndianaIndianapolis | | | | ~/.ssh/id_rsa.pub |
| red04 | latest-lite-64 | | worker | | 10.1.1.5 | ['8.8.8.8', '8.8.4.4'] | 10.1.1.1 | en_US.UTF-8 | AmericaIndianaIndianapolis | | | | ~/.ssh/id_rsa.pub |
+-------+----------------+---------+---------+--------------------+----------+------------------------+----------+-------------+----------------------------+--------+---------+-------------+-------------------+
Note the
--newflag instructscms burnto build a new inventory and overwrites it if it already exists (the -f flag does the same, but we have not yet tested it). To see the contents of this file, you can use the commandcms inventory list --inventory=inventory-red.yaml
After each card is burned, cms burn raspberry will prompt you to
swap the SD card to burn the next host.
After all the cards have been burned, we can now plug them in our Raspberry PI’s and boot. Ensure that your workers and manager are connected to the same network switch via the ethernet cables. Ensure this network switch does not have internet access in itself, e.g., do not connect the switch to the internet router. We will use the manager as the sole point of internet access here. This we do deliberately to be able to disconnect all nodes from the network via the Master in case this is needed.
After you boot, we recommend waiting 2-3 minutes for the boot process to complete. You will notice that the red LED will be on and that the green LED is off. If this is not the case, please wait. If it does not work after a long while, please reboot the PI that has issues and see if it works after the reboot. Also, make sure you check your hardware and network.
One of the important issues is how the PIs are named in your network.
Some networks require that a .local be added to the hostname.
To find that out you can use on amchines where arp is available the command
| |
In case you use a mesh network, it will print out all Raspberry PI 4s in your
network and indicate if they can be found with the .local
extension to the hostname. In case you use a static network it will return
the manager node and indicate if the nodename needs to be appended with .local
or not.
cms hostBefore we start we make sure that you entered your ssh key. Naturally you need to have your ssh-agent running as discussed before.
| |
The next command depends on if you can use the .local extension or not.local network.
Next, we need to identify if you need to use the manager as a proxy machine to the
worker nodes and if your host names need to be appended with .local which is
the case for a network that uses mDNS such as on a macOS. If you do not know
these values you can try out different combinations of the
flags and use the one that succeds.
Let us assume you are not using a mesh network, then you can set up proxy jump on our laptop/desktop while adding it to the ssh config file. This will make it easier to access our workers. Use the following command to set this up:
| |
This assumes that hosts in your network are appended with .local. If this is not the case you can switch it off by using the following command:
| |
If you are on a mesh network, it is simpler to not use a proxy machine and use the followng
| |
However some mesh networks still require the addition of .local. In which case
you can use
| |
To view the modifications use the command
| |
Optionally you can add the following to the top of your
~/.ssh/config file. As you may have done this before, we do not
automatically do it, and we ask you to add it with your favorite
editor.
Host *
ServerAliveInterval 30
ServerAliveCountMax 5
This will keep the connections alive and avoids that you get disconnected.
First, verify that you can reach the manager (red).
| |
Next we want to execute a more advanced program that retrieves the
temperature of the PIs. We can use a simple cms command to verify the connection to our Pis.
For this purpose, we use our build-in temperature command that reads the
temperature values from each of the Pis.
| |
Which returns output in a table recording the temperatures
+--------+--------+-------+----------------------------+
| host | cpu | gpu | date |
|--------+--------+-------+----------------------------|
| red | 47.712 | 47.2 | 2022-04-27 19:52:56.674668 |
| red01 | 37.485 | 37.4 | 2022-04-27 19:52:57.333300 |
| red02 | 38.946 | 38.9 | 2022-04-27 19:52:57.303389 |
| red03 | 38.946 | 39.4 | 2022-04-27 19:52:57.440690 |
| red04 | 38.936 | 39.4 | 2022-04-27 19:52:57.550690 |
+--------+--------+-------+----------------------------+
By receiving this information from our devices, we have confirmed our access.
If you receive the error ERROR: not enough values to unpack (expected 2, got 0)
then delete the proxy config inside ~/.ssh/config file (either with nano,
Notepad++, or even delete the file with rm ~/.ssh/config if you do not have any
other important preexisting configs done outside the scope of this project).
Then, try the different cms host config commands individually as shown in section
7.1, until temp returns all the nodes' temperatures (instead of 0 which indicates
missing/offline node or that host cannot connect).
To set up keys on each PI so we can login from one PI to another, we
can use our create/gather/scatter/access commands. First, we need to
create a key on the workers and manager. Then we gather all keys and
scatter them on all PIs. We also set up a configuration file located at
.ssh/config on each one of the hosts. The sequence of commands is as
follows:
We describe each step in more detail next, or if you are impatient, you can skip to the next section.
Each of the nodes only has our laptop’s ssh-key in its respective
authorized_keys file. We can use the cms command to gather all
keys in our cluster and then distribute them so that each node can ssh
into each other.
We first create ssh-keys for all the nodes in our cluster.
| |
+-------+---------+--------------------------------------------------+
| host | success | stdout |
+-------+---------+--------------------------------------------------+
| red | True | ssh-rsa AAAAB3NzaC1yc2EAAAADAQABAAABAQC99RR79UTQ |
| | | JznOPRN/FI6MqNsZ5Eirqs7JXA4UYfnMx8LVaD/ZcI6Sajr0 |
| | | 2nw2ucec8OMxtdzPrpWX5B+Hxz3GZWNKCbh2yHhMDIrf/Ohn |
| | | QGJrBx1mtAbqy4gd7qljEsL0FummdYmPdtHFBy7t2zkVp0J1 |
| | | V5YiLEbbrmX9RXQF1bJvHb4VNOOcwq47qX9h561q8qBxgQLz |
| | | F3iHmrMxmL8oma1RFVgZmjhnKMoXF+t13uZrf2R5/hVO4K6T |
| | | +PENSnjW7OX6aiIT8Ty1ga74FhXr9F5t14cofpN6QwuF2SqM |
| | | CgpVGfRSGMrLI/2pefszU2b5eeICWYePdopkslML+f+n |
| | | pi@red |
| red01 | True | ssh-rsa AAAAB3NzaC1yc2EAAAADAQABAAABAQDRN/rGGF+e |
| | | dZ9S2IWX4P26F7T2H+nsbw7CfeJ6df9oX/npYuM9BPDzcEP7 |
| | | +2jNIZtZVehJj5zHiodjAspCxjg+mByQZye1jioa3MBmgO3j |
| | | VwxCOPA7x0Wc2Dm9/QOg1kMMMlnNT2NHs+SeQMDXoUkpaLCQ |
| | | 108VQxaTclJ67USC1e/9B7OtjhsVm5kGA7Eamyd5PgtANT7G |
| | | jHERXSnGzFnbqqsZEBvCLWLSbaSq3adWR1bVvDblu11nyitE |
| | | x7YKZA9RK0A7rTBzrZa70SfG65dSbpqQFxmQYSrgiwVSBokk |
| | | 0vvk5l7NhBDrrrxWYWd9dm/SrDrInjcuDsCsjOVuccx7 |
| | | pi@red01 |
... # Ommitted some output for brevity
+-------+---------+--------------------------------------------------+
We can subsequently gather these keys into a file.
| |
And then Scatter them to the authorized_keys of our nodes.
| |
host key scatter red,red0[1-4]
+-------+---------+--------+
| host | success | stdout |
+-------+---------+--------+
| red | True | |
| red01 | True | |
| red02 | True | |
| red03 | True | |
| red04 | True | |
+-------+---------+--------+
All nodes should now have ssh access to each other.
We like to be able to login to each of the nodes in a convenient fashion, without needing
to add the host to knownhosts. To do this we have developed a command that switches off
StrictHostKeyChecking for all hosts. Before being able to issue the command, the user may
have to switch to the windows branch of cloudmesh-inventory by cd to cloudmesh-inventory
and then using git checkout windows and git pull. You invoke the command with
(ENV3) you@yourlaptop $ cms host key access red,red0[1-4]
You will see an output similar to
+-------+---------+--------+--------------------------------------------------+
| host | success | stdout | stderr |
+-------+---------+--------+--------------------------------------------------+
| red | True | | b"Warning: Permanently added 'red.local' |
| | | | (...) to the list of known hosts.\r\n" |
| red01 | True | | b"Warning: Permanently added 'red01' (...) |
| | | | to the list of known hosts.\r\n" |
| red02 | True | | b"Warning: Permanently added 'red02' (...) |
| | | | to the list of known hosts.\r\n" |
| red03 | True | | b"Warning: Permanently added 'red03' (...) |
| | | | to the list of known hosts.\r\n" |
| red04 | True | | b"Warning: Permanently added 'red04' (...) |
| | | | to the list of known hosts.\r\n" |
+-------+---------+--------+--------------------------------------------------+
In order for you to be able to successfully disable StrictHostKeyChecking, you can pass along filename that includes a customization. Here is an example on how to disable StrictHostKeyChecking on the subnet 10.1.1.1 We assume you have the following in the file subnet.conf:
Host 10.1.1.*
StrictHostKeyChecking no
Now you can invoke the command with:
(ENV3) you@yourlaptop $ cms host key access red,red0[1-4] subnet.conf
cms on a PiCloudmesh provides some very useful commands. Hence it can be of advantage to install it on the PIs. This is very simple with a onle line curl command
| |
This will not only install cms, but will also upgrade your system,
install the dependencies for cms, and create a virtual
environment. Because a system upgrade takes place, this command may
take several minutes to run.
After a reboot, we can verify the success of the script with the following:
| |
Documented commands (type help <topic>):
========================================
EOF check default help pause quit start test
admin clear diagram host pi set stop var
banner commands dryrun info provider shell stopwatch version
bridge config echo inventory py sleep sys
burn debug gui man q ssh term
This feature is implicitly included in the burn command, and you will have an inventory created automatically.
Cloudmesh has a simple system for managing cluster configurations as
an inventory. We do this management for you, but you can control it
also from the command line. We can first add a manager with cluster
subnet IP 10.1.1.1. We also add the bridge service, which is
recognized by cms as the WIFI bridge service connecting devices on
eth0 to the internet. We also set the timezone and locale here. You
may want to change them as you wish.
As we want to make the cluster very easy to create, we demonstrated in Section 5 how to create a default cluster directly from the burn command. As a future feature, this behavior will also be implemented into the inventory command. To make a default inventory named inventory-red.yaml:
you@yourlaptop $ cms inventory add cluster "red,red[01-04]"
This command will find your current WiFi SSID, and your current locale and set up a simple network as depicted in Figure 1 on your cluster. In case you have more or fewer nodes, the command will make appropriate updates.
For a custom cluster, you can inspect the parameters of the inventory command. Here are the commands to use for the previous setup while writing them out. You can modify the parameters to your liking:
you@yourlaptop $ cms inventory add red --service=manager --ip=10.1.1.1 --tag="latest-lite" --timezone="America/Indiana/Indianapolis" --locale="us" --inventory="inventory-red.yaml"
you@yourlaptop $ cms inventory set red services to "bridge,wifi" --listvalue --inventory="inventory-red.yaml"
We can then add the workers
you@yourlaptop $ cms inventory add "red0[1-4]" --service=worker --ip="10.1.1.[2-5]" --router=10.1.1.1 --tag="latest-lite" --timezone="America/Indiana/Indianapolis" --locale="us" --inventory="inventory-red.yaml"
you@yourlaptop $ cms inventory set "red0[1-4]" dns to "8.8.8.8,8.8.4.4" --listvalue --inventory="inventory-red.yaml"
Note we are using Google’s DNS here [8.8.8.8, 8.8.4.4]
Our cluster configuration is now complete. You may run the following to list your configuration. We include ours for a sanity check:
you@yourlaptop $ cms inventory list --inventory="inventory-red.yaml"
+-------+-------------+---------+---------+--------------------+----------+------------------------+----------+--------+------------------------------+--------+---------+-------------+-------------------+
| host | tag | cluster | service | services | ip | dns | router | locale | timezone | owners | comment | description | keyfile |
+-------+-------------+---------+---------+--------------------+----------+------------------------+----------+--------+------------------------------+--------+---------+-------------+-------------------+
| red | latest-lite | | manager | ['bridge', 'wifi'] | 10.1.1.1 | | | us | America/Indiana/Indianapolis | | | | ~/.ssh/id_rsa.pub |
| red01 | latest-lite | | worker | | 10.1.1.2 | ['8.8.8.8', '8.8.4.4'] | 10.1.1.1 | us | America/Indiana/Indianapolis | | | | ~/.ssh/id_rsa.pub |
| red02 | latest-lite | | worker | | 10.1.1.3 | ['8.8.8.8', '8.8.4.4'] | 10.1.1.1 | us | America/Indiana/Indianapolis | | | | ~/.ssh/id_rsa.pub |
| red03 | latest-lite | | worker | | 10.1.1.4 | ['8.8.8.8', '8.8.4.4'] | 10.1.1.1 | us | America/Indiana/Indianapolis | | | | ~/.ssh/id_rsa.pub |
| red04 | latest-lite | | worker | | 10.1.1.5 | ['8.8.8.8', '8.8.4.4'] | 10.1.1.1 | us | America/Indiana/Indianapolis | | | | ~/.ssh/id_rsa.pub |
+-------+-------------+---------+---------+--------------------+----------+------------------------+----------+--------+------------------------------+--------+---------+-------------+-------------------+
You can now specify your inventory as you burn your cluster or specific machines from the cluster with the burn command. All hosts data found in the inventory will be written to the machines, regardless if they are in the burn command or not.
Burn the whole cluster.
(ENV3) (admin) you@yourlaptop $ cms burn raspberry "red,red0[1-4]" --device=/dev/sdX
--inventory="inventory-red.yaml"
Burn a specific machine.
(ENV3) (admin) you@yourlaptop $ cms burn raspberry "red03" --device=/dev/sdX --inventory="inventory-red.yaml"
In case you reburn a SDCard and use it in your cluster, you will get a warning once you try to ssh into the machine. To remove the error simply execute the command
you@yourlaptop $ ssh-keygen -R HOSTNAME
where hostname is either the hostname or the ip address of your machine. that is registered in known hosts. To see the list, please use
you@yourlaptop $ cat ~/.ssh/known_hosts
Note that the lite tag is the same as lite-32 and full the same
as full-32. We added them for increased consistency and visibility.
We may drop in the future the lite and full tag so users are
forced to be aware of the 32 and 64 bit versions with
you@yourlaptop $ cms burn image versions --refresh
+---------------------------+------------+-------------+-------------+-----------------------------------------+
| Tag | Date | OS | Type | Version |
|---------------------------+------------+-------------+-------------+-----------------------------------------|
| lite-2020-05-28 | 2020-05-28 | raspberryos | lite | raspios_lite_armhf-2020-05-28 |
| lite-2020-08-24 | 2020-08-24 | raspberryos | lite | raspios_lite_armhf-2020-08-24 |
| lite-2020-12-04 | 2020-12-04 | raspberryos | lite | raspios_lite_armhf-2020-12-04 |
| lite-2021-01-12 | 2021-01-12 | raspberryos | lite | raspios_lite_armhf-2021-01-12 |
| lite-2021-03-25 | 2021-03-25 | raspberryos | lite | raspios_lite_armhf-2021-03-25 |
| lite-2021-05-28 | 2021-05-28 | raspberryos | lite | raspios_lite_armhf-2021-05-28 |
| lite-2021-11-08 | 2021-11-08 | raspberryos | lite | raspios_lite_armhf-2021-11-08 |
| lite-2022-01-28 | 2022-01-28 | raspberryos | lite | raspios_lite_armhf-2022-01-28 |
| lite-2022-04-07 | 2022-04-07 | raspberryos | lite | raspios_lite_armhf-2022-04-07 |
| latest-lite | 2022-04-07 | raspberryos | lite | raspios_lite_armhf-2022-04-07 |
| full-2020-05-28 | 2020-05-28 | raspberryos | full | raspios_full_armhf-2020-05-28 |
| full-2020-08-24 | 2020-08-24 | raspberryos | full | raspios_full_armhf-2020-08-24 |
| full-2020-12-04 | 2020-12-04 | raspberryos | full | raspios_full_armhf-2020-12-04 |
| full-2021-01-12 | 2021-01-12 | raspberryos | full | raspios_full_armhf-2021-01-12 |
| full-2021-03-25 | 2021-03-25 | raspberryos | full | raspios_full_armhf-2021-03-25 |
| full-2021-05-28 | 2021-05-28 | raspberryos | full | raspios_full_armhf-2021-05-28 |
| full-2021-11-08 | 2021-11-08 | raspberryos | full | raspios_full_armhf-2021-11-08 |
| full-2022-01-28 | 2022-01-28 | raspberryos | full | raspios_full_armhf-2022-01-28 |
| full-2022-04-07 | 2022-04-07 | raspberryos | full | raspios_full_armhf-2022-04-07 |
| latest-full | 2022-04-07 | raspberryos | full | raspios_full_armhf-2022-04-07 |
| lite-2020-05-28 | 2020-05-28 | raspberryos | lite-32 | raspios_lite_armhf-2020-05-28 |
| lite-2020-08-24 | 2020-08-24 | raspberryos | lite-32 | raspios_lite_armhf-2020-08-24 |
| lite-2020-12-04 | 2020-12-04 | raspberryos | lite-32 | raspios_lite_armhf-2020-12-04 |
| lite-2021-01-12 | 2021-01-12 | raspberryos | lite-32 | raspios_lite_armhf-2021-01-12 |
| lite-2021-03-25 | 2021-03-25 | raspberryos | lite-32 | raspios_lite_armhf-2021-03-25 |
| lite-2021-05-28 | 2021-05-28 | raspberryos | lite-32 | raspios_lite_armhf-2021-05-28 |
| lite-2021-11-08 | 2021-11-08 | raspberryos | lite-32 | raspios_lite_armhf-2021-11-08 |
| lite-2022-01-28 | 2022-01-28 | raspberryos | lite-32 | raspios_lite_armhf-2022-01-28 |
| lite-2022-04-07 | 2022-04-07 | raspberryos | lite-32 | raspios_lite_armhf-2022-04-07 |
| latest-lite-32 | 2022-04-07 | raspberryos | lite-32 | raspios_lite_armhf-2022-04-07 |
| full-2020-05-28 | 2020-05-28 | raspberryos | full-32 | raspios_full_armhf-2020-05-28 |
| full-2020-08-24 | 2020-08-24 | raspberryos | full-32 | raspios_full_armhf-2020-08-24 |
| full-2020-12-04 | 2020-12-04 | raspberryos | full-32 | raspios_full_armhf-2020-12-04 |
| full-2021-01-12 | 2021-01-12 | raspberryos | full-32 | raspios_full_armhf-2021-01-12 |
| full-2021-03-25 | 2021-03-25 | raspberryos | full-32 | raspios_full_armhf-2021-03-25 |
| full-2021-05-28 | 2021-05-28 | raspberryos | full-32 | raspios_full_armhf-2021-05-28 |
| full-2021-11-08 | 2021-11-08 | raspberryos | full-32 | raspios_full_armhf-2021-11-08 |
| full-2022-01-28 | 2022-01-28 | raspberryos | full-32 | raspios_full_armhf-2022-01-28 |
| full-2022-04-07 | 2022-04-07 | raspberryos | full-32 | raspios_full_armhf-2022-04-07 |
| latest-full-32 | 2022-04-07 | raspberryos | full-32 | raspios_full_armhf-2022-04-07 |
| lite_arm64-2020-08-24 | 2020-08-24 | raspberryos | lite-64 | raspios_lite_arm64-2020-08-24 |
| lite_arm64-2021-04-09 | 2021-04-09 | raspberryos | lite-64 | raspios_lite_arm64-2021-04-09 |
| lite_arm64-2021-05-28 | 2021-05-28 | raspberryos | lite-64 | raspios_lite_arm64-2021-05-28 |
| lite_arm64-2021-11-08 | 2021-11-08 | raspberryos | lite-64 | raspios_lite_arm64-2021-11-08 |
| lite_arm64-2022-01-28 | 2022-01-28 | raspberryos | lite-64 | raspios_lite_arm64-2022-01-28 |
| lite_arm64-2022-04-07 | 2022-04-07 | raspberryos | lite-64 | raspios_lite_arm64-2022-04-07 |
| latest-lite-64 | 2022-04-07 | raspberryos | lite-64 | raspios_lite_arm64-2022-04-07 |
| arm64-2020-05-28 | 2020-05-28 | raspberryos | full-64 | raspios_arm64-2020-05-28 |
| arm64-2020-08-24 | 2020-08-24 | raspberryos | full-64 | raspios_arm64-2020-08-24 |
| arm64-2021-04-09 | 2021-04-09 | raspberryos | full-64 | raspios_arm64-2021-04-09 |
| arm64-2021-05-28 | 2021-05-28 | raspberryos | full-64 | raspios_arm64-2021-05-28 |
| arm64-2021-11-08 | 2021-11-08 | raspberryos | full-64 | raspios_arm64-2021-11-08 |
| arm64-2022-01-28 | 2022-01-28 | raspberryos | full-64 | raspios_arm64-2022-01-28 |
| arm64-2022-04-07 | 2022-04-07 | raspberryos | full-64 | raspios_arm64-2022-04-07 |
| latest-full-64 | 2022-04-07 | raspberryos | full-64 | raspios_arm64-2022-04-07 |
| oldstable_lite-2021-12-02 | 2021-12-02 | raspberryos | lite-legacy | raspios_oldstable_lite_armhf-2021-12-02 |
| oldstable_lite-2022-01-28 | 2022-01-28 | raspberryos | lite-legacy | raspios_oldstable_lite_armhf-2022-01-28 |
| oldstable_lite-2022-04-07 | 2022-04-07 | raspberryos | lite-legacy | raspios_oldstable_lite_armhf-2022-04-07 |
| latest-lite-legacy | 2022-04-07 | raspberryos | lite-legacy | raspios_oldstable_lite_armhf-2022-04-07 |
| oldstable-2021-12-02 | 2021-12-02 | raspberryos | full-legacy | raspios_oldstable_armhf-2021-12-02 |
| oldstable-2022-01-28 | 2022-01-28 | raspberryos | full-legacy | raspios_oldstable_armhf-2022-01-28 |
| oldstable-2022-04-07 | 2022-04-07 | raspberryos | full-legacy | raspios_oldstable_armhf-2022-04-07 |
| latest-full-legacy | 2022-04-07 | raspberryos | full-legacy | raspios_oldstable_armhf-2022-04-07 |
| ubuntu-20.04.2-64-bit | 2021-02-01 | ubuntu | ubuntu | 20.04.2&architecture=server-arm64+raspi |
| ubuntu-20.04.2-32-bit | 2021-02-01 | ubuntu | ubuntu | 20.04.2&architecture=server-armhf+raspi |
| ubuntu-20.10-64-bit | 2021-02-01 | ubuntu | ubuntu | 20.10&architecture=server-arm64+raspi |
| ubuntu-20.10-32-bit | 2021-02-01 | ubuntu | ubuntu | 20.10&architecture=server-armhf+raspi |
| ubuntu-desktop | 2021-02-01 | ubuntu | ubuntu | 20.10&architecture=desktop-arm64+raspi |
+---------------------------+------------+-------------+-------------+-----------------------------------------+
you@yourlaptop $ cms burn image get latest-lite
you@yourlaptop $ cms burn image get latest-fll
The images are stored in the .cloudmesh/cmburn/images directory
and can be removed with the command
you@yourlaptop $ rm -i ~/.cloudmesh/cmburn/images/*
We also provide a list of related tutorials for other operating systems. This includes
Cluster with RaspberryOS on it:
Cluster with Ubuntu on it:
We have the following tutorials also on other web pages. Here is a list
Hackaday:
Piplanet:
Many tutorials are available at
We would like to thank Venkata (DK) Kolli github.com/dkkolli for his contributions to this project. The timezone preference was contributed by him. Note that the timezone preference is not working when burning is conducted from a PI. We are looking for contributors that fix this issue.

Here comes a small abstract
Learning Objectives
Topics covered
Warning
This is a warning notice. Be warned!
Tip
This is a very good tip.
Note
This is a very good tip.
Info
This is a very good tip.
Sections should be umbered
| Firstname | Lastname |
|---|---|
| Gregor | von Laszewski |
participant participant as Foo
actor actor as Foo1
boundary boundary as Foo2
control control as Foo3
entity entity as Foo4
database database as Foo5
collections collections as Foo6
queue queue as Foo7
Foo -> Foo1 : To actor
Foo -> Foo2 : To boundary
Foo -> Foo3 : To control
Foo -> Foo4 : To entity
Foo -> Foo5 : To database
Foo -> Foo6 : To collections
Foo -> Foo7: To queue

In this tutorial we will deploy and demonstrate MPI for use across a cluster of Raspberry Pis. The Pis can run Ubuntu or Raspberry OS. This tutorial is part ofa larger effort to use Python for MPI programming.
Learning Objectives
Topics covered
Modern AI and Deep Learning algorithms require immense processing power to churn through big data. In this tutorial we show how to install and try out MPI on a cluster of Raspberry Pis. MPI gives developers access to a powerful set of parallel processing, synchronization, and communication tools to develop thier algorithms in a scalable manner on clustesr. mpi4py gives developers access to MPI from Python allowing easy integration into Python applications.
This tutorial assumes a cluster burned using the convenient cloudmesh burn program. It has the advantage that the cluster is preconfigured for you at burn time of the SD Cards. We assume that you use one of the following methods:
The tutorial supports both Raspberry OS and Ubuntu.
We use cloudmesh shell (cms) to provide you with some easy to use commands that address deployment of MPI on the cluster.
The MPI commands available from cms are:
$ cms mpi deploy raspberry HOSTS
$ cms mpi deploy ubuntu HOSTS
$ cms mpi uninstall raspberry HOSTS
$ cms mpi uninstall ubuntu HOSTS
The commands can be installed as follows:
$ cd cm
$ cloudmesh-installer get mpi
We can install MPI on a cluster of Pis using the following command. The installation is done in parallel to scale with the number of hosts. Make sure to choose the argument that corresponds to the OS installed on the Raspberry Pis. In this example we will demonstrate the installation on a cluster of Pis running Raspberry OS.
Required python packages are installed, followed by MPI and mpi4py, and then the version of MPI installed is checked.
A return code of 0 indicates command success, any other indicates a failure.
(ENV3) you@your-laptop:~ $ cms mpi deploy raspberry "red,red0[1-3]"
mpi deploy raspberry red,red0[1-3]
# ----------------------------------------------------------------------
# Install MPI on hosts
# ----------------------------------------------------------------------
INFO: Installing essential python packages
INFO: sudo apt-get install python3-venv python3-wheel python3-dev build-essential python3-pip -y; pip3 install pip -U; python3 -m venv ~/ENV3
INFO: This may take several minutes
+-------+------------+--------+
| host | returncode | stderr |
+-------+------------+--------+
| red | 0 | |
| red01 | 0 | |
| red02 | 0 | |
| red03 | 0 | |
+-------+------------+--------+
INFO: Installing mpi on hosts
INFO: sudo apt-get install openmpi-bin -y; source ~/ENV3/bin/activate; pip3 install mpi4py
INFO: This may take several minutes
+-------+------------+--------+
| host | returncode | stderr |
+-------+------------+--------+
| red | 0 | |
| red01 | 0 | |
| red02 | 0 | |
| red03 | 0 | |
+-------+------------+--------+
INFO: Checking version of mpi on hosts
INFO: mpicc --showme:version
+-------+------------+--------+-------------------------------------+
| host | returncode | stderr | stdout |
+-------+------------+--------+-------------------------------------+
| red | 0 | | mpicc: Open MPI 3.1.3 (Language: C) |
| red01 | 0 | | mpicc: Open MPI 3.1.3 (Language: C) |
| red02 | 0 | | mpicc: Open MPI 3.1.3 (Language: C) |
| red03 | 0 | | mpicc: Open MPI 3.1.3 (Language: C) |
+-------+------------+--------+-------------------------------------+
To test MPI functionality on a single host you can run the following command to run 4 processes on a single Pi.
(ENV3) pi@red:~ $ mpiexec -n 4 python3 -m mpi4py.bench helloworld
Hello, World! I am process 0 of 4 on red.
Hello, World! I am process 1 of 4 on red.
Hello, World! I am process 2 of 4 on red.
Hello, World! I am process 3 of 4 on red.
NOTE: This example does not currently work with mpich installed on ubuntu, but it does with openmpi.
To test MPI functionality on a cluster you can run the following command.
NOTE: This command may silently fail if one of the hosts is not in the ~/.ssh/known_hosts file of the executing machine. To ensure it is present, connect to it via ssh first,
ssh red01, and approve adding the host key to the known_host file.
(ENV3) pi@red:~ $ mpiexec -n 4 -host red,red01,red02,red03 ~/ENV3/bin/python -m mpi4py.bench helloworld
Hello, World! I am process 0 of 3 on red.
Hello, World! I am process 1 of 3 on red01.
Hello, World! I am process 2 of 3 on red02.
Hello, World! I am process 2 of 3 on red03.
However, this will only run one process per host. A raspberry Pi 4 has 4 vprocessors. We can make a machine file to declare this information and then use mpirun and the machinefile to use all available processors.
Create a file named machinefile with the following content.
pi@red slots=4
pi@red01 slots=4
pi@red02 slots=4
pi@red03 slots=4
Now we can run the same helloworld example while using all available processors.
(ENV3) pi@red:~ $ mpirun -np 16 -machinefile ./machinefile ~/ENV3/bin/python -m mpi4py.bench helloworld
Hello, World! I am process 0 of 16 on red.
Hello, World! I am process 1 of 16 on red.
Hello, World! I am process 2 of 16 on red.
Hello, World! I am process 3 of 16 on red.
Hello, World! I am process 4 of 16 on red01.
Hello, World! I am process 6 of 16 on red01.
Hello, World! I am process 5 of 16 on red01.
Hello, World! I am process 7 of 16 on red01.
Hello, World! I am process 8 of 16 on red02.
Hello, World! I am process 9 of 16 on red02.
Hello, World! I am process 10 of 16 on red02.
Hello, World! I am process 11 of 16 on red02.
Hello, World! I am process 12 of 16 on red03.
Hello, World! I am process 13 of 16 on red03.
Hello, World! I am process 14 of 16 on red03.
Hello, World! I am process 15 of 16 on red03.
You can unistall MPI in the following manner.
(ENV3) you@yourlaptop:~ $ cms mpi uninstall raspberry "red,red0[1-3]"
mpi uninstall raspberry red,red0[1-3]
# ----------------------------------------------------------------------
# Uninstall MPI on hosts
# ----------------------------------------------------------------------
INFO: Uninstalling mpi on hosts
INFO: sudo apt-get --purge remove openmpi-bin -y; source ~/ENV3/bin/activate; pip3 uninstall mpi4py -y"
+-------+------------+--------+
| host | returncode | stderr |
+-------+------------+--------+
| red | 0 | |
| red01 | 0 | |
| red02 | 0 | |
| red03 | 0 | |
+-------+------------+--------+
Usage:
mpi deploy raspberry HOSTS
mpi deploy ubuntu HOSTS
mpi uninstall raspberry HOSTS
mpi uninstall ubuntu HOSTS
This command is used to install MPI on a cluster running Raspberry Pi OS or Ubuntu OS.
Arguments:
HOSTS parameterized list of hosts
Description:
mpi deploy raspberry HOSTS
Will deploy mpi for raspberry OS HOSTS in a parallel manner and return installation results.
mpi deploy ubuntu HOSTS
Will deploy mpi for ubuntu OS HOSTS (possibly running on raspberry pi platform) in a parallel manner
and return installation results.
mpi uninstall raspberry HOSTS
Will uninstall mpi packagess from raspberry OS HOSTS.
mpi uninstall ubuntu HOSTS
Will uninstall mpi packages from ubuntu OS HOSTS.
To learn more about MPI4PY, including examples of communication mechanisms, please see this report.
In this tutorial we will use a cms-burn created cluster to install Docker, create a Docker container for the cloudmesh-openapi service, deploy the container on Docker, install K3s, deploy the container on K3s, and enable access to the container from an external host. Finally, automatically deploy an OpenApi service onto a K3s cluster given only its python and yaml files.
This is currently (4/29/21) tested on a Raspberry pi using Ubuntu OS.
Learning Objectives
Topics covered
Many tutorials walk you through individual components of our learning objectives. This tutorial will walk you through step-by-step to create a service and deploy it on a cms-brun created cluster.
This tutorial assumes a cluster burned using one of the following methods:
Burn a Raspberry OS Cluster (not currently tested)
Burn an Ubuntu Cluster (currently tested)
Access your cluster manager (red) and get the cloudmesh Docker installer.
laptop$ ssh red
red$ cd cm
red$ cloudmesh-installer get docker-command
red$ cd ..
Now we install Docker.
red$ cms docker deploy --host=localhost
Let us add our user to the Docker group so we can execute Docker comands without sudo.
red$ sudo usermod -aG docker ubuntu
Let us verify the install by checking the version.
red$ docker version
We will create a file named Dockerfile in a directory
cloudmesh-openapi-container. Substitute your prefered editor if you do not
like emacs.
red$ mkdir cloudmesh-openapi-container
red$ cd cloudmesh-openapi-container
red$ emacs Dockerfile
In Dockerfile add the following lines. This provides Docker the commands
needed to install cloudmesh-openapi
and the needed packages for our PipleLineAnovaSVM example into a Ubuntu
container.
# syntax=docker/dockerfile:1
FROM ubuntu:20.04
RUN mkdir cm
RUN apt update
RUN apt install python3-venv python3-wheel python3-dev python3-pip build-essential -y
RUN ln -s /usr/bin/pip3 /usr/bin/pip
RUN pip install pip -U
RUN pip install cloudmesh-installer
RUN apt install git -y
RUN cd cm; cloudmesh-installer get openapi
RUN pip install sklearn pandas
ARG DEBIAN_FRONTEND=noninteractive
ENV TZ=America/Indiana/Indianapolis
RUN apt install tzdata -y
RUN apt install emacs -y
CMD /bin/bash
Now we build an image based on the instructions provided in Dockerfile. We
name the image cloudmesh-openapi. The . instructs Docker to use the
Dockerfile in the present working directory.
red$ docker build -t cloudmesh-openapi .
Now we start a Docker containe using our cloudmesh-openapi image. The
-it provide an interactive terminal, the -p maps the container port 8080
to the host port 8080, and /bin/bash is the command to run in the container.
red$ docker run -it -p 8080:8080 cloudmesh-openapi /bin/bash
Generate the service yaml.
container$ cms openapi generate PipelineAnovaSVM \
--filename=./tests/Scikitlearn-experimental/sklearn_svm.py \
--import_class \
--enable_upload
Start the service (defaults to port 8080). Leave this running and go to a new terminal.
container$ cms openapi server start ./tests/Scikitlearn-experimental/sklearn_svm.yaml --host=0.0.0.0
In another terminal on your laptop you can now access the service from
red.local:8080 because we mapped the container port 8080 to the host port 8080.
In a web browser go to http://red.local:8080/cloudmesh/ui to access the
web UI of the service.
Alternatively, you can access the service directly from the command line of your laptop.
laptop$ curl -L -o iris.data "https://raw.githubusercontent.com/cloudmesh/cloudmesh-openapi/main/tests/Scikitlearn-experimental/iris.data"
laptop$ export CMSIP=red.local:8080
laptop$ curl -X POST "http://$CMSIP/cloudmesh/upload" -H "accept: text/plain" -H "Content-Type: multipart/form-data" -F "upload=@iris.data"
laptop$ curl -X GET "http://$CMSIP/cloudmesh/PipelineAnovaSVM/train?filename=iris.data" -H "accept: text/plain"
laptop$ curl -X GET "http://$CMSIP/cloudmesh/PipelineAnovaSVM/make_prediction?model_name=iris¶ms=5.1%2C%203.5%2C%201.4%2C%200.2" -H "accept: */*"
You can now ctrl-C and exit the running container to stop the service.
We need to save the Docker image so we can provide it to our K3s cluster. alternatively you can upload it to a Docker registry like DockerHub.
We save our image in a tarfile named cloudmesh-openapi.tar.
red$ docker save --output cloudmesh-openapi.tar cloudmesh-openapi:latest
We will reference this file later to import it to our K3s cluster.
Enable containers in the kernel, and wait for the cluster to reboot.
laptop$ cms pi k3 enable containers red,red[01-03]
Now install K3s
laptop$ cms pi k3 install cluster red,red0[1-3]
Verify all nodes show up.
laptop$ cms pi k3 cluster info
cloudmesh-openapi Image into All K3s NodesAs we are not using an image repository, we need to copy our
cloudmesh-openapi.tar file to all k3s nodes and import them image into
K3s.
red$ cms pi k3 import image red,red0[1-3] cloudmesh-openapi.tar /home/ubuntu
pi k3 import image red,red0[1-3] cloudmesh-openapi.tar /home/ubuntu
INFO: Copying image to ['red', 'red01', 'red02', 'red03'] using source: cloudmesh-openapi.tar and destination: /home/ubuntu
INFO: This may take a few minutes depending on the file size and number of destinations
+---------+---------+--------+
| host | success | stdout |
+---------+---------+--------+
| red | True | |
| red01 | True | |
| red02 | True | |
| red03 | True | |
+---------+---------+--------+
INFO: Import image on ['red', 'red01', 'red02', 'red03'] using filepath:/home/ubuntu/cloudmesh-openapi.tar
+---------+---------+--------------------------------------------------+
| host | success | stdout |
+---------+---------+--------------------------------------------------+
| red | True | unpacking docker.io/library/cloudmesh- |
| | | openapi:latest (sha256:829d62dafbb8c3335804517d6 |
| | | 00313e64be1983b93286328f6c0f66f7c4781ad)...done |
| red01 | True | unpacking docker.io/library/cloudmesh- |
| | | openapi:latest (sha256:829d62dafbb8c3335804517d6 |
| | | 00313e64be1983b93286328f6c0f66f7c4781ad)...done |
| red02 | True | unpacking docker.io/library/cloudmesh- |
| | | openapi:latest (sha256:829d62dafbb8c3335804517d6 |
| | | 00313e64be1983b93286328f6c0f66f7c4781ad)...done |
| red03 | True | unpacking docker.io/library/cloudmesh- |
| | | openapi:latest (sha256:829d62dafbb8c3335804517d6 |
| | | 00313e64be1983b93286328f6c0f66f7c4781ad)...done |
+---------+---------+--------------------------------------------------+
Validate the container is present.
red$ sudo k3s ctr images list
To create Pod in Kubernetes, you need to define a YAML file. We create one
named cloudmesh-openapi-pod.yaml. The pod is the smallest deployable unit
of computing in K8s, and is a group of one or more containers. In our case one.
Create cloudmesh-openapi-pod.yaml and paste the following lines in the
document.
apiVersion: v1
kind: Pod
metadata:
name: cloudmesh-openapi-pod
labels:
app: cloudmesh-openapi-pod
spec:
containers:
- name: cloudmesh-openapi
image: cloudmesh-openapi:latest
imagePullPolicy: Never
command:
- "sleep"
- "604800"
This will define a pod named cloudmesh-openapi-pod, containing
one container named cloudmesh-openapi based on our
cloudmesh-openapi:latest image, running the command sleep 604800. This
will essentially keep our container running for 7 days and then it will
close and restart based on the default restart policy: ALWAYS. The . metadata.label.app is important as it allows us to select our pod in our
in our following load-balancer service. The .spec.imagePullPolicy: Never
is also important as it prevents K8s from trying to download our image from
any repository and instead use the local copy.
Deploy your pod by applying the cloudmesh-openapi-pod.yaml configuration.
red$ sudo kubectl apply -f ./cloudmesh-openapi-pod.yaml
Check that the pod is running.
red$ sudo kubectl get pods
We need to start a shell in our Pod so we can generate and run the cloudmesh-openapi service.
red$ sudo kubectl exec --stdin --tty cloudmesh-openapi-pod -- /bin/bash
We can now run our serice generate and start command.
container$ cms openapi generate PipelineAnovaSVM \
--filename=./tests/Scikitlearn-experimental/sklearn_svm.py \
--import_class \
--enable_upload
container$ cms openapi server start ./tests/Scikitlearn-experimental/sklearn_svm.yaml --host=0.0.0.0
You can now exit and the container and the service will continue running.
Kubernetes services expose your cluster Pods to external networks. K3s comes with a build int load balancer that watches for Kubernetes LoadBalancer services, and then deploys the necessary network infrastructure to make your service accessible.
Create a file names cloudmesh-openapi-lb-service.yaml and paste the
following lines.
apiVersion: v1
kind: Service
metadata:
name: cloudmesh-openapi-lb-service
spec:
selector:
app: cloudmesh-openapi-pod
ports:
- protocol: TCP
port: 8080
targetPort: 8080
nodePort: 30000
type: LoadBalancer
It is important that the .spec.selector.app matches that defined in your
pod yaml. The port is the port accessible on cluster internal nodes, the
targetPort is the port in the container to which traffic will be forwarded,
and the nodePort is the port on cluster external networks can access the
service. This must match a predefined range.
Deploy the loadbalancer.
red$ sudo kubectl apply -f ./cloudmesh-openapi-lb.service.yaml
Check to ensure it deployed.
red$ sudo kubectl get services -o wide
Check to see the load balancer pods are deployed on all agent nodes.
red$ sudo kubectl get pods
cloudmesh-openapi PodBecause the loadbalancer is running on all nodes and forwarding traffic to
the existing pod, we can now reach our service from our laptop at red.local:30000. For some
reason red.local:8080 works as well, I can’t explain that yet.
On your laptop web browser browse to http://red.local:30000/cloudmesh/ui
Alternatively, interact with the service from the command line.
laptop$ curl -L -o iris.data "https://raw.githubusercontent.com/cloudmesh/cloudmesh-openapi/main/tests/Scikitlearn-experimental/iris.data"
laptop$ export CMSIP=red.local:30000
laptop$ curl -X POST "http://$CMSIP/cloudmesh/upload" -H "accept: text/plain" -H "Content-Type: multipart/form-data" -F "upload=@iris.data"
laptop$ curl -X GET "http://$CMSIP/cloudmesh/PipelineAnovaSVM/train?filename=iris.data" -H "accept: text/plain"
laptop$ curl -X GET "http://$CMSIP/cloudmesh/PipelineAnovaSVM/make_prediction?model_name=iris¶ms=5.1%2C%203.5%2C%201.4%2C%200.2" -H "accept: */*"
We have provided a command that can automatically deploy an OpenAPI service given the YAML file, python file, the server, and the ports you want it deployed on. We expect the user to have previously used cloudmesh-openapi to generate these files as needed.
cms pi k3 api deploy SERVER PORTS YAML PYTHON
Below is an example command invocation where whe deploy the Scikilearn Pipeline Anova SVM example as a service using the yaml file sklearn_svm.yaml and the python file sklearn_svm_upload-enabled.py
laptop$ cms pi k3 api deploy red 80[80-85] sklearn_svm.yaml sklearn_svm_upload-enabled.py
pi k3 api deploy red 80[80-85] sklearn_svm.yaml sklearn_svm_upload-enabled.py
INFO: Deploying cloudmesh openapi service based on yaml:sklearn_svm.yaml
python file: sklearn_svm_upload-enabled.py to ports: ['8080', '8081', '8082','8083', '8084', '8085'] on server red
INFO: Deploying service for port: 8080
INFO: Deploying service for port: 8081
INFO: Deploying service for port: 8082
INFO: Deploying service for port: 8083
INFO: Deploying service for port: 8084
INFO: Deploying service for port: 8085
INFO: Services are available at:
NAME TYPE CLUSTER-IP EXTERNAL-IP PORT(S) AGE
kubernetes ClusterIP 10.43.0.1 <none> 443/TCP 39h
cloudmesh-openapi-sklearn-svm-port-8080-lb-service LoadBalancer 10.43.157.137 192.168.1.16 8080:30988/TCP 89s
cloudmesh-openapi-sklearn-svm-port-8081-lb-service LoadBalancer 10.43.105.151 192.168.1.16 8081:31733/TCP 69s
cloudmesh-openapi-sklearn-svm-port-8082-lb-service LoadBalancer 10.43.66.0 192.168.1.16 8082:30442/TCP 55s
cloudmesh-openapi-sklearn-svm-port-8083-lb-service LoadBalancer 10.43.212.54 192.168.1.16 8083:31632/TCP 33s
cloudmesh-openapi-sklearn-svm-port-8084-lb-service LoadBalancer 10.43.52.81 192.168.1.16 8084:30334/TCP 22s
cloudmesh-openapi-sklearn-svm-port-8085-lb-service LoadBalancer 10.43.238.192 192.168.1.16 8085:31442/TCP 8s
You can now access and interact with the service in the same manner as we conducted in section 17.
Next we will install a Kubernetes Dashboard so we can monitor the resource consumption of our services.
If using Raspberry OS on the pis, run:
you@your-laptop:~$ cms pi k3 dashboard create red
If using Ubuntu Server on the pis, run:
you@your-laptop:~$ cms pi k3 dashboard create red --ubuntu
Both commands will automatically start the dashboard. However, on Ubuntu Server, cms pi k3 dashboard start red needs to be run when the pi is rebooted.
We can easily access the Web UI Dashboard for easy management of our cluster.
First, let us connect to the new dashboard created above.
you@your-laptop:~$ cms pi k3 dashboard connect red
We should get a green “Connection created” message. We can now check on the status of our dashboard and obtain our token to log in.
you@your-laptop:~$ cms pi k3 dashboard info
pi k3 dashboard info
INFO: Finding running dashboards...
+---------------------+-------------+------------+------------------+-------+
| Server Access Point | Remote Port | Local Port | Dashboard Status | PID |
+---------------------+-------------+------------+------------------+-------+
| red | 8001 | 8001 | Active | 99240 |
+---------------------+-------------+------------+------------------+-------+
INFO: Dashboard Link:
http://localhost:8001/api/v1/namespaces/kubernetes-dashboard/services/https:kubernetes-dashboard:/proxy/
INFO: Fetching authentication token...
# A long token will go here
Note. If
Dasboard Statussays “Up but not ready”, the k3s dashboard is still likely in the process of coming online. Wait a few moments and try the info command again.
Take note of the authentication token given. To open the dashboard, you may click on the link provided by the info command or use the following command to automaticallly open in browser.
you@your-laptop:~$ cms pi k3 dashboard
pi k3 dashboard
Opening dashboard...
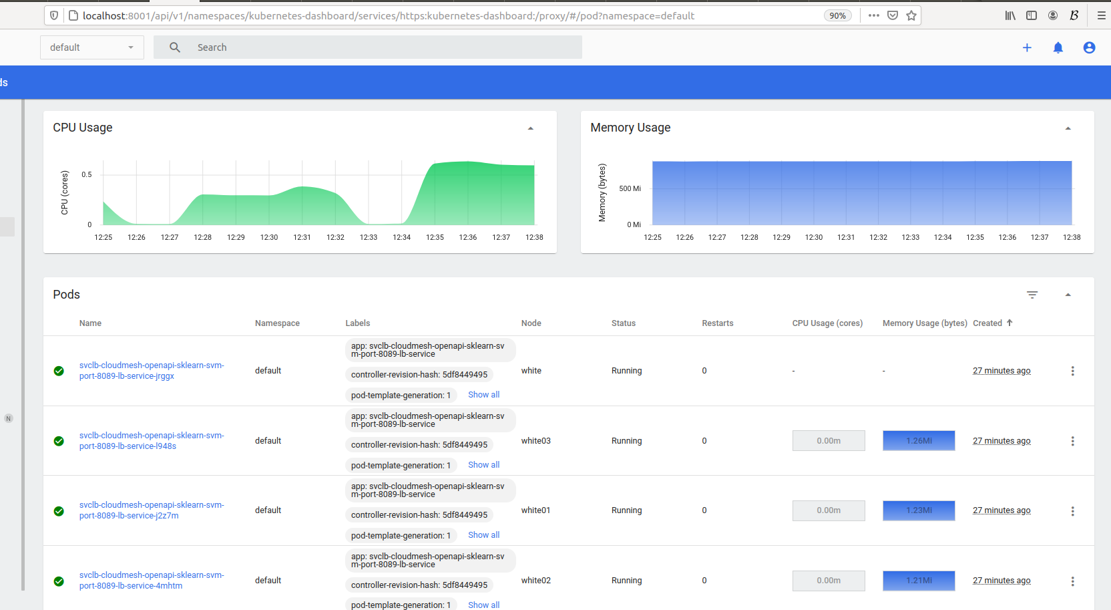
You can monitor your pods resources consumption on the Pods tab.
When ready, you can then disconnect from your dashboard with the following:
you@your-laptop:~$ cms pi k3 dashboard disconnect
While hte containers will persist after a reboot, the services do not currently automatically restart.
To restart the service suse the command
cms pi k3 api start SERVER PORTS YAML PYTHON
The YAML and PYTHON require the base filename only, they are not re-copied.
Here is an example invocation.
laptopl$ cms pi k3 api start red 80[80-89] sklearn_svm.yaml sklearn_svm_upload-enabled.py
pi k3 api start red 80[80-89] sklearn_svm.yaml sklearn_svm_upload-enabled.py
INFO: Starting services in on ports ['8080', '8081', '8082', '8083', '8084', '8085']
INFO: Service on 8080 successfully started
INFO: Service on 8081 successfully started
INFO: Service on 8082 successfully started
INFO: Service on 8083 successfully started
INFO: Service on 8084 successfully started
INFO: Service on 8085 successfully started
Useful kubectl commands to debug a broken pod/service
sudo kubectl describe pod cloudmesh-openapi-pod
sudo kubectl logs --previous cloudmesh-openapi-pod cloudmesh-openapi
sudo kubectl logs cloudmesh-openapi-pod cloudmesh-openapi
sudo kubectl delete pod cloudmesh-openapi-pod
sudo kubectl delete service clodmesh-openapi-lb-service
sudo kubectl get pods --show-labels
sudo kubectl edit pod cloudmesh-openapi-pod
If you have trouble accessing the pod shell, like below. Try stopping and restarting the K3s services.
(ENV3) ubuntu@red:~/cloudmesh-openapi-container$ sudo kubectl exec --stdin --tty cloudmesh-openapi-pod -- /bin/bash
error: unable to upgrade connection: Authorization error (user=kube-apiserver, verb=create, resource=nodes, subresource=proxy)
Stop and restart the K3s services.
red$ cms pi k3 stop agent red,red0[1-3]
red$ cms pi k3 stop server red
red$ cms pi k3 start server red
ree$ cms pi k3 start agent red,red0[1-3]
laptop$ cms pi k3 uninstall cluster red,red0[1-3]
red$ sudo apt-get purge docker-ce docker-ce-cli containerd.io
red$ sudo rm -rf /var/lib/docker
red$ sudo rm -rf /var/lib/containerd

Install, manage, operate, and uninstall K3s on a cluster of Raspberry Pis running Raspberry OS or Ubuntu.
Learning Objectives
cms.Topics covered
K3S provides a lightweight, single binary distribution of Kubernetes with very close feature parity to K8s that is perfect for single board computers like the Raspberry Pi. In this tutorial we will install, verify, and unistall K3s on a cluster of Pis that was created using the Cloudmesh burn software.
This tutorial assumes a cluster burned using one of the following methods:
The tutorial supports both Raspberry OS and Ubuntu with no required user input change.
pi k3 enable containers NAMES
pi k3 install server NAMES
pi k3 install agent NAMES SERVER
pi k3 install cluster NAMES
pi k3 uninstall server NAMES
pi k3 uninstall agent NAMES
pi k3 uninstall cluster NAMES
pi k3 kill NAMES
pi k3 start server NAMES
pi k3 start agent NAMES
pi k3 start cluster NAMES
pi k3 stop server NAMES
pi k3 stop agent NAMES
pi k3 stop cluster NAMES
pi k3 remove node NAMES SERVER
pi k3 cluster info SERVER
pi k3 dashboard create SERVER [--ubuntu]
pi k3 dashboard start SERVER
pi k3 dashboard connect SERVER
pi k3 dashboard disconnect [SERVER]
pi k3 dashboard info
pi k3 dashboard
pi k3 import image NAMES SOURCE DESTINATION
pi k3 api deploy SERVER PORTS YAML PYTHON
pi k3 api start SERVER PORTS YAML PYTHON
This command adds 'cgroup_enable=cpuset cgroup_memory=1 cgroup_enable=memory' to the end of the arguments in cmdline.txt if
they are not already present, and reboots the machines. This is required to
enable containers in the kernel.
you@your-laptop:~$ cms pi k3 enable containers red,red0[1-3]
pi k3 enable containers red,red0[1-3]
INFO: Enabling cgroups for ['red', 'red01', 'red02', 'red03']
+-------+---------+--------+
| host | success | stdout |
+-------+---------+--------+
| red | True | |
| red01 | True | |
| red02 | True | |
| red03 | True | |
+-------+---------+--------+
INFO: Executing `sudo reboot` for ['red01', 'red02', 'red03']
INFO: Executing `sudo reboot` for red
This command wil install a K3S cluster with the manager (red) acting as the K3s server, and the workers and the manager will be installed as agents of that server. This also installs and configures a Web UI Dashboard.
you@yourlaptop:~$ cms pi k3 install cluster red,red0[1-3]
pi k3 install cluster red,red0[1-3]
INFO: Installing K3s as stand-alone server on ['red']
+------+---------+--------------------------------------------------+
| host | success | stdout |
+------+---------+--------------------------------------------------+
| red | True | [INFO] Finding release for channel stable |
| | | [INFO] Using v1.20.5+k3s1 as release |
| | | [INFO] Downloading hash https://github.com/k3s- |
| | | io/k3s/releases/download/v1.20.5+k3s1/sha256sum- |
| | | arm.txt |
| | | [INFO] Downloading binary https://github.com/k3 |
| | | s-io/k3s/releases/download/v1.20.5+k3s1/k3s-armh |
| | | f |
| | | [INFO] Verifying binary download |
| | | [INFO] Installing k3s to /usr/local/bin/k3s |
| | | [INFO] Creating /usr/local/bin/kubectl symlink |
| | | to k3s |
| | | [INFO] Creating /usr/local/bin/crictl symlink |
| | | to k3s |
| | | [INFO] Creating /usr/local/bin/ctr symlink to |
| | | k3s |
| | | [INFO] Creating killall script |
| | | /usr/local/bin/k3s-killall.sh |
| | | [INFO] Creating uninstall script |
| | | /usr/local/bin/k3s-uninstall.sh |
| | | [INFO] env: Creating environment file |
| | | /etc/systemd/system/k3s.service.env |
| | | [INFO] systemd: Creating service file |
| | | /etc/systemd/system/k3s.service |
| | | [INFO] systemd: Enabling k3s unit |
| | | [INFO] systemd: Starting k3s |
+------+---------+--------------------------------------------------+
INFO: Installing K3s on red as agent of red
INFO: Fetching the server token
+------+---------+--------------------------------------------------+
| host | success | stdout |
+------+---------+--------------------------------------------------+
| red | True | [INFO] Finding release for channel stable |
| | | [INFO] Using v1.20.5+k3s1 as release |
| | | [INFO] Downloading hash https://github.com/k3s- |
| | | io/k3s/releases/download/v1.20.5+k3s1/sha256sum- |
| | | arm.txt |
| | | [INFO] Skipping binary downloaded, installed |
| | | k3s matches hash |
| | | [INFO] Skipping /usr/local/bin/kubectl symlink |
| | | to k3s, already exists |
| | | [INFO] Skipping /usr/local/bin/crictl symlink |
| | | to k3s, already exists |
| | | [INFO] Skipping /usr/local/bin/ctr symlink to |
| | | k3s, already exists |
| | | [INFO] Creating killall script |
| | | /usr/local/bin/k3s-killall.sh |
| | | [INFO] Creating uninstall script |
| | | /usr/local/bin/k3s-agent-uninstall.sh |
| | | [INFO] env: Creating environment file |
| | | /etc/systemd/system/k3s-agent.service.env |
| | | [INFO] systemd: Creating service file |
| | | /etc/systemd/system/k3s-agent.service |
| | | [INFO] systemd: Enabling k3s-agent unit |
| | | [INFO] systemd: Starting k3s-agent |
+------+---------+--------------------------------------------------+
INFO: Installing K3s on ['red01', 'red02', 'red03'] as agent of red
INFO: Fetching the server token
+-------+---------+--------------------------------------------------+
| host | success | stdout |
+-------+---------+--------------------------------------------------+
| red01 | True | [INFO] Finding release for channel stable |
| | | [INFO] Using v1.20.5+k3s1 as release |
| | | [INFO] Downloading hash https://github.com/k3s- |
| | | io/k3s/releases/download/v1.20.5+k3s1/sha256sum- |
| | | arm.txt |
| | | [INFO] Downloading binary https://github.com/k3 |
| | | s-io/k3s/releases/download/v1.20.5+k3s1/k3s-armh |
| | | f |
| | | [INFO] Verifying binary download |
| | | [INFO] Installing k3s to /usr/local/bin/k3s |
| | | [INFO] Creating /usr/local/bin/kubectl symlink |
| | | to k3s |
| | | [INFO] Creating /usr/local/bin/crictl symlink |
| | | to k3s |
| | | [INFO] Creating /usr/local/bin/ctr symlink to |
| | | k3s |
| | | [INFO] Creating killall script |
| | | /usr/local/bin/k3s-killall.sh |
| | | [INFO] Creating uninstall script |
| | | /usr/local/bin/k3s-agent-uninstall.sh |
| | | [INFO] env: Creating environment file |
| | | /etc/systemd/system/k3s-agent.service.env |
| | | [INFO] systemd: Creating service file |
| | | /etc/systemd/system/k3s-agent.service |
| | | [INFO] systemd: Enabling k3s-agent unit |
| | | [INFO] systemd: Starting k3s-agent |
... Some output removed for brevity
Wait a moment for k3s to set up initial containers.
Let us check that server reports the appropriate nodes as members.
We can run remote commands with the cms host ssh command as well as using
K3S specific commands.
For example to get cluster information we can run
you@your-laptop:~$ cms pi k3 cluster info red
pi k3 cluster info red
INFO: Getting cluster info for red
INFO: sudo kubectl get nodes -o wide
NAME STATUS ROLES AGE VERSION INTERNAL-IP EXTERNAL-IP OS-IMAGE KERNEL-VERSION CONTAINER-RUNTIME
red03 Ready <none> 28s v1.20.5+k3s1 10.1.1.4 <none> Raspbian GNU/Linux 10 (buster) 5.10.17-v7l+ containerd://1.4.4-k3s1
red02 Ready <none> 30s v1.20.5+k3s1 10.1.1.3 <none> Raspbian GNU/Linux 10 (buster) 5.10.17-v7l+ containerd://1.4.4-k3s1
red01 Ready <none> 27s v1.20.5+k3s1 10.1.1.2 <none> Raspbian GNU/Linux 10 (buster) 5.10.17-v7l+ containerd://1.4.4-k3s1
red Ready control-plane,master 84s v1.20.5+k3s1 10.1.1.1 192.168.1.22 Raspbian GNU/Linux 10 (buster) 5.10.17-v7l+ containerd://1.4.4-k3s1
INFO: Server node token
K106f1caa41b133e69a69b1e3ac1da3a451393029e382be846eb0bcb7dfc7eab2db::server:2d604411ff6ab2a7c162bc4e82292690
INFO: Containers running on nodes
NODE: red03
CONTAINER IMAGE CREATED STATE NAME ATTEMPT POD ID
a24076569fa00 7d23a14d38d24 5 seconds ago Running lb-port-443 0 70adcf7269a03
3332e6b1f602d 7d23a14d38d24 6 seconds ago Running lb-port-80 0 70adcf7269a03
2f1273e3eca91 d24dd28770a36 15 seconds ago Running metrics-server 0 0ca2190dba121
NODE: red02
CONTAINER IMAGE CREATED STATE NAME ATTEMPT POD ID
be2ca6f1b77a5 7d23a14d38d24 5 seconds ago Running lb-port-443 0 fc85e830e60bd
98ae1280e7a59 7d23a14d38d24 6 seconds ago Running lb-port-80 0 fc85e830e60bd
ebcc2edeb3926 1e695755cc09d 13 seconds ago Running local-path-provisioner 0 140da1f145714
NODE: red01
CONTAINER IMAGE CREATED STATE NAME ATTEMPT POD ID
bb4a9295bc345 7d23a14d38d24 1 second ago Running lb-port-443 0 9fc4bec3faae0
6ba339136ae1a 944e5aba28f45 1 second ago Running traefik 0 87ce8f8685767
491c2d8832f8d 7d23a14d38d24 1 second ago Running lb-port-80 0 9fc4bec3faae0
d12b76e2c51e7 a0ce6ab869a69 12 seconds ago Running coredns 0 a1777698c457c
NODE: red
CONTAINER IMAGE CREATED STATE NAME ATTEMPT POD ID
afa997d47eb33 7d23a14d38d24 4 seconds ago Running lb-port-443 0 524fcbbd2b879
d0921db7d2229 7d23a14d38d24 5 seconds ago Running lb-port-80 0 524fcbbd2b879
Or we can run the commands directly with cms host ssh as demonstrated
below. This is useful for commands that may not be built into cms, or that
the user knows better than the cms shell commands.
NOTE:
cms host sshcommands go are interpreted first by bash and then by python, complex commands may not work without complex escape sequences.
you@your-laptop:~$ cms host ssh red \" sudo kubectl get nodes \"
host ssh red " sudo kubectl get nodes "
+------+---------+--------------------------------------------------+
| host | success | stdout |
+------+---------+--------------------------------------------------+
| red | True | NAME STATUS ROLES AGE |
| | | VERSION |
| | | red01 Ready <none> 15m |
| | | v1.20.5+k3s1 |
| | | red02 Ready <none> 15m |
| | | v1.20.5+k3s1 |
| | | red03 Ready <none> 15m |
| | | v1.20.5+k3s1 |
| | | red Ready control-plane,master 16m |
| | | v1.20.5+k3s1 |
+------+---------+--------------------------------------------------+
It is straightforward to create a dashboard for our newly created cluster.
If using Raspberry OS on the pis, run:
you@your-laptop:~$ cms pi k3 dashboard create red
If using Ubuntu Server on the pis, run:
you@your-laptop:~$ cms pi k3 dashboard create red --ubuntu
Both commands will automatically start the dashboard. However, on Ubuntu Server, cms pi k3 dashboard start red needs to be run when the pi is rebooted.
We can easily access the Web UI Dashboard for easy management of our cluster.
First, let us connect to the new dashboard created above.
you@your-laptop:~$ cms pi k3 dashboard connect red
We should get a green “Connection created” message. We can now check on the status of our dashboard and obtain our token to log in.
you@your-laptop:~$ cms pi k3 dashboard info
pi k3 dashboard info
INFO: Finding running dashboards...
+---------------------+-------------+------------+------------------+-------+
| Server Access Point | Remote Port | Local Port | Dashboard Status | PID |
+---------------------+-------------+------------+------------------+-------+
| red | 8001 | 8001 | Active | 99240 |
+---------------------+-------------+------------+------------------+-------+
INFO: Dashboard Link:
http://localhost:8001/api/v1/namespaces/kubernetes-dashboard/services/https:kubernetes-dashboard:/proxy/
INFO: Fetching authentication token...
# A long token will go here
Note. If
Dasboard Statussays “Up but not ready”, the k3s dashboard is still likely in the process of coming online. Wait a few moments and try the info command again.
Take note of the authentication token given. To open the dashboard, you may click on the link provided by the info command or use the following command to automaticallly open in browser.
you@your-laptop:~$ cms pi k3 dashboard
pi k3 dashboard
Opening dashboard...
When ready, you can then disconnect from your dashboard with the following:
you@your-laptop:~$ cms pi k3 dashboard disconnect
We will add a new machine red04 to be an agent of the red hosted cluster.
you@your-laptop:~$ cms pi k3 install agent red04 red
pi k3 install agent red04 red
INFO: Installing K3s on red04 as agent of red
INFO: Fetching the server token
+-------+---------+--------------------------------------------------+
| host | success | stdout |
+-------+---------+--------------------------------------------------+
| red04 | True | [INFO] Finding release for channel stable |
| | | [INFO] Using v1.20.5+k3s1 as release |
| | | [INFO] Downloading hash https://github.com/k3s- |
| | | io/k3s/releases/download/v1.20.5+k3s1/sha256sum- |
| | | arm.txt |
| | | [INFO] Downloading binary https://github.com/k3 |
| | | s-io/k3s/releases/download/v1.20.5+k3s1/k3s-armh |
| | | f |
| | | [INFO] Verifying binary download |
| | | [INFO] Installing k3s to /usr/local/bin/k3s |
| | | [INFO] Creating /usr/local/bin/kubectl symlink |
| | | to k3s |
| | | [INFO] Creating /usr/local/bin/crictl symlink |
| | | to k3s |
| | | [INFO] Creating /usr/local/bin/ctr symlink to |
| | | k3s |
| | | [INFO] Creating killall script |
| | | /usr/local/bin/k3s-killall.sh |
| | | [INFO] Creating uninstall script |
| | | /usr/local/bin/k3s-agent-uninstall.sh |
| | | [INFO] env: Creating environment file |
| | | /etc/systemd/system/k3s-agent.service.env |
| | | [INFO] systemd: Creating service file |
| | | /etc/systemd/system/k3s-agent.service |
| | | [INFO] systemd: Enabling k3s-agent unit |
| | | [INFO] systemd: Starting k3s-agent |
+-------+---------+--------------------------------------------------+
We can also easily uninstall the K3S cluster.
you@your-laptop:~$ cms pi k3 uninstall cluster red,red0[1-3]
pi k3 uninstall cluster red,red0[1-3]
INFO: Uninstalling agent install of K3s on ['red', 'red01', 'red02', 'red03', red04']
+-------+---------+--------------------------------------------------+
| host | success | stdout |
+-------+---------+--------------------------------------------------+
| red | True | /usr/bin/systemctl |
| | | Additional k3s services installed, skipping |
| | | uninstall of k3s |
| red01 | True | /usr/bin/systemctl |
| red02 | True | /usr/bin/systemctl |
| red03 | True | /usr/bin/systemctl |
| red04 | True | /usr/bin/systemctl |
+-------+---------+--------------------------------------------------+
INFO: Uninstalling server install of K3s on red
+------+---------+--------------------+
| host | success | stdout |
+------+---------+--------------------+
| red | True | /usr/bin/systemctl |
+------+---------+--------------------+
Now we will create a new standalone K3s server on red05.
you@your-laptop:~$ cms pi k3 install server red05
pi k3 install server red05
INFO: Installing K3s as stand-alone server on ['red05']
+-------+---------+--------------------------------------------------+
| host | success | stdout |
+-------+---------+--------------------------------------------------+
| red05 | True | [INFO] Finding release for channel stable |
| | | [INFO] Using v1.20.5+k3s1 as release |
| | | [INFO] Downloading hash https://github.com/k3s- |
| | | io/k3s/releases/download/v1.20.5+k3s1/sha256sum- |
| | | arm.txt |
| | | [INFO] Downloading binary https://github.com/k3 |
| | | s-io/k3s/releases/download/v1.20.5+k3s1/k3s-armh |
| | | f |
| | | [INFO] Verifying binary download |
| | | [INFO] Installing k3s to /usr/local/bin/k3s |
| | | [INFO] Creating /usr/local/bin/kubectl symlink |
| | | to k3s |
| | | [INFO] Creating /usr/local/bin/crictl symlink |
| | | to k3s |
| | | [INFO] Creating /usr/local/bin/ctr symlink to |
| | | k3s |
| | | [INFO] Creating killall script |
| | | /usr/local/bin/k3s-killall.sh |
| | | [INFO] Creating uninstall script |
| | | /usr/local/bin/k3s-uninstall.sh |
| | | [INFO] env: Creating environment file |
| | | /etc/systemd/system/k3s.service.env |
| | | [INFO] systemd: Creating service file |
| | | /etc/systemd/system/k3s.service |
| | | [INFO] systemd: Enabling k3s unit |
| | | [INFO] systemd: Starting k3s |
+-------+---------+--------------------------------------------------+
To subsequently add this server as an agent to itself, you will need to run
you@your-laptop:~$ cms pi k3 install agent red05 red05
you@your-laptop:~$ cms pi k3 uninstall server red05
you@your-laptop:~$ cms pi k3 uninstall agent red06
This command runs the K3s provided k3s-kill-all.sh script that “cleans up containers, K3s directories, and networking components while also removing the iptables chain with all the associated rules. The cluster data will not be deleted.”
you@your-laptop:~$ cms pi k3 kill red,red0[1-3]
pi k3 kill red,red0[1-3]
INFO: Stopping k3s services and containers on ['red01', 'red02', 'red03']
+-------+---------+--------+
| host | success | stdout |
+-------+---------+--------+
| red01 | True | |
| red02 | True | |
| red03 | True | |
+-------+---------+--------+
INFO: Stopping k3s services and containers on red
+------+---------+--------+
| host | success | stdout |
+------+---------+--------+
| red | True | |
+------+---------+--------+
This command starts systemd the services k3s for the server and k3s-agent
for
the agents.
you@your-laptop:~$ cms pi k3 start cluster red,red0[1-3]
pi k3 start cluster red,red0[1-3]
INFO: Starting server on red
+------+---------+--------+
| host | success | stdout |
+------+---------+--------+
| red | True | |
+------+---------+--------+
INFO: Starting agent on ['red', 'red01', 'red02', 'red03']
+-------+---------+--------+
| host | success | stdout |
+-------+---------+--------+
| red | True | |
| red01 | True | |
| red02 | True | |
| red03 | True | |
+-------+---------+--------+
This command stops the systemd services k3s for the server and k3s-agent
for
the agents.
you@your-laptop:~$ cms pi k3 stop cluster red,red0[1-3]
pi k3 stop cluster red,red0[1-3]
INFO: Stopping server on red
+------+---------+--------+
| host | success | stdout |
+------+---------+--------+
| red | True | |
+------+---------+--------+
INFO: Stopping agent on ['red', 'red01', 'red02', 'red03']
+-------+---------+--------+
| host | success | stdout |
+-------+---------+--------+
| red | True | |
| red01 | True | |
| red02 | True | |
| red03 | True | |
+-------+---------+--------+
Let us remove red01 from the K3s cluster server red.
you@your-laptop:~$ cms pi k3 remove node red01 red
pi k3 remove node red01 red
INFO: Removing agents red01 from server red
INFO: Draining agent red01
+------+---------+---------------------+
| host | success | stdout |
+------+---------+---------------------+
| red | True | node/red01 cordoned |
| | | node/red01 drained |
+------+---------+---------------------+
INFO: Deleting agents red01
+------+---------+----------------------+
| host | success | stdout |
+------+---------+----------------------+
| red | True | node "red01" deleted |
+------+---------+----------------------+
On this page, we will deploy a Pipeline Anova SVM onto our openapi server, and subsequently train the model with data and make predictions from said data. All code needed for this is provided in the [cloudmesh-openapi](https://github. com/cloudmesh/cloudmesh-openapi) repository. The code is largely based on this sklearn example. It is supported on Raspberry Pi OS, Linux and Mac.
Learning Objectives
Topics covered
It is also assumed that the user has installed and has familiarity with the following:
python3 --version >= 3.8In this module, we focus on the following:
cms openapi for existing python codeWe describe the syntax for terminal commands used in this tutorial using the following example:
(TESTENV) ~ $ echo "hello"
Here, we are in the python virtual environment (TESTENV) in the home directory ~. The $ symbol denotes the beginning of the terminal command (ie. echo "hello"). When copying and pasting commands, do not include $ or anything before it.
It is best practice to create virtual environments when you do not envision needing a python package consistently. We also want to place all source code in a common directory called cm. Let us set up this create one for this tutorial.
On clusters created with cloudmesh-burn this virtual environment and cm
directory are already created and enabled by default, so you can skip to the pip installations
further below in this section if you do not want to isolate this in a
separate venv.
On your Linux/Mac, open a new terminal.
~ $ python3 -m venv ~/ENV3
The above will create a new python virtual environment. Activate it with the following.
~ $ source ~/ENV3/bin/activate
First, we update pip and verify your python and pip are correct
(ENV3) ~ $ which python
/Users/user/ENV3/bin/python
(ENV3) ~ $ which pip
/Users/user/ENV3/bin/pip
(ENV3) ~ $ pip install -U pip
Now we can use cloudmesh-installer to install the code in developer mode. This gives you access to the source code.
First, create a new directory for the cloudmesh code.
(ENV3) ~ $ mkdir ~/cm
(ENV3) ~ $ cd ~/cm
Next, we install cloudmesh-installer and use it to install cloudmesh openapi.
(ENV3) ~/cm $ pip install -U pip
(ENV3) ~/cm $ pip install cloudmesh-installer
(ENV3) ~/cm $ cloudmesh-installer get openapi
Finally, for this tutorial, we use sklearn. Install the needed packages as follows:
(ENV3) ~/cm $ pip install sklearn pandas
Let’s take a look at the python code we would like to make a REST service from. First, let’s navigate to the local openapi repository that was installed with cloudmesh-installer.
(ENV3) ~/cm $ cd cloudmesh-openapi
(ENV3) ~/cm/cloudmesh-openapi $ pwd
/Users/user/cm/cloudmesh-openapi
Let us take a look at the PipelineAnova SVM example code. The code can also be viewed here
A Pipeline is a pipeline of transformations to apply with a final estimator. Analysis of variance (ANOVA) is used for feature selection. A Support vector machine SVM is used as the actual learning model on the features.
Use your favorite editor to look at it (whether it be vscode, vim, nano, etc). We will use emacs
(ENV3) ~/cm/cloudmesh-openapi $ emacs ./tests/Scikitlearn-experimental/sklearn_svm.py
You may also look at the code here
The class within this file has two main methods to interact with (except for the file upload capability which is added at runtime)
@classmethod
def train(cls, filename: str) -> str:
"""
Given the filename of an uploaded file, train a PipelineAnovaSVM
model from the data. Assumption of data is the classifications
are in the last column of the data.
Returns the classification report of the test split
"""
# some code...
@classmethod
def make_prediction(cls, model_name: str, params: str):
"""
Make a prediction based on training configuration
"""
# some code...
Note the parameters that each of these methods takes in. These parameters are expected as part of the stateless request for each method.
Let us now use the python code from above to create the openapi YAML file that we will deploy onto our server. To correctly generate this file, use the following command:
(ENV3) ~/cm/cloudmesh-openapi $ cms openapi generate PipelineAnovaSVM \
--filename=./tests/Scikitlearn-experimental/sklearn_svm.py \
--import_class \
--enable_upload
Let us digest the options we have specified:
--filename indicates the path to the python file in which our code is located--import_class notifies cms openapi that the YAML file is generated
from a class. The name of this class is specified as PipelineAnovaSVM--enable_upload allows the user to upload files to be stored on the server for reference. This flag causes cms openapi to auto-generate a new python file with the upload method appended to the end of
the file. For this example, you will notice a new file has been added in the same directory as sklearn_svm.py. The file is aptly called: sklearn_svm_upload-enabled.pyIf Section 2 above was correctly, cms will have generated the corresponding openapi YAML file. Let us take a look at it.
(ENV3) ~/cm/cloudmesh-openapi $ emacs ./tests/Scikitlearn-experimental/sklearn_svm.yaml
You may also view the yaml file here
This YAML file has a lot of information to digest. The basic structure is documented here. However, it is not necessary to understand this information to deploy RESTful APIs.
However, take a look at paths: on line 9 in this file. Under this section, we have several different endpoints for our API listed. Notice the correlation between the endpoints and the python file we generated from.
Using the YAML file from Section 2, we can now start the server.
(ENV3) ~/cm/cloudmesh-openapi $ cms openapi server start ./tests/Scikitlearn-experimental/sklearn_svm.yaml
The server should now be active. Navigate to http://localhost:8080/cloudmesh/ui.
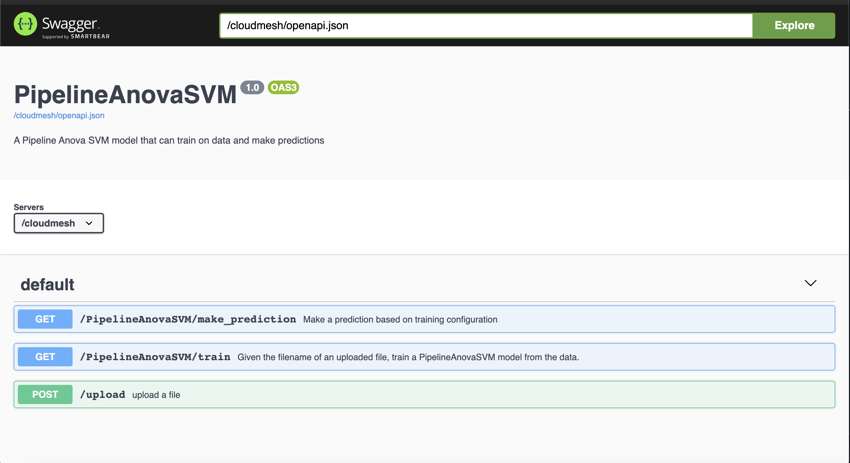
We now have a nice user inteface to interact with our newly generated
API. Let us upload the data set. We are going to use the iris data set in this example. We have provided it for you to use. Simply navigate to the /upload endpoint by clicking on it, then click Try it out.
We can now upload the file. Click on Choose File and upload the data set located at ~/cm/cloudmesh-openapi/tests/Scikitlearn-experimental/iris.data. Simply hit Execute after the file is uploaded. We should then get a 200 return code (telling us that everything went ok).
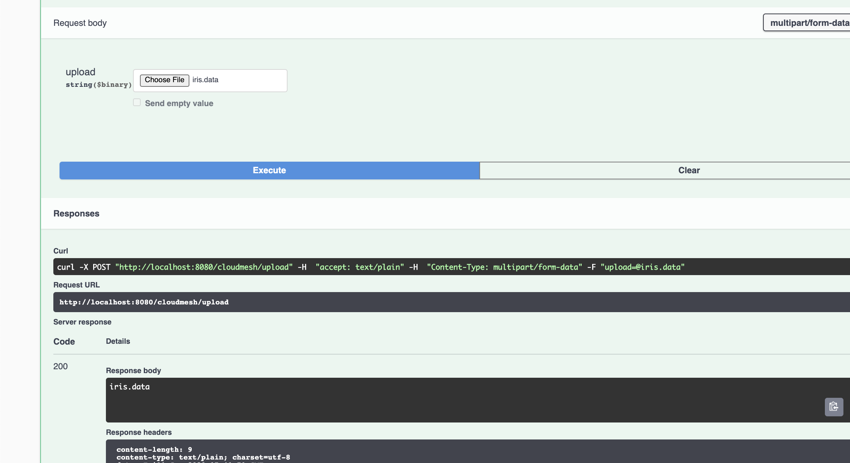
The server now has our dataset. Let us now navigate to the /train endpoint by, again, clicking on it. Similarly, click Try it out. The parameter being asked for is the filename. The filename we are interested in is iris.data. Then click execute. We should get another 200 return code with a Classification Report in the Response Body.
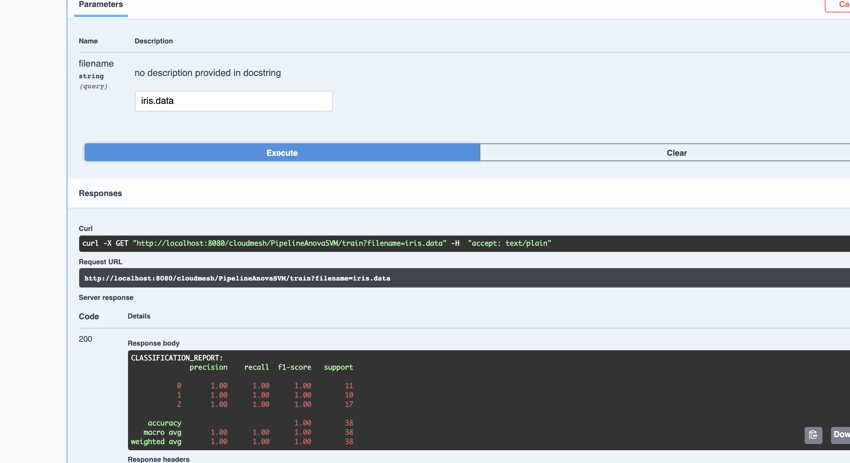
We now have a trained model on the iris data set. Let us now use it to make predictions. The model expects 4 attribute values: sepal length, seapl width, petal length, and petal width. Let us use the values 5.1, 3.5, 1.4, 0.2 as our attributes. The expected classification is Iris-setosa.
Navigate to the /make_prediction endpoint as we have with other endpoints. Again, let us Try it out. We need to provide the name of the model and the params (attribute values). For the model name, our model is aptly called iris (based on the name of the data set).
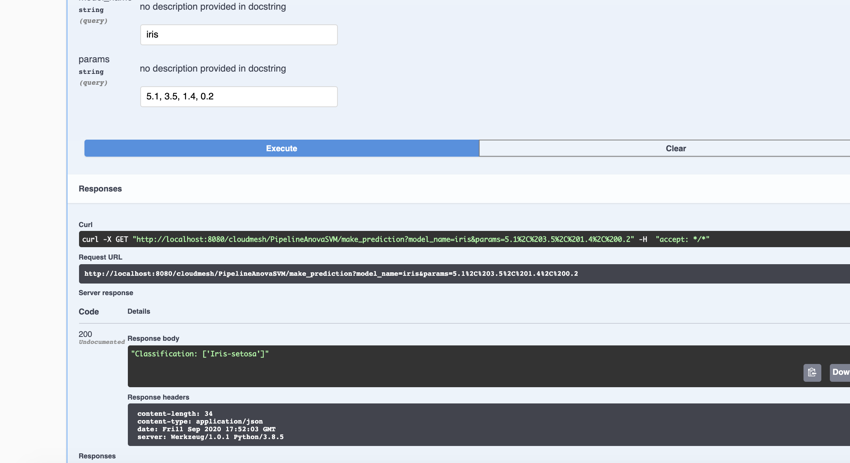
As expected, we have a classification of Iris-setosa.
At this point, we have created and trained a model using cms openapi. After satisfactory use, we can shut down the server. Let us check what we have running.
(ENV3) ~/cm/cloudmesh-openapi $ cms openapi server ps
openapi server ps
INFO: Running Cloudmesh OpenAPI Servers
+-------------+-------+--------------------------------------------------+
| name | pid | spec |
+-------------+-------+--------------------------------------------------+
| sklearn_svm | 94428 | ./tests/Scikitlearn- |
| | | experimental/sklearn_svm.yaml |
+-------------+-------+--------------------------------------------------+
We can stop the server with the following command:
(ENV3) ~/cm/cloudmesh-openapi $ cms openapi server stop sklearn_svm
We can verify the server is shut down by running the ps command again.
(ENV3) ~/cm/cloudmesh-openapi $ cms openapi server ps
openapi server ps
INFO: Running Cloudmesh OpenAPI Servers
None
After running this tutorial, you may uninstall all cloudmesh-related things as follows:
First, deactivate the virtual environment.
(ENV3) ~/cm/cloudmesh-openapi $ deactivate
~/cm/cloudmesh-openapi $ cd ~
Then, we remove the ~/cm directory.
~ $ rm -r -f ~/cm
We also remove the cloudmesh hidden files:
~ $ rm -r -f ~/.cloudmesh
Lastly, we delete our virtual environment.
~ $ rm -r -f ~/ENV3
Cloudmesh is now succesfully uninstalled.

In this tutorial, we explain how to easily set up a preconfigured cluster of Pis using RaspberryOS while only burning SD Cards. The cluster is ready to boot after all cards have been burned. No other configuration is needed.
Learning Objectives
Topics covered
With the release of Pi Imager 1.6, it is possible to configure a Raspberry Pi from any operating system while using RaspberryOS. While pi-imager only uses a limited number of parameters, our system adds network configurations to create a cluster including a simple network configuration. The system works while executing configurations automatically after the first boot.
Note: at this time we have not yet ported our system to Windows, but it is fairly easy to do so. If you like to help, please contact laszewski@gmail.com.
In addition to using RaspberryOS, we also have another tutorial that showcases how to use Ubuntu) as the operating system. Our tutorials are useful as typically many steps are involved to set up a cluster. This requires either the replication of time-consuming tasks that can be automated or the knowledge of DevOps frameworks.
We avoid this by simply burning a card for each of the PIs. No more hours wasted on setting up your initial cluster.
To facilitate this we developed a special command called cms burn, which allows us to create preconfigured cards with the necessary information. The features this command supports include:
We demonstrate the usage of the cms burn command by creating a cluster of
5 pis (1 manager, 4 workers) where we connect the manager to the internet
via Wifi and configure the workers to access the internet through the manager via
ethernet connection. This is useful for those with restricted internet access where devices must be registered
by MAC Address or through browser login.
python3 --version > 3.8For parts for different pi cluster configurations, please see lists please see our links on piplanet.org
In our tutorial we define the manager hostname to be red, while each
worker has a number in it red01, red02, red03, red04
The following image shows our cluster configuration:
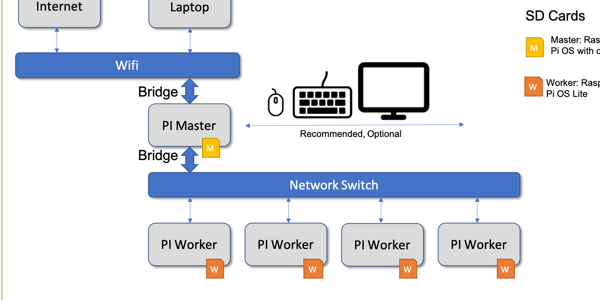
It is best practice to create virtual environments when you do not envision needing a python package consistently. We also want to
place all source code in a common directory called cm.
Let us set up this create one for this tutorial.
On your Linux/Mac, open a new terminal.
you@yourlaptop $ python3 -m venv ~/ENV3
This will create a new python virtual environment. Activate it with the following.
you@yourlaptop $ source ~/ENV3/bin/activate
First, we update pip and verify your python and pip are correct
(ENV3) you@yourlaptop $ pip install --upgrade pip
(ENV3) you@yourlaptop $ which python
~/ENV3/bin/python
(ENV3) you@yourlaptop $ which pip
~/ENV3/bin/pip
(ENV3) you@yourlaptop $ pip install cloudmesh-pi-cluster
If you are a developer that likes to add new features we recommend our source set up. We start after you have created the virtual env with the install of our convenient cloudmesh-installer and creating a directory called cm in which we download the sources
(ENV3) you@yourlaptop $ pip install cloudmesh-installer
(ENV3) you@yourlaptop $ mkdir ~/cm
(ENV3) you@yourlaptop $ cd ~/cm
(ENV3) you@yourlaptop $ cloudmesh-installer get pi
(ENV3) you@yourlaptop $ ls
This directory will now contain all source code. It will also have the needed installed cms command.
It is very important to initialize the cms command and test if it is properly installed. You do this simply with the command
(ENV3) you@yourlaptop $ cms help
You will see a list of subcommands that are part of the cms if your installation succeeded.
It is important that we can easily access the manager and worker nodes from the laptop/desktop. Hence we create a keypair in ~/.ssh. You can create one as follows by accepting the default location in ~/.ssh/id_rsa
(ENV3) you@yourlaptop $ ssh-keygen
Please use a unique and strong passphrase. We will use this default key to access our cluster after burning.
We are now ready to burn our cluster. Start by making sure you have the latest desired images to burn:
(ENV3) you@yourlaptop $ cms burn image versions --refresh
(ENV3) you@yourlaptop $ cms burn image get latest-lite
(ENV3) you@yourlaptop $ cms burn image get latest-full
Next, plug in your first SD Card into your card writer. Check your writer’s path with the following:
(ENV3) you@yourlaptop $ cms burn info
# ----------------------------------------------------------------------
# SD Cards Found
# ----------------------------------------------------------------------
+----------+------------------------+-------------+------------------+--------------+------------+---------+----------+-------------+-------------+
| Path | Info | Formatted | Size | Plugged-in | Readable | Empty | Access | Removable | Writeable |
|----------+------------------------+-------------+------------------+--------------+------------+---------+----------+-------------+-------------|
| /dev/sdb | Generic STORAGE DEVICE | True | 64.1 GB/59.7 GiB | True | True | False | True | True | True |
+----------+------------------------+-------------+------------------+--------------+------------+---------+----------+-------------+-------------+
Record the path for the SDCard. In this case, it is /dev/sdb
Note we omit some output of
cms burn infofor clarity. On MacOS, you may get anERROR: We could not find your USB reader in the list of known readers. This can be ignored. Additionally,cms burn infowill list the partitions as well. For example, if you see the path/dev/disk2s1and/dev/disk2s2, then your device is/dev/disk2.
This command will autodetect the SSID, locale, and country of your laptop.
We recommend not to use the password flags for the wifipassword and sudo
password as they will be stored in the command history and logs. When not
supplied as command line arguments, they will be asked for interactively.
The wifi setup will only be enabled on the manager (red). To burn the latest
32 bit OS use the following command. Otherwise, look at our subsequent note
for instructions to burn the latest 64 bit OS.
(ENV3) you@yourlaptop $ cms burn raspberry "red,red0[1-4]" --device=/dev/sdb -f
Note: the
-fflag instructscms burnto build a default cloudmesh inventory for the names provided. To see the contents of this file you can use the commandcms inventory list --inventory=inventory-red.yaml
Note: if you want to burn the 64 bit OS or a Legacy version of Raspberry OS use the following series of commands instead.This creates a default cluster configuration, and then changes the OS tag to
latest-lite-64. For the legacy version use thelatest-lite-legacytag orlatest-full legacytag. Currently (12/16/21) the legacy version is based on Debian Buster while the latest version is based on Debian Bullseye. The Raspberry Pi team released the legacy OS to solve compatibility issues that arose during ther upgrade to the Bullseye image. You must research to see which OS your application supports.cms burn image versions --refresh cms inventory add cluster "red,red0[1-4]" cms inventory set "red,red0[1-4]" tag to latest-lite-64 --inventory="inventory-red.yaml" cms burn raspberry "red,red0[1-4]" --device=/dev/sdb --inventory="inventory-red.yaml"
After each card is burned, cms burn raspberry will prompt you to swap the SD card to burn the next host.
After all the cards have been burned, we can now plug them in our raspberry pis and boot. Ensure that your workers and manager are connected to the same network switch via the ethernet cables. Ensure this network switch does not have internet access in itself, e.g. do not connect the switch to the internet router. We will use the manager as the sole point of internet access here. This we do deliberately to be able to disconnect all nodes from the network via the Master in case this is needed.
After you boot, we recommend waiting 2-3 minutes for the boot process to complete.
cms hostWhile we are waiting for the Pis to boot, we can set up proxy jump on our laptop/desktop while adding it to the ssh config file. This will make it easier to access our workers. Use the following command to set this up:
(ENV3) you@yourlaptop $ cms host config proxy pi@red.local "red0[1-4]"
It will do the appropriate modifications.
First verify that you can reach the manager (red).
(ENV3) you@yourlaptop $ ssh red
...
pi@red:~ $ exit
Note: If this does not work, it is likely that the wifi configuration was incorrect, or there is an RF block on the Pi that could not be removed due to an unknown locale of the burning machine. 2.4GHz wifi is more likely to work without explicit country configuration than 5 GHz bands.
We can use a simple cms command to verify connection to our Pis. For this purpose, we use our build in temperature command that reads the temperature values from each of the Pis.
(ENV3) you@yourlaptop $ cms pi temp "red,red0[1-4]"
pi temp red,red0[1-4]
+--------+--------+-------+----------------------------+
| host | cpu | gpu | date |
|--------+--------+-------+----------------------------|
| red | 47.712 | 47.2 | 2021-03-27 19:52:56.674668 |
| red01 | 37.485 | 37.4 | 2021-03-27 19:52:57.333300 |
| red02 | 38.946 | 38.9 | 2021-03-27 19:52:57.303389 |
| red03 | 38.946 | 39.4 | 2021-03-27 19:52:57.440690 |
| red04 | 38.936 | 39.4 | 2021-03-27 19:52:57.550690 |
+--------+--------+-------+----------------------------+
By receiving this information from our devices we have confirmed our access.
Each of the nodes only has our laptop’s ssh-key in its respective authorized_keys file. We can use the cms command to gather all keys in our cluster and then distribute them so that each node can ssh into each other.
We first create ssh-keys for all the nodes in our cluster.
(ENV3) you@yourlaptop $ cms host key create "red,red0[1-4]"
host key create red,red0[1-4]
+-------+---------+--------------------------------------------------+
| host  | success | stdout                                           |
+-------+---------+--------------------------------------------------+
| red   | True    | ssh-rsa AAAAB3NzaC1yc2EAAAADAQABAAABAQC99RR79UTQ |
|       |         | JznOPRN/FI6MqNsZ5Eirqs7JXA4UYfnMx8LVaD/ZcI6Sajr0 |
|       |         | 2nw2ucec8OMxtdzPrpWX5B+Hxz3GZWNKCbh2yHhMDIrf/Ohn |
|       |         | QGJrBx1mtAbqy4gd7qljEsL0FummdYmPdtHFBy7t2zkVp0J1 |
|       |         | V5YiLEbbrmX9RXQF1bJvHb4VNOOcwq47qX9h561q8qBxgQLz |
|       |         | F3iHmrMxmL8oma1RFVgZmjhnKMoXF+t13uZrf2R5/hVO4K6T |
|       |         | +PENSnjW7OX6aiIT8Ty1ga74FhXr9F5t14cofpN6QwuF2SqM |
|       |         | CgpVGfRSGMrLI/2pefszU2b5eeICWYePdopkslML+f+n     |
|       |         | pi@red                                           |
| red01 | True    | ssh-rsa AAAAB3NzaC1yc2EAAAADAQABAAABAQDRN/rGGF+e |
|       |         | dZ9S2IWX4P26F7T2H+nsbw7CfeJ6df9oX/npYuM9BPDzcEP7 |
|       |         | +2jNIZtZVehJj5zHiodjAspCxjg+mByQZye1jioa3MBmgO3j |
|       |         | VwxCOPA7x0Wc2Dm9/QOg1kMMMlnNT2NHs+SeQMDXoUkpaLCQ |
|       |         | 108VQxaTclJ67USC1e/9B7OtjhsVm5kGA7Eamyd5PgtANT7G |
|       |         | jHERXSnGzFnbqqsZEBvCLWLSbaSq3adWR1bVvDblu11nyitE |
|       |         | x7YKZA9RK0A7rTBzrZa70SfG65dSbpqQFxmQYSrgiwVSBokk |
|       |         | 0vvk5l7NhBDrrrxWYWd9dm/SrDrInjcuDsCsjOVuccx7     |
|       |         | pi@red01                                         |
... # Ommitted some output for brevity
+-------+---------+--------------------------------------------------+
We can subsequently gather these keys into a file.
(ENV3) you@yourlaptop $ cms host key gather "red,red0[1-4]" ~/.ssh/cluster_red_keys
And then Scatter them to the authorized_keys of our nodes.
(ENV3) you@yourlaptop $ cms host key scatter "red,red0[1-4]" ~/.ssh/cluster_red_keys
host key scatter red,red0[1-4] /Users/richie/.ssh/cluster_red_keys
+-------+---------+--------+
| host | success | stdout |
+-------+---------+--------+
| red | True | |
| red01 | True | |
| red02 | True | |
| red03 | True | |
| red04 | True | |
+-------+---------+--------+
All nodes should now have ssh access to each other.
We like to be able to login to each of the nodes in a convenient fashion, without needing to add the host to knownhosts. To do this we have developed a command that switches off StrictHostKeyChecking for all hosts. You invoke the command with
(ENV3) you@yourlaptop $ cms host key access red,red0[1-4]
You will see an output similar to
+-------+---------+--------+--------------------------------------------------+
| host  | success | stdout | stderr                                           |
+-------+---------+--------+--------------------------------------------------+
| red   | True    |        | b"Warning: Permanently added 'red.local'         |
|       |         |        | (...) to the list of known hosts.\r\n"           |
| red01 | True    |        | b"Warning: Permanently added 'red01' (...)       |
|       |         |        | to the list of known hosts.\r\n"                 |
| red02 | True    |        | b"Warning: Permanently added 'red02' (...)       |
|       |         |        | to the list of known hosts.\r\n"                 |
| red03 | True    |        | b"Warning: Permanently added 'red03' (...)       |
|       |         |        | to the list of known hosts.\r\n"                 |
| red04 | True    |        | b"Warning: Permanently added 'red04' (...)       |
|       |         |        | to the list of known hosts.\r\n"                 |
+-------+---------+--------+--------------------------------------------------+
In order for you to be able to successfully disable StrictHostKeyChecking, you can pass along filename that includes a customization. Here is an example on how to disable StrictHostKeyChecking on the subnet 10.1.1.1 We assume you have the following in the file subnet.conf:
Host 10.1.1.*
    StrictHostKeyChecking no
Now you can invoke the command with:
(ENV3) you@yourlaptop $ cms host key access red,red0[1-4] subnet.conf
cms on a PiSome cloudmesh commands offered can be very useful on the Pis. You can install cms on all Pis in this fashion, but
we will only demonstrate this for the manager pi.
For the production version pleas use
(ENV3) you@yourlaptop $ ssh red
pi@red $ curl -Ls http://cloudmesh.github.io/get/pi | sh -
However, to get the newest development version please use
(ENV3) you@yourlaptop $ ssh red
pi@red $ curl -Ls https://raw.githubusercontent.com/cloudmesh/get/main/pi/index.html | sh -
This will not only install cms, but will also upgrade your system, install the dependencies for cms, and create a
virtual environment. Because a system upgrade takes place, this command may take several minutes to run.
After a reboot, we can verify the success of the script with the following:
(ENV3) pi@red $ cms help
help
Documented commands (type help <topic>):
========================================
EOF     check     default  help       pause     quit   start      test
admin   clear     diagram  host       pi        set    stop       var
banner  commands  dryrun   info       provider  shell  stopwatch  version
bridge  config    echo     inventory  py        sleep  sys
burn    debug     gui      man        q         ssh    term
Cloudmesh has a simple system for managing cluster configurations as an inventory.
We do this management for you, but you can control it also from the command line.
We can first add a manager with cluster subnet IP 10.1.1.1. We also add the bridge service which is
recognized by cms as the Wifi bridge service connecting devices on eth0 to the internet.
We also set the timezone and locale here. You may want to change them as you wish.
As we want to make the cluster very easy to create we demonstrated in Section 5 how to create a default cluster directly from the burn command. As a future feature, this behavior will also be implemented into the inventory command. To make a default inventory named inventory-red.yaml:
you@yourlaptop $ cms inventory add cluster "red,red[01-04]"
This command will find your current WiFi SSID, your current locale and set up a simple network as depicted in Figure 1 on your cluster. In case you have more or fewer nodes, the command will make appropriate updates.
For a custom cluster, you can inspect the parameters of the inventory command. Here are the commands to use for the previous setup while writing them out. You can modify the parameters to your liking:
you@yourlaptop $ cms inventory add red --service=manager --ip=10.1.1.1 --tag="latest-lite" --timezone="America/Indiana/Indianapolis" --locale="us" --inventory="inventory-red.yaml"
you@yourlaptop $ cms inventory set red services to "bridge,wifi" --listvalue --inventory="inventory-red.yaml"
We can then add the workers
you@yourlaptop $ cms inventory add "red0[1-4]" --service=worker --ip="10.1.1.[2-5]" --router=10.1.1.1 --tag="latest-lite"  --timezone="America/Indiana/Indianapolis" --locale="us" --inventory="inventory-red.yaml"
you@yourlaptop $ cms inventory set "red0[1-4]" dns to "8.8.8.8,8.8.4.4" --listvalue --inventory="inventory-red.yaml"
Note we are using Google’s DNS here [8.8.8.8, 8.8.4.4]
Our cluster configuration is now complete. You may run the following to list your configuration. We include ours for a sanity check:
you@yourlaptop $ cms inventory list --inventory="inventory-red.yaml"
+-------+-------------+---------+---------+--------------------+----------+------------------------+----------+--------+------------------------------+--------+---------+-------------+-------------------+
| host  | tag         | cluster | service | services           | ip       | dns                    | router   | locale | timezone                     | owners | comment | description | keyfile           |
+-------+-------------+---------+---------+--------------------+----------+------------------------+----------+--------+------------------------------+--------+---------+-------------+-------------------+
| red   | latest-lite |         | manager | ['bridge', 'wifi'] | 10.1.1.1 |                        |          | us     | America/Indiana/Indianapolis |        |         |             | ~/.ssh/id_rsa.pub |
| red01 | latest-lite |         | worker  |                    | 10.1.1.2 | ['8.8.8.8', '8.8.4.4'] | 10.1.1.1 | us     | America/Indiana/Indianapolis |        |         |             | ~/.ssh/id_rsa.pub |
| red02 | latest-lite |         | worker  |                    | 10.1.1.3 | ['8.8.8.8', '8.8.4.4'] | 10.1.1.1 | us     | America/Indiana/Indianapolis |        |         |             | ~/.ssh/id_rsa.pub |
| red03 | latest-lite |         | worker  |                    | 10.1.1.4 | ['8.8.8.8', '8.8.4.4'] | 10.1.1.1 | us     | America/Indiana/Indianapolis |        |         |             | ~/.ssh/id_rsa.pub |
| red04 | latest-lite |         | worker  |                    | 10.1.1.5 | ['8.8.8.8', '8.8.4.4'] | 10.1.1.1 | us     | America/Indiana/Indianapolis |        |         |             | ~/.ssh/id_rsa.pub |
+-------+-------------+---------+---------+--------------------+----------+------------------------+----------+--------+------------------------------+--------+---------+-------------+-------------------+
You can now specify your inventory as you burn your cluster or specific machines from the cluster with the burn command. All hosts data found in the inventory will be written to the machines, regardless if they are in the burn command or not.
Burn the whole cluster.
(ENV3) you@yourlaptop $ cms burn raspberry "red,red0[1-4]" --device=/dev/sdb
--inventory="inventory-red.yaml"
Burn a specific machine.
(ENV3) you@yourlaptop $ cms burn raspberry "red03" --device=/dev/sdb --inventory="inventory-red.yaml"

In this tutorial, we explain how to easily set up a cluster of Pis with pre-configured Ubuntu cards initialized with custom cloud-init configurations.
Learning Objectives
Topics covered
Cloud-init provides powerful tools for configuring an Ubuntu Server. It allows users to configure network information, add authorized keys, run commands on boot, and other useful tasks to set up the operating system. While cloud-init is a very powerful tool, it requires knowledge to use it properly and therefore has a high learning curve when it comes to cluster-specific tasks such as using user data and network configurations to get a cluster operational.
For this reason, we provide a simple set of commands to not only burn SD Cards with ubuntu server but to augment them with configurations for cloud-init to set up a cluster correctly.
In this tutorial, we will burn a cluster of Raspberry Pis with Ubuntu Server per a user-friendly configuration. This cluster will have wifi access from the manager, and the manager will act as a router for the workers (in that all internet traffic is routed through the manager). This type of setup is useful for those with restricted internet access (no access to modem), especially those that are required to register the MAC addresses of their devices. With a cluster of 10 or more nodes, this can be quite tedious to do.
python3 --version > 3.8In our tutorial we define the manager hostname to be red, while each
worker has a number in it red01, red02, red03, red04
The following image shows our cluster configuration:

It is best practice to create virtual environments when you do not envision needing a python package consistently. We also want to
place all source code in a common directory called cm.
Let us set up this create one for this tutorial.
On your Linux/Mac, open a new terminal.
you@yourlaptop $ python3 -m venv ~/ENV3
The above will create a new python virtual environment. Activate it with the following.
you@yourlaptop $ source ~/ENV3/bin/activate
First, we update pip and verify your python and pip are correct
(ENV3) you@yourlaptop $ pip install --upgrade pip
(ENV3) you@yourlaptop $ which python
~/ENV3/bin/python

(ENV3) you@yourlaptop $ which pip
~/ENV3/bin/pip
(ENV3) you@yourlaptop $ pip install cloudmesh-pi-cluster
If you are a developer that likes to add new features we recommend our source set up. We start after you have created the virtual env with the install of our convenient cloudmesh-installer and creating a directory called cm in which we download the sources
(ENV3) you@yourlaptop $ pip install cloudmesh-installer
(ENV3) you@yourlaptop $ mkdir ~/cm
(ENV3) you@yourlaptop $ cd ~/cm
(ENV3) you@yourlaptop $ cloudmesh-installer get pi
(ENV3) you@yourlaptop $ ls
This directory will now contain all source code. It will also have the needed installed cms command.
It is very important to initialize the cms command and test if it is properly installed. You do this simply with the command
(ENV3) you@yourlaptop $ cms help
You will see a list of subcommands that are part of the cms if your installation succeeded.
It is important that we can easily access the manager and worker nodes from the laptop/desktop. Hence we create a keypair in ~/.ssh. You can create one as follows by accepting the default location in ~/.ssh/id_rsa
(ENV3) you@yourlaptop $ ssh-keygen
Please use a unique and strong passphrase. We will use this default key to access our cluster after burning.
We are now ready to burn our cluster. Start by plugging in your first SD Card into your card writer. Check your writer’s path with the following:
(ENV3) you@yourlaptop $ cms burn info
# ----------------------------------------------------------------------
# SD Cards Found
# ----------------------------------------------------------------------

+----------+------------------------+-------------+------------------+--------------+------------+---------+----------+-------------+-------------+
| Path     | Info                   | Formatted   | Size             | Plugged-in   | Readable   | Empty   | Access   | Removable   | Writeable   |
|----------+------------------------+-------------+------------------+--------------+------------+---------+----------+-------------+-------------|
| /dev/sdb | Generic STORAGE DEVICE | True        | 64.1 GB/59.7 GiB | True         | True       | False   | True     | True        | True        |
+----------+------------------------+-------------+------------------+--------------+------------+---------+----------+-------------+-------------+
Record the path for the SDCard. In this case, it is /dev/sdb
Note we omit some output of
cms burn infofor clarity. On MacOS, you may get anERROR: We could not find your USB reader in the list of known readers. This can be ignored. Additionally,cms burn infowill list the partitions as well. For example, if you see the path/dev/disk2s1and/dev/disk2s2, then your device is/dev/disk2.
This command will autodetect the SSID, locale, and country of your laptop.
We recommend not to use the password flags for the wifipassword and sudo
password as they will be stored in the command history and logs. When not
supplied as command line arguments, they will be asked for interactively.
The wifi setup will only be enabled on the manager (red).
(ENV3) you@yourlaptop $ cms burn ubuntu "red,red0[1-4]" --device=/dev/sdb -f
Note the
-fflag instructscms burnto build a default cloudmesh inventory for the names provided. To see the contents of this file you can use the commandcms inventory list --inventory=inventory-red.yaml
After each card is burned, cms burn ubuntu will prompt you to swap the SD
card to burn the next host.
After all the cards have been burned, we can now plug them in our raspberry pis and boot. Ensure that your workers and manager are connected to the same network switch via the ethernet cables. Ensure this network switch does not have internet access in itself, e.g. do not connect the switch to the internet router. We will use the manager as the sole point of internet access here. This we do deliberately to be able to disconnect all nodes from the network via the Master in case this is needed.
After you boot, we recommend waiting 2-3 minutes for the boot process to complete.
cms hostWhile we are waiting for the Pis to boot, we can set up proxy jump on our laptop/desktop while adding it to the ssh config file. This will make it easier to access our workers. Use the following command to set this up:
(ENV3) you@yourlaptop $ cms host config proxy ubuntu@red.local "red0[1-4]"
It will do the appropriate modifications.
First verify that you can reach the manager (red).
(ENV3) you@yourlaptop $ ssh red
...
pi@red:~ $ exit
Note: If this does not work, it is likely that the wifi configuration was incorrect, or there is an RF block on the Pi that could not be removed due to an unknown locale of the burning machine. 2.4GHz wifi is more likely to work without explicit country configuration than 5 GHz bands.
We can use a simple cms commands to verify connection to our Pis. First we
reboot the cluster to activate the libraspberrypi-bin tools that were
installed on the first boot.
(ENV3) you@yourlaptop $ cms host reboot "red,red0[1-4]"
host reboot red,rede0[1-4]
INFO: Executing `sudo reboot` for ['red01', 'red02', 'red03', 'red04']
INFO: Executing `sudo reboot` for red
Wait for the reboot to complete. Then we use our built in temperature command that reads the temperature values from each of the Pis.
(ENV3) you@yourlaptop $ cms pi temp "red,red0[1-4]"
pi temp red,red0[1-4]
+--------+--------+-------+----------------------------+
| host   |    cpu |   gpu | date                       |
|--------+--------+-------+----------------------------|
| red    | 47.712 |  47.2 | 2021-03-27 19:52:56.674668 |
| red01  | 37.485 |  37.4 | 2021-03-27 19:52:57.333300 |
| red02  | 38.946 |  38.9 | 2021-03-27 19:52:57.303389 |
| red03  | 38.946 |  39.4 | 2021-03-27 19:52:57.440690 |
| red04  | 38.936 |  39.4 | 2021-03-27 19:52:57.550690 |
+--------+--------+-------+----------------------------+
By receiving this information from our devices we have confirmed our access.
Each of the nodes only has our laptop’s ssh-key in its respective authorized_keys file. We can use the cms command to gather all keys in our cluster and then distribute them so that each node can ssh into each other.
We first create ssh-keys for all the nodes in our cluster.
(ENV3) you@yourlaptop $ cms host key create "red,red0[1-4]"
host key create red,red0[1-4]
+-------+---------+--------------------------------------------------+
| host | success | stdout |
+-------+---------+--------------------------------------------------+
| red | True | ssh-rsa AAAAB3NzaC1yc2EAAAADAQABAAABAQC99RR79UTQ |
| | | JznOPRN/FI6MqNsZ5Eirqs7JXA4UYfnMx8LVaD/ZcI6Sajr0 |
| | | 2nw2ucec8OMxtdzPrpWX5B+Hxz3GZWNKCbh2yHhMDIrf/Ohn |
| | | QGJrBx1mtAbqy4gd7qljEsL0FummdYmPdtHFBy7t2zkVp0J1 |
| | | V5YiLEbbrmX9RXQF1bJvHb4VNOOcwq47qX9h561q8qBxgQLz |
| | | F3iHmrMxmL8oma1RFVgZmjhnKMoXF+t13uZrf2R5/hVO4K6T |
| | | +PENSnjW7OX6aiIT8Ty1ga74FhXr9F5t14cofpN6QwuF2SqM |
| | | CgpVGfRSGMrLI/2pefszU2b5eeICWYePdopkslML+f+n |
| | | ubuntu@red |
| red01 | True | ssh-rsa AAAAB3NzaC1yc2EAAAADAQABAAABAQDRN/rGGF+e |
| | | dZ9S2IWX4P26F7T2H+nsbw7CfeJ6df9oX/npYuM9BPDzcEP7 |
| | | +2jNIZtZVehJj5zHiodjAspCxjg+mByQZye1jioa3MBmgO3j |
| | | VwxCOPA7x0Wc2Dm9/QOg1kMMMlnNT2NHs+SeQMDXoUkpaLCQ |
| | | 108VQxaTclJ67USC1e/9B7OtjhsVm5kGA7Eamyd5PgtANT7G |
| | | jHERXSnGzFnbqqsZEBvCLWLSbaSq3adWR1bVvDblu11nyitE |
| | | x7YKZA9RK0A7rTBzrZa70SfG65dSbpqQFxmQYSrgiwVSBokk |
| | | 0vvk5l7NhBDrrrxWYWd9dm/SrDrInjcuDsCsjOVuccx7 |
| | | ubuntu@red01 |
... # Ommitted some output for brevity
+-------+---------+--------------------------------------------------+
We can subsequently gather these keys into a file.
(ENV3) you@yourlaptop $ cms host key gather "red,red0[1-4]" ~/.ssh/cluster_red_keys
And then Scatter them to the authorized_keys of our nodes.
(ENV3) you@yourlaptop $ cms host key scatter "red,red0[1-4]" ~/.ssh/cluster_red_keys
host key scatter red,red0[1-4] /Users/richie/.ssh/cluster_red_keys
+-------+---------+--------+
| host  | success | stdout |
+-------+---------+--------+
| red   | True    |        |
| red01 | True    |        |
| red02 | True    |        |
| red03 | True    |        |
| red04 | True    |        |
+-------+---------+--------+
All nodes should now have ssh access to each other.
cms on a PiSome cloudmesh commands offered can be very useful on the Pis. You can install cms on all Pis in this fashion, but
we will only demonstrate this for the manager pi.
For the production version pleas use
(ENV3) you@yourlaptop $ ssh red
pi@red $ curl -Ls http://cloudmesh.github.io/get/pi | sh -
However, to get the newest development version please use
(ENV3) you@yourlaptop $ ssh red
pi@red $ curl -Ls https://raw.githubusercontent.com/cloudmesh/get/main/pi/index.html | sh -
This will not only install cms, but will also upgrade your system, install the dependencies for cms, and create a
virtual environment. Because a system upgrade takes place, this command may take several minutes to run.
After a reboot, we can verify the success of the script with the following:
(ENV3) pi@red $ cms help
help

Documented commands (type help <topic>):
========================================
EOF     check     default  help       pause     quit   start      test
admin   clear     diagram  host       pi        set    stop       var
banner  commands  dryrun   info       provider  shell  stopwatch  version
bridge  config    echo     inventory  py        sleep  sys
burn    debug     gui      man        q         ssh    term
Cloudmesh has a simple system for managing cluster configurations as an inventory.
We do this management for you, but you can control it also from the command line.
We can first add a manager with cluster subnet IP 10.1.1.1. We also add the bridge service which is
recognized by cms as the Wifi bridge service connecting devices on eth0 to the internet.
We also set the timezone and locale here. You may want to change them as you wish.
As we want to make the cluster very easy to create we demonstrated in Section 5 how to create a default cluster directly from the burn command. As a future feature, this behavior will also be implemented into the inventory command. To make a default inventory named inventory-red.yaml:
you@yourlaptop $ cms inventory add cluster "red,red[01-04]"
This command will find your current WiFi SSID, your current locale and set up a simple network as depicted in Figure 1 on your cluster. In case you have more or fewer nodes, the command will make appropriate updates.
For a custom cluster, you can inspect the parameters of the inventory command. Here are the commands to use for the previous setup while writing them out. You can modify the parameters to your liking:
you@yourlaptop $ cms inventory add red --service=manager --ip=10.1.1.1 --tag="ubuntu-20.10-64-bit" --timezone="America/Indiana/Indianapolis" --locale="us" --inventory="inventory-red.yaml"
you@yourlaptop $ cms inventory set red services to "bridge,wifi" --listvalue --inventory="inventory-red.yaml"
We can then add the workers
you@yourlaptop $ cms inventory add "red0[1-4]" --service=worker --ip="10.1.1.[2-5]" --router=10.1.1.1 --tag="ubuntu-20.10-64-bit" --timezone="America/Indiana/Indianapolis" --locale="us" --inventory="inventory-red.yaml"
you@yourlaptop $ cms inventory set "red0[1-4]" dns to "8.8.8.8,8.8.4.4" --listvalue --inventory="inventory-red.yaml"
Note we are using Google’s DNS here [8.8.8.8, 8.8.4.4]
Our cluster configuration is now complete. You may run the following to list your configuration. We include ours for a sanity check:
you@yourlaptop $ cms inventory list --inventory="inventory-red.yaml"
+-------+---------------------+---------+---------+--------------------+----------+------------------------+----------+--------+------------------------------+--------+---------+-------------+-------------------+
| host | tag | cluster | service | services | ip | dns | router | locale | timezone | owners | comment | description | keyfile |
+-------+---------------------+---------+---------+--------------------+----------+------------------------+----------+--------+------------------------------+--------+---------+-------------+-------------------+
| red | ubuntu-20.10-64-bit | | manager | ['bridge', 'wifi'] | 10.1.1.1 | | | us | America/Indiana/Indianapolis | | | | ~/.ssh/id_rsa.pub |
| red01 | ubuntu-20.10-64-bit | | worker | | 10.1.1.2 | ['8.8.8.8', '8.8.4.4'] | 10.1.1.1 | us | America/Indiana/Indianapolis | | | | ~/.ssh/id_rsa.pub |
| red02 | ubuntu-20.10-64-bit | | worker | | 10.1.1.3 | ['8.8.8.8', '8.8.4.4'] | 10.1.1.1 | us | America/Indiana/Indianapolis | | | | ~/.ssh/id_rsa.pub |
| red03 | ubuntu-20.10-64-bit | | worker | | 10.1.1.4 | ['8.8.8.8', '8.8.4.4'] | 10.1.1.1 | us | America/Indiana/Indianapolis | | | | ~/.ssh/id_rsa.pub |
| red04 | ubuntu-20.10-64-bit | | worker | | 10.1.1.5 | ['8.8.8.8', '8.8.4.4'] | 10.1.1.1 | us | America/Indiana/Indianapolis | | | | ~/.ssh/id_rsa.pub |
+-------+---------------------+---------+---------+--------------------+----------+------------------------+----------+--------+------------------------------+--------+---------+-------------+-------------------+
You can now specify your inventory as you burn your cluster or specific machines from the cluster with the burn command. All hosts data found in the inventory will be written to the machines, regardless if they are in the burn command or not.
Burn the whole cluster.
(ENV3) you@yourlaptop $ cms burn ubuntu "red,red0[1-4]" --device=/dev/sdb --inventory="inventory-red.yaml"
Burn a specific machine.
(ENV3) you@yourlaptop $ cms burn ubuntu "red03" --device=/dev/sdb --inventory="inventory-red.yaml"

In this tutorial, we explain how to easily set up a preconfigured cluster of Pis using RaspberryOS or Ubuntu while only burning SD Cards. The cluster is ready to boot after all cards have been burned. No other configuration is needed.
Learning Objectives
Topics covered
With the release of Pi Imager 1.6, it is possible to configure a Raspberry Pi from any operating system while using RaspberryOS. While pi-imager only uses a limited number of parameters, our system supports both RaspberryOS and Ubunty, and adds network configurations to create a cluster with a simple network configuration. The system works while executing configurations automatically after the first boot.
Note: at this time we have not yet ported our system to Windows, but it is fairly easy to do so. If you like to help, please contact laszewski@gmail.com.
In addition to using the GUI, we have additional command line tutorials for RaspberryOS, and Ubuntu that provide additional flexibility. Our tutorials are useful as typically many steps are involved to set up a cluster. This requires either the replication of time-consuming tasks that can be automated or the knowledge of DevOps frameworks.
We avoid this by simply burning a card for each of the PIs. No more hours wasted on setting up your initial cluster.
To facilitate this we developed a special command called cms burn gui, which
allows us to create preconfigured cards with the necessary information. The features this command supports include:
We demonstrate the usage of the cms burn gui command by creating a cluster of
4 pis (1 manager, 3 workers) where we
connect the manager to the internet via Wifi and configure the workers to access the internet through the manager via
ethernet connection. This is useful for those with restricted internet access where devices must be registered
by MAC Address or through browser login.
python3 --version > 3.8For parts for different pi cluster configurations, please see lists please see our links on piplanet.org
In our tutorial we define the manager hostname to be red, while each
worker has a number in it red01, red02, red03, red04
The following image shows our cluster configuration:
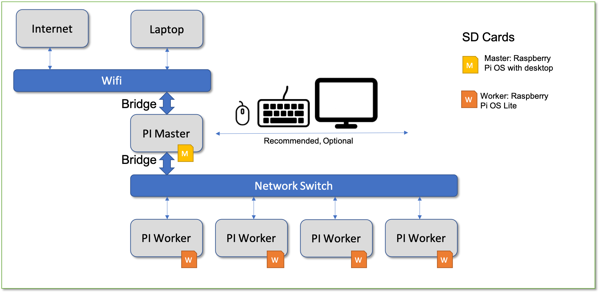
It is best practice to create virtual environments when you do not envision needing a python package consistently. We also want to
place all source code in a common directory called cm.
Let us set up this create one for this tutorial.
On your Linux/Mac, open a new terminal.
you@yourlaptop $ python3 -m venv ~/ENV3
The above will create a new python virtual environment. Activate it with the following.
you@yourlaptop $ source ~/ENV3/bin/activate
First, we update pip and verify your python and pip are correct
(ENV3) you@yourlaptop $ pip install --upgrade pip
(ENV3) you@yourlaptop $ which python
~/ENV3/bin/python

(ENV3) you@yourlaptop $ which pip
~/ENV3/bin/pip
(ENV3) you@yourlaptop $ pip install cloudmesh-pi-cluster
If you are a developer that likes to add new features we recommend our source set up. We start after you have created the virtual env with the install of our convenient cloudmesh-installer and creating a directory called cm in which we download the sources
(ENV3) you@yourlaptop $ pip install cloudmesh-installer
(ENV3) you@yourlaptop $ mkdir ~/cm
(ENV3) you@yourlaptop $ cd ~/cm
(ENV3) you@yourlaptop $ cloudmesh-installer get pi
(ENV3) you@yourlaptop $ ls
This directory will now contain all source code. It will also have the needed installed cms command.
It is very important to initialize the cms command and test if it is properly installed. You do this simply with the command
(ENV3) you@yourlaptop $ cms help
You will see a list of subcommands that are part of the cms if your installation succeeded.
It is important that we can easily access the manager and worker nodes from the laptop/desktop. Hence we create a keypair in ~/.ssh. You can create one as follows by accepting the default location in ~/.ssh/id_rsa
(ENV3) you@yourlaptop $ ssh-keygen
Please use a unique and strong passphrase. We will use this default key to access our cluster after burning.
We are now ready to burn our cluster. Start by plugging in your first SD
Card into your card writer. Then run the following command, where the
–hostname includes the names of the devices to be burned. You will be asked
to input your sudo password which is needed to burn the sd cards. After
entering the password a simple GUI will appear.
(ENV3) you@yourlaptop $ cms burn gui --hostname=red,red0[1-4]
# ----------------------------------------------------------------------
# _____ _
# | __ \ | |
# | |__) |_ _ _ __ __ _ _ __ ___ ___| |_ ___ _ __ ___
# | ___/ _` | '__/ _` | '_ ` _ \ / _ \ __/ _ \ '__/ __|
# | | | (_| | | | (_| | | | | | | __/ || __/ | \__ \
# |_| \__,_|_| \__,_|_| |_| |_|\___|\__\___|_| |___/
#
#
# ----------------------------------------------------------------------
Manager: red
Workers: ['red01', 'red02', 'red03', 'red04']
IPS: ['10.1.1.1', '10.1.1.2', '10.1.1.3', '10.1.1.4', '10.1.1.5']
Key: /home/anthony/.ssh/id_rsa.pub
Dryrun: False
sudo password:
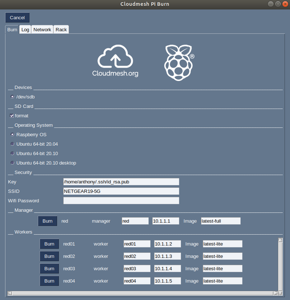
Ensure the appropriate device is selected so you do not accidentally burn to the wrong storage device. It is best to only have one attached storage device to prevent mistakes.
Next, select the OS that you would like to burn to the SD cards. Selecting the radio button will automatically update the image field for each machine. RaspberryOS supports two tags, latest-full (a desktop environment that takes more storage space) and latest-lite (smaller image with no desktop). Ubuntu only has one tag per distribution type.
If you want to further customize your image selction, you can input any tag from
cms burn image versions --refresh.
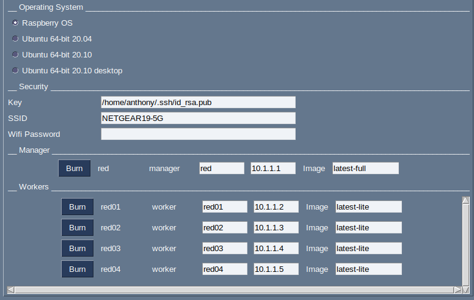
Next, verify the path to the SSH key that will be written to all hosts authorized_keys file. Verify the SSID (this will be prepopulated with your machines current wifi network if one exists), and enter the wifi password.

We are now ready to burn.
Note: you can further customize image tags and IP addresses.
Burn the manager device by pressing the Burn button next to the machine red.
In the command line prompt you will see the inventory created for the
cluster, the underlying burn command, OS image download progress, and finally
you will be asked to verify that the sd card is inserted.
# ----------------------------------------------------------------------
# _____ _ _ _
# | __ \ | | | (_)
# | | | | _____ ___ __ | | ___ __ _ __| |_ _ __ __ _
# | | | |/ _ \ \ /\ / / '_ \| |/ _ \ / _` |/ _` | | '_ \ / _` |
# | |__| | (_) \ V V /| | | | | (_) | (_| | (_| | | | | | (_| |
# |_____/ \___/ \_/\_/ |_| |_|_|\___/ \__,_|\__,_|_|_| |_|\__, |
# __/ |
# |___/
# _____
# |_ _|
# | | _ __ ___ __ _ __ _ ___ ___
# | | | '_ ` _ \ / _` |/ _` |/ _ \/ __|
# _| |_| | | | | | (_| | (_| | __/\__ \
# |_____|_| |_| |_|\__,_|\__, |\___||___/
# __/ |
# |___/
# ----------------------------------------------------------------------
INFO: Attempting to download latest-lite
Downloading 2021-03-04-raspios-buster-armhf-lite.zip
...
INFO: Verifying sha1
INFO: Verifying sha256
SHA1 is ok
SHA256 is ok
Extracting 2021-03-04-raspios-buster-armhf-lite.img
INFO: Attempting to download latest-full
Downloading 2021-03-04-raspios-buster-armhf-full.zip
...
INFO: Verifying sha1
INFO: Verifying sha256
SHA1 is ok
SHA256 is ok
Extracting 2021-03-04-raspios-buster-armhf-full.img
Is the card to be burned for red inserted? (Y/n) y
The Burn button will turn grey while the burn is in progress.
And the Burn button will turn green once the burn has completed. It is
best to check the command line output to verify there were no unhandled
errors. If an error occurred, you can first try to re-burn before further
troubleshooting.

Continue to burn the workers 1 by 1, remembering to answer the “card inserted?” prompt on the commandline, until you have completed burning all SD cards.
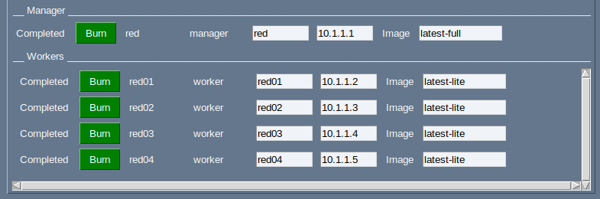
Note: You can view a network diagram and rack diagram on the respective tabs.
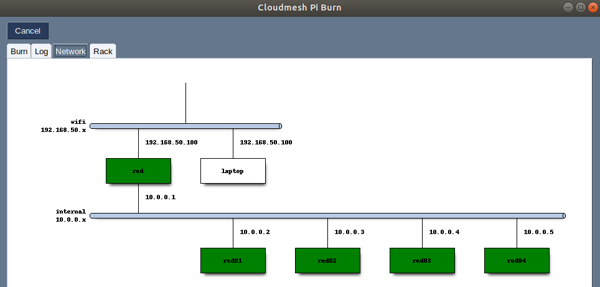
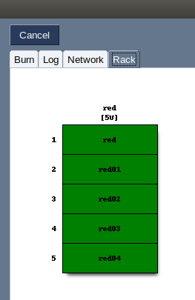
Now, plug in the SD cards and boot the cluster.
After you boot, we recommend waiting 2-3 minutes for the boot process to complete.
cms hostWhile we are waiting for the Pis to boot, we can set up proxy jump on our laptop/desktop while adding it to the ssh config file. This will make it easier to access our workers. Use the following command to set this up:
(ENV3) you@yourlaptop $ cms host config proxy pi@red.local "red0[1-4]"
It will do the appropriate modifications.
First verify that you can reach the manager (red).
(ENV3) you@yourlaptop $ ssh red
...
pi@red:~ $ exit
Note: If this does not work, it is likely that the wifi configuration was incorrect, or there is an RF block on the Pi that could not be removed due to an unknown locale of the burning machine. 2.4GHz wifi is more likely to work without explicit country configuration than 5 GHz bands.
Now we can use a simple cms command to verify connection to our Pis. For this
purpose, we use our build in temperature command that reads the temperature values from each of the Pis.
(ENV3) you@yourlaptop $ cms pi temp "red,red0[1-4]"
pi temp red,red0[1-4]
+--------+--------+-------+----------------------------+
| host | cpu | gpu | date |
|--------+--------+-------+----------------------------|
| red | 52.095 | 52.5 | 2021-03-29 16:24:29.375779 |
| red01 | 51.608 | 51.6 | 2021-03-29 16:24:29.775136 |
| red02 | 54.53 | 54.5 | 2021-03-29 16:24:29.735953 |
| red03 | 55.504 | 55.5 | 2021-03-29 16:24:30.375218 |
| red04 | 50.147 | 50.6 | 2021-03-29 16:24:30.949371 |
+--------+--------+-------+----------------------------+
By receiving this information from our devices we have confirmed our access.
Each of the nodes only has our laptop’s ssh-key in its respective authorized_keys file. We can use the cms command to gather all keys in our cluster and then distribute them so that each node can ssh into each other.
We first create ssh-keys for all the nodes in our cluster.
(ENV3) you@yourlaptop $ cms host key create "red,red0[1-3]"
host key create red,red0[1-3]
+-------+---------+--------------------------------------------------+
| host | success | stdout |
+-------+---------+--------------------------------------------------+
| red | True | ssh-rsa AAAAB3NzaC1yc2EAAAADAQABAAABAQC99RR79UTQ |
| | | JznOPRN/FI6MqNsZ5Eirqs7JXA4UYfnMx8LVaD/ZcI6Sajr0 |
| | | 2nw2ucec8OMxtdzPrpWX5B+Hxz3GZWNKCbh2yHhMDIrf/Ohn |
| | | QGJrBx1mtAbqy4gd7qljEsL0FummdYmPdtHFBy7t2zkVp0J1 |
| | | V5YiLEbbrmX9RXQF1bJvHb4VNOOcwq47qX9h561q8qBxgQLz |
| | | F3iHmrMxmL8oma1RFVgZmjhnKMoXF+t13uZrf2R5/hVO4K6T |
| | | +PENSnjW7OX6aiIT8Ty1ga74FhXr9F5t14cofpN6QwuF2SqM |
| | | CgpVGfRSGMrLI/2pefszU2b5eeICWYePdopkslML+f+n |
| | | pi@red |
| red01 | True | ssh-rsa AAAAB3NzaC1yc2EAAAADAQABAAABAQDRN/rGGF+e |
| | | dZ9S2IWX4P26F7T2H+nsbw7CfeJ6df9oX/npYuM9BPDzcEP7 |
| | | +2jNIZtZVehJj5zHiodjAspCxjg+mByQZye1jioa3MBmgO3j |
| | | VwxCOPA7x0Wc2Dm9/QOg1kMMMlnNT2NHs+SeQMDXoUkpaLCQ |
| | | 108VQxaTclJ67USC1e/9B7OtjhsVm5kGA7Eamyd5PgtANT7G |
| | | jHERXSnGzFnbqqsZEBvCLWLSbaSq3adWR1bVvDblu11nyitE |
| | | x7YKZA9RK0A7rTBzrZa70SfG65dSbpqQFxmQYSrgiwVSBokk |
| | | 0vvk5l7NhBDrrrxWYWd9dm/SrDrInjcuDsCsjOVuccx7 |
| | | pi@red01 |
... # Ommitted some output for brevity
+-------+---------+--------------------------------------------------+
We can subsequently gather these keys into a file.
(ENV3) you@yourlaptop $ cms host key gather "red,red0[1-4]" ~/.
ssh/cluster_red_keys
And then Scatter them to the authorized_keys of our nodes.
(ENV3) you@yourlaptop $ cms host key scatter "red,red0[1-4]" ~/.
sss/cluster_red_keys
host key scatter red,red0[1-3] /Users/richie/.ssh/cluster_red_keys
+-------+---------+--------+
| host | success | stdout |
+-------+---------+--------+
| red | True | |
| red01 | True | |
| red02 | True | |
| red03 | True | |
| red04 | True | |
+-------+---------+--------+
All nodes should now have ssh access to each other.
cms on a PiSome cloudmesh commands offered can be very useful on the Pis. You can install cms on all Pis in this fashion, but
we will only demonstrate this for the manager pi.
For the production version pleas use
(ENV3) you@yourlaptop $ ssh red
pi@red $ curl -Ls curl -Ls http://cloudmesh.github.io/get/pi | sh -
However, to get the newest development version please use
(ENV3) you@yourlaptop $ ssh red
pi@red $ curl -Ls https://raw.githubusercontent.com/cloudmesh/get/main/pi/index.html | sh -
This will not only install cms, but will also upgrade your system, install the dependencies for cms, and create a
virtual environment. Because a system upgrade takes place, this command may take several minutes to run.
After a reboot, we can verify the success of the script with the following:
(ENV3) pi@red $ cms help
help

Documented commands (type help <topic>):
========================================
EOF     check     default  help       pause     quit   start      test
admin   clear     diagram  host       pi        set    stop       var
banner  commands  dryrun   info       provider  shell  stopwatch  version
bridge  config    echo     inventory  py        sleep  sys
burn    debug     gui      man        q         ssh    term
Figure 1: GitHub Command gh.
GitHub provides an extended gh commandline tool that allow easy interaction of forking repositories directly from github. IT also provides additional fimctionality to interact with other advanced features that are typically not provided in the git command tool.
Learning Objectives
Topics covered
The new GitHub gh command allows GitHub users to work from the terminal of
their machine without having to visit the web browser GUI to manage things like
issues, PRs, and forking. We will show you what features it provides and how to
use it. The gh command provides useful features that is not provided by the `git
commandline tool.
Visit the GitHub CLI homepage at https://cli.github.com/ for installation instructions. We recommend that you check out the source distribution because We found that whne we did this tutorial not all features were included in the brew instalation. We assume ths will cahnge over time and you may soon be able to just use the bre install on LInux and MacOs.
On mac, you can use the following command with Brew:
brew install gh
For Windows useser, please follow the install instructions fro Winodws.
It is best practice to be using SSH-keys with GitHub. Create one if you have not already with the following command:
ssh-keygen
We recommend t use the the default location.
To authenticate with the GitHub gh comamand, run the following command. We have included
the answers to the interactive prompts used for this guide.
gh auth login

What account do you want to log into? GitHub.com
? What account do you want to log into? GitHub.com
? What is your preferred protocol for Git operations? SSH
? Upload your SSH public key to your GitHub account? ~/.ssh/id_rsa.pub
? How would you like to authenticate GitHub CLI? Login with a web browser

! First copy your one-time code: 1234-1A11
- Press Enter to open github.com in your browser...
IN acse you work with multiple computers it is advisable to add your keys from these machines also. We demonstarte the interaction to upload the key from a new machine.
newmachine$ gh ssh-key add ~/.ssh/id_rsa.pub
Error: insufficient OAuth scopes to list SSH keys
Run the following to grant scopes: gh auth refresh -s write:public_key
newmachine$ gh auth refresh -s write:public_key

! First copy your one-time code: 4C2D-E896
- Press Enter to open github.com in your browser...
✓ Authentication complete. Press Enter to continue...

newmachine$ gh ssh-key add ~/.ssh/id_rsa.pub
✓ Public key added to your account
We can easily create a fork of a repo with the following:
gh repo fork
This is useful for when you do not have write access to the original repository.
We can create a pull request easily as follows from a git repo:
gh pr create
The command above will ask the user where to push the branch (if it does not already exist on the remote). It will also offer the option to fork the initial repository. You will want to do this if you do not have write access to the original repo.
Once created, you may view the status of the PR with the following:
gh pr status
Reviewers can checkout your pull request to verify changes as follows:
gh pr checkout {PR NUMBER}
The reviewer can then approve the PR as follows:
gh pr review --approve
Subsequently, the PR can be merged as follows:
gh pr merge {PR NUMBER}
You may also list all pull requests with the following:
gh pr list
Finally, PRs can be closed with
gh pr close {PR NUMBER}
To create an issue, call the following:
gh issue create --title="Bug 1" --body="description"
We can also check the status of issues relevant to use with:
gh issue status
Alternatively, we may list all open issues.
gh issue list
Finally, we may close issues with:
gh issue close {ISSUE NUMBER}
gh(1)                                                                    gh(1)

NAME
       gh - GitHub CLI

SYNOPSIS
       gh   [flags]

DESCRIPTION
       Work seamlessly with GitHub from the command line.

OPTIONS
       --help[=false]      Show help for command

       --version[=false]      Show gh version

EXAMPLE
              $ gh issue create
              $ gh repo clone cli/cli
              $ gh pr checkout 321

SEE ALSO
       gh-alias(1),  gh-api(1),  gh-auth(1),  gh-completion(1),  gh-config(1),
       gh-gist(1),   gh-issue(1),   gh-pr(1),    gh-release(1),    gh-repo(1),
       gh-secret(1), gh-ssh-key(1)
Tha manual pages are published at the gh manual. For mor information you can also use the man command. A full list of manual pages includes:
There are many other commands for the GitHub CLI that can be found in the gh manual, however we only include a select number of relevant commands for this guide. The commands mentioned above serve to familiarize the user with the GitHub CLI while also providing practical usage.

Cloudmesh Commands
We explain how to very quickly add new commands to cloudmesh
Learning Objectives
Topics covered
Cloudmesh offers an easy-to-use command line and shell interface using a library
called cloudmesh-cmd5. Cmd5 installs a program called Cloudmesh Shell or
cms when called in a terminal. Cludmesh can be installed either directly from pip of developers can install it via the cloudmesh-installer that also downloads the source. The installations are discussed in detail in the Cloudmesh Manual.
In any case, we recommend you use a venv to assure that you d not by accident
destroy your system-wide python installation. We always use the environment
~/ENV3 to have all tutorials uniform and to simplify them. If you do not yet have one create it as follows.
We recommend installing a 64-bit version of python directly from python.org. Anaconda is also possible, but we do not use anaconda much as it has many unnecessary packages and thus is not ideal for cloud-based research. It is always better to assemble just the libraries that you really need.
python --version
# on some systems you need to use python3 or python3.9
For convenience, we assume your system uses python3.9. Now create the venv with
$ python3.9 -m venv ~/ENV3
$ source ~/ENV3/bin/activate
$ pip install pip -U
To install Cloudmesh shell from PyPI you can say
$ pip install cloudmesh-cms
To install it with source say
$ mkdir ~/cm
$ cd ~/cm
$ pip install cloudmesh-installer
$ cloudmesh-installer get cms
$ cmas help
Now you have everything that you need to install new commands. The important feature that cloudmesh includes is that it uses python namespaces. This makes it possible to develop your own command in separate directories and store them in GitHub in your own repositories.
To create a command we simply create a new directory for it and populate it
with a template by calling the command generation command in cloudmesh. For
simplicity, we name the directory cloudmesh-gregor but you can name it the way
you like it. We intend to create a command called gergor
mkdir -p ~/cm/cloudmesh-gregor
cd ~/cm/cloudmesh-gregor
cms sys command generate gregor .
pip install -e .
cms help
Yes, this is it, you have now generated a new command gregor that you can see listed in the commands. Try it out with
cms gregor
To change the source, go to the file
emacs ~/cm/cloudmesh-gregor/cloudmesh/gregor/command/gregor.py
There you will see a comment as part of the command using docopts. We chose
docopts for our command generation as it allows us to design the documentation
first before we implement it. Docopts will take this docstring and generate a
dictionary that we can inspect and use in if conditions. We have significantly
enhanced the cms tool from python to more conveniently program new commands.
For example, we use a dotdict
implementation allowing us to say
arguments.FILE instead of argunemnts["FILE"]
This has two limitations
you can not use build-in names such as format, list, and so on. In this case, you still have to use arguments["format"] as .format in python has a
very special meaning.
in case a parameter is passed as an option with --option or --option2=OPTION2
you can obviously not use arguments.--option
For you to use arguments.option we introduced a function called
Parameter
from cloudmesh.shell.command import command, map_parameters

map_parameters(arguments,
               "option",
               "option2")
that maps the -- preceded options simply into the arguments dictionary
without the --.
Cloudmesh has also a build-in mechanism to store and use cms variables. YOu can see them while using the command
$ cms set
These are variables that you can use to for example initialize options not just form the command line, but through preset values you yous yourself.
Let us assume you like to preset the FILE to the value ~/cm/cloudmesh-gregor/README.md
you can do this with
cms set FILE=~/cm/cloudmesh-gregor/README.md`
Now you can enhance your program by checking if the variable exists and use
it. This has the advantage that the implementation is slightly more dynamic
than using the [default: value] option from cloudmesh and allows to use of a
shared state of the variable between invocations.
We simply add the following just after the map parameters function
variables = Variables()

arguments.output = Parameter.find(
    "FILE",
    arguments,
    variables,
    "~/cm/cloudmesh-gregor/README.md")
The order in the find is done sequentially. First, we look if arguments.FILE
is defined by the command, then we look if it is in the variables, then we set a
default value. The default value is simply last.
We also included a simple debug function that prints the content of dicts as well as the filename and the line number in the program.
YOu can use it for displaying the contents of the arguments so you can see how
to best crate if conditions that react to their state. Please be reminded that
the order in the if conditions are relevant t write your command. Assure your
arguments setting does not fire the specific rule you intend
to use.
from cloudmesh.common.debug import VERBOSE

VERBOSE(arguments)
YOU can use VERBOSE with any variable, but it works best with one dicts having
a single layer such as arguments or variables.
from cloudmesh.shell.command import command, map_parametersfrom cloudmesh.common.debug import VERBOSETutorial Links.
A collection of potentially useful tutirial links
Learning Objectives
Topics covered
interesting article to use a vm to modify the image

The Web Page.
Abstract
Learning Objectives
Topics covered
While working with clusters there will be many times you need to troubleshoot network connectivity. Below are useful commands to help you enumerate and verify you network is operating correctly.
The ip address command can help you determine your network interface card configuration (NIC) including IP address, networks, and MAC address.
(ENV3) pi@red:~ $ ip address
1: lo: <LOOPBACK,UP,LOWER_UP> mtu 65536 qdisc noqueue state UNKNOWN group default qlen 1000
    link/loopback 00:00:00:00:00:00 brd 00:00:00:00:00:00
    inet 127.0.0.1/8 scope host lo
       valid_lft forever preferred_lft forever
    inet6 ::1/128 scope host
       valid_lft forever preferred_lft forever
2: eth0: <BROADCAST,MULTICAST,UP,LOWER_UP> mtu 1500 qdisc mq state UP group default qlen 1000
    link/ether dc:a6:32:e8:03:09 brd ff:ff:ff:ff:ff:ff
    inet 10.1.1.1/24 brd 10.1.1.255 scope global noprefixroute eth0
       valid_lft forever preferred_lft forever
    inet6 fe80::bc02:69de:ea6d:78a2/64 scope link
       valid_lft forever preferred_lft forever
3: wlan0: <BROADCAST,MULTICAST,UP,LOWER_UP> mtu 1500 qdisc pfifo_fast state UP group default qlen 1000
    link/ether dc:a6:32:e8:03:0a brd ff:ff:ff:ff:ff:ff
    inet 192.168.1.27/24 brd 192.168.1.255 scope global dynamic noprefixroute wlan0
       valid_lft 86368sec preferred_lft 75568sec
    inet6 fe80::20a9:5c10:42fe:5eb0/64 scope link
       valid_lft forever preferred_lft forever
(ENV3) pi@red:~ $
To ping an IP address
ping 10.1.1.1
Try using multicast doman name servcie (mDNS) to resolve the hostname using the .local extension.
ping red.local
If you need to ping out a specific interface, such as eth0 or wlan0
ping -I wlan0 red.local
When your computer needs to send a packet to an IP address it must first determine the next hop MAC address. It does this using the ARP protocol.
Next hop MAC address to IP pairings can be viewed in the ARP table. The ARP also contains conveniently contains hostnames if they were resolved.
arp -a
pi@red:~ $ arp -a
red001 (10.1.1.2) at dc:a6:32:e7:fe:69 [ether] on eth0
? (192.168.1.1) at dc:ef:09:d9:5f:64 [ether] on wlan0
? (192.168.1.12) at e4:b3:18:d4:bd:d1 [ether] on wlan0
? (192.168.1.14) at e8:d8:d1:82:42:b8 [ether] on wlan0
red002 (10.1.1.3) at dc:a6:32:e8:02:25 [ether] on eth0
ip -s -s neigh flush all
The route command shows you all the rules you machine uses to route packets.
The example below informs us the default route is using the wlan0 interface, while the 10.1.1.0/24 network will be reached using the eth0 interface.
pi@red:~ $ route
Kernel IP routing table
Destination     Gateway         Genmask         Flags Metric Ref    Use Iface
default         192.168.1.1     0.0.0.0         UG    303    0        0 wlan0
10.1.1.0        0.0.0.0         255.255.255.0   U     202    0        0 eth0
192.168.1.0     0.0.0.0         255.255.255.0   U     303    0        0 wlan0
Traceroute is a tool to determine the network routers on a path from your host to a destination ip. For example, lets verify the worker (red001) uses the manager pi (10.1.1.1) to reach the internet (8.8.8.8)
pi@red001:~ $ traceroute 8.8.8.8
traceroute to 8.8.8.8 (8.8.8.8), 30 hops max, 60 byte packets
 1  red (10.1.1.1)  0.290 ms  0.252 ms  0.182 ms
 2  192.168.1.1 (192.168.1.1)  3.362 ms  3.577 ms  3.484 ms
 3  96.120.112.113 (96.120.112.113)  22.974 ms  15.305 ms  21.364 ms
 4  96.110.168.9 (96.110.168.9)  20.590 ms  19.890 ms  20.401 ms
 5  96.108.120.86 (96.108.120.86)  20.164 ms  21.079 ms  21.164 ms
 6  96.108.120.145 (96.108.120.145)  27.577 ms  22.101 ms  22.144 ms
 7  24.153.88.85 (24.153.88.85)  28.857 ms  29.504 ms  29.553 ms
 8  be-32241-cs04.350ecermak.il.ibone.comcast.net (96.110.40.61)  30.314 ms  31.071 ms  31.177 ms
 9  be-2112-pe12.350ecermak.il.ibone.comcast.net (96.110.33.210)  36.510 ms be-2412-pe12.350ecermak.il.ibone.comcast.net (96.110.33.222)  36.423 ms be-2111-pe11.350ecermak.il.ibone.comcast.net (96.110.33.194)  35.794 ms
10  96-87-9-122-static.hfc.comcastbusiness.net (96.87.9.122)  33.767 ms 66.208.233.86 (66.208.233.86)  34.202 ms 96-87-9-122-static.hfc.comcastbusiness.net (96.87.9.122)  34.035 ms
11  * * *
12  dns.google (8.8.8.8)  33.843 ms  33.433 ms  34.622 ms
NMAP is a a tool that can conduct a wide variety of network scans. We will use NMAP to find the IP of our manager pi (red) from our laptop on our wireless network (192.168.1.0/24).
Note: Raspberry Pi MAC addresses start with DC:A6:32, so we know 192.168.1. 27 is our manager pi
anthony@anthony-ubuntu:~$ sudo nmap -sP 192.168.1.0/24

Starting Nmap 7.60 ( https://nmap.org ) at 2021-03-11 14:16 EST
Nmap scan report for _gateway (192.168.1.1)
Host is up (0.0031s latency).
MAC Address: DC:EF:09:D9:5F:64 (Netgear)
Nmap scan report for 192.168.1.7
Host is up (0.18s latency).
MAC Address: E0:F6:B5:EA:C6:CC (Unknown)
Nmap scan report for 192.168.1.14
Host is up (0.46s latency).
MAC Address: E8:D8:D1:82:42:B8 (Unknown)
Nmap scan report for 192.168.1.19
Host is up (-0.017s latency).
MAC Address: 34:93:42:87:BA:46 (Unknown)
Nmap scan report for 192.168.1.23
Host is up (0.98s latency).
MAC Address: D0:D2:B0:90:2E:60 (Apple)
Nmap scan report for 192.168.1.27
Host is up (1.5s latency).
MAC Address: DC:A6:32:E8:03:0A (Unknown)
Nmap scan report for anthony-ubuntu (192.168.1.12)
Host is up.
Nmap done: 256 IP addresses (7 hosts up) scanned in 17.90 seconds
This file contains static hostname to IP mappings.
(ENV3) pi@red:~ $ cat /etc/hosts
127.0.0.1  localhost
::1        localhost ip6-localhost ip6-loopback
ff02::1    ip6-allnodes
ff02::2    ip6-allrouters
#
127.0.1.1  red
#
10.1.1.1	red
10.1.1.2	red001
10.1.1.3	red002
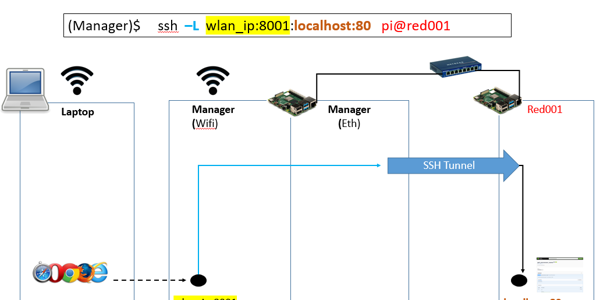
Port Forwarding Tutorial
c
Learning Objectives
Learn how to provide external machines permanent access to cluster-internal services with ssh port forwarding, autossh, and systemd
Easily SSH into cluster internal machines from an external machine using ProxyJump.
Topics covered
NOTE: This is actually more than what is needed if all you want is SSH, see ProxyJump section below
In this image below we setup a ssh tunnel on the manager pi to enable ssh access from the laptop to the worker node Red001.
The manager and laptop must both be included in red001’s
~/.ssh/authorized_hosts file.

We create one tunnel for each worker each with a unique wlan_ip:port assigned.
Now in the laptop ~/.ssh/config file we add:
Host red
     HostName    red.local
     User        pi

Host red001
     HostName    red.local
     User        pi
     Port       8001

Host red002
     HostName    red.local
     User        pi
     Port        8002
Finally we can ssy from the laptop to the worker.
you@laptop:~ $ ssh red001
However, this tunnel is not permanent as is. Besides manager or worker *restarts, it is also subject to communication failures, such as timeouts, that *will cause the tunnel to break. This will force the user to re-run the command *to create the tunnel, and in some cases, find and kill a failed but still *existing tunnel process.
For additional visualizations and discussion of local and remote port forwarding see http://dirk-loss.de/ssh-port-forwarding.htm
Autossh is a program designed to automatically restart SSH sessions and tunnels.
Systemd is a Linux system and service manager used by Raspi OS.
We use systemd to install an autossh service that starts on system boot to establish the ssh tunnel.
Create the below file. Notice this requires the wifi IP address on the manager (wlan0 e.g. 192.168.1.24).
/etc/systemd/system/autossh-red001.service
[Unit]
Description=AutoSSH tunnel service to red001 on local port 8001
After=multi-user.target

[Service]
User=pi
Group=pi
Environment="AUTOSSH_GATETIME=0"
ExecStart=/usr/bin/autossh -M 0 -o "ServerAliveInterval 30" -o "ServerAliveCountMax 3" -i /home/pi/.ssh/id_rsa -NL 192.168.1.24:8001:localhost:22 pi@red001

[Install]
WantedBy=multi-user.target
To get the service to start and be enabled on system restart we need to run the following commands.
sudo systemctl daemon-reload
sudo systemctl start autossh-red001.service
sudo systemctl enable autossh-red001.service
NOTE: As we are binding the tunnel to a dynamically assigned address on our wlan0 interface. The tunnel will not function if wlan0 interface is assigned a different IP.
Currently the command below will setup a autossh tunnel for ssh access to the workers.
pi@manger $ cms host tunnel create red00[1-2] [--port] If the wifi IP
changes, the above command needs to be run again, but the ssh config on the
laptop will not need to be changed unless the user specifies new ports.
It turns out setting up a port forward for simple ssh access to the workers via the manger is over complicated.
ProxyJump is an SSH option that exists to simply this purpose. It is also more reliabe as the tunnel is setup on demand.
See the example below.
ssh -J pi@red.local pi@red001
We can also do this with a only ~/.ssh/config file.
Host red
   Hostname red.local
   User	    pi

Host red001
   Hostname red001
   User	    pi
   ProxyJump red
No we can simply setup a tunnel on demand as we access the worker.
you@laptop:~ $ ssh red001
I don’t know yet. Based on a quick glance at this article, the answer is no, but it can be useful if you need to tunnel through multiple hosts before starting a remote port forward.
https://medium.com/maverislabs/proxyjump-the-ssh-option-you-probably-never-heard-of-2d7e41d43464
So, port forwarding is still useful to expose arbitrary services.
In the example below we expose a worker running cloudmesh-openapi on port 80 to the laptop with a local port foward. Again we can make this permanent with autossh and systemd.

For simple ssh access we make a command (or Gregor might have already done this, I haven’t reviewed his work yet)
cms ssh config NAMES MANAGER [--laptop]
e.g.
cms ssh config red00[1-2] red --laptop=anthony@anthony-ubuntu.local
We will probably turn cms host tunnel create into a command to expose an
arbirary cluster-internal service to the laptop (not just ssh). For example
accessing a web page running on a worker.
cms host tunnel create NAMES SERVICE_PORTS EXTERNAL_START_PORT
e.g.
cms host tunnel create red00[1-2] 80 8080
Now from laptop we can browse to http://red.local:8080 and
http://red.local:8081 to access the web pages on red001:80 and red002:80
respectively.

Upuntu Turorials
A collection of links and tutorials that halp making using Ubuntu on the Pi.
Learning Objectives
Topics covered
Ubuntu is a real good alternative for an operating system on teh PI. The reason is that at this time RaspberryOS is only supporting 32-bit, while Ubuntu supports both 32 and 64 bit versions of their operating system. We recommend to just install the 64 bit version.
Ubuntu PI tutorials from Canonical
Currently this includes
from: https://www.zdnet.com/article/hands-on-adventures-with-ubuntu-linux-on-the-raspberry-pi-4/
xzcat ubuntu-20.10-preinstalled-desktop-arm64+raspi.img.xz | dd bs=4M of=/dev/sdX iflag=fullblock oflag=direct status=progress
xzcat uncompresses the download file and writes it to standard output, so we can pipe it to the dd command dd is the Linux raw copy utility, which will actually write the data to the SD card bs=4M tells dd to read/write the data in blocks of 4 Megabytes of=/dev/sdX tells dd where to write the output; you need to replace the X with the device identifier for the SD card on your system; be very careful about this, because putting the wrong character here can have catastrophic consequences iflag=fullblock tells dd to accumulate full blocks on the input before proceeding to the output oflag=direct tells dd to use direct I/O operations for the data status=progress tells dd to show a periodic summary of the data transfer
sudo cloud-init clean –logs –reboot
Will cause cloud-init to reset itself and re-run after rebooting the machine. Note that this does not clean up everything that cloud-init did the first time round (user creation, file-writing, etc.), so depending on the configuration it may or may not work successfully the second time (though generally I’ve found it reasonably useful for testing). Currently, the only way to completely clean the system is to re-image.
Important read but we want to use k3s and not k3sup https://medium.com/icetek/building-a-kubernetes-cluster-on-raspberry-pi-running-ubuntu-server-8fc4edb30963
some tool, nt sure if useful

This tutorial will introduce you to simple user management commands for a Pi cluster generated with cloudmeah cms burn. It allows adding, deleting new users as wall as adding new keys too the manager and workers. It does only use ssh as mechanism for authentication as to keep the number of used services small.
Learning Objectives
Topics covered
This tutorial assumes you have local network access to the target machines.
If this is not the case, such as in a bridge setup, you can run the
following command to setup your ~/.ssh/config file to use the bridge to access
the target machines.
In this example red.local is the bridge and red0[1-2] are workers
accessible via the bridge device, and the workers already have your laptop’s
ssh key in authorized_keys.
you@yourlaptop:~/$ cms host config proxy pi@red.local red0[1-2]
host config proxy pi@red.local red0[1-2]
Adding to ~/.ssh/config

##### CLOUDMESH PROXY CONFIG #####

Host red
     HostName pi@red.local
     User pi

Host red01
     HostName red01
     User pi
     ProxyJump pi@red.local

Host red02
     HostName red02
     User pi
     ProxyJump pi@red.local

##### CLOUDMESH PROXY CONFIG #####
Let’s test
you@yourlaptop:~/$ ssh red
pi@red:~/$ exit
you@yourlaptop:~/$ ssh red01
pi@red001:~/$ exit
you@yourlaptop:~/$ ssh red02
pi@red002:~/$ exit
On red only.
pi@red:~ $ sudo add user bob
On multiple cluster machines.
you@yourlaptop:~/$ cms host adduser localhost,red,red0[1-2] wendy
host adduser localhost,red,red0[1-2] wendy

Adding user to localhost
Adding user `wendy' ...
Adding new group `wendy' (1011) ...
Adding new user `wendy' (1010) with group `wendy' ...
Creating home directory `/home/wendy' ...
Copying files from `/etc/skel' ...

+--------+---------+--------------------------------------------------+
| host   | success | stdout                                           |
+--------+---------+--------------------------------------------------+
| red    | True    | Adding user `wendy' ...                          |
|        |         | Adding new group `wendy' (1001) ...              |
|        |         | Adding new user `wendy' (1001) with group        |
|        |         | `wendy' ...                                      |
|        |         | Creating home directory `/home/wendy' ...        |
|        |         | Copying files from `/etc/skel' ...               |
| red01  | True    | Adding user `wendy' ...                          |
|        |         | Adding new group `wendy' (1001) ...              |
|        |         | Adding new user `wendy' (1001) with group        |
|        |         | `wendy' ...                                      |
|        |         | Creating home directory `/home/wendy' ...        |
|        |         | Copying files from `/etc/skel' ...               |
| red02  | True    | Adding user `wendy' ...                          |
|        |         | Adding new group `wendy' (1001) ...              |
|        |         | Adding new user `wendy' (1001) with group        |
|        |         | `wendy' ...                                      |
|        |         | Creating home directory `/home/wendy' ...        |
|        |         | Copying files from `/etc/skel' ...               |
+--------+---------+--------------------------------------------------+
On red only.
pi@red:~ $ sudo passwd bob
On multiple cluster machines.
you@yourlaptop:~/$ cms host passwd localhost,red,red0[1-2] wendy
host passwd localhost,red,red0[1-2] wendy

Setting password on localhost, please provide user password
Enter new UNIX password:
Retype new UNIX password:
passwd: password updated successfully
0

Setting password on remote hosts, please enter user password

Please enter the user password:
c+--------+---------+--------+
| host   | success | stdout |
+--------+---------+--------+
| red    | True    |        |
| red01  | True    |        |
| red02  | True    |        |
+--------+---------+--------+
However, it seems like this may not work on the local machine (red).
On red only.
pi@red:~ $ sudo adduser bob sudo
On multiple cluster machines.
you@yourlaptop:~/$ cms host addsudo localhost,red,red00[1-2] wendy
host addsudo localhost,red,red00[1-2] wendy

Adding user to sudo group on localhost
Adding user `wendy' to group `sudo' ...
Adding user wendy to group sudo
Done.

+--------+---------+-----------------------------------------+
| host   | success | stdout                                  |
+--------+---------+-----------------------------------------+
| red    | True    | Adding user `wendy' to group `sudo' ... |
|        |         | Adding user wendy to group sudo         |
|        |         | Done.                                   |
| red01  | True    | Adding user `wendy' to group `sudo' ... |
|        |         | Adding user wendy to group sudo         |
|        |         | Done.                                   |
| red02  | True    | Adding user `wendy' to group `sudo' ... |
|        |         | Adding user wendy to group sudo         |
|        |         | Done.                                   |
+--------+---------+-----------------------------------------+
you@yourlaptop:~ $ ssh red01

pi@red01:~$ su wendy
Password:
To run a command as administrator (user "root"), use "sudo <command>".
See "man sudo_root" for details.

wendy@red01:/home/ubuntu$ sudo echo hello
[sudo] password for wendy:
hello
you@yourlaptop:~ $ cms host key gather red keys.txt
host key gather red keys.txt

you@yourlaptop:~ $ cms host key scatter red,red0[1-2] keys.txt --user=wendy
host key scatter red,red0[1-2] keys.txt --user=wendy
INFO: SCP to ./temp_authorzied_keys_temp
+--------+---------+--------+
| host   | success | stdout |
+--------+---------+--------+
| red    | True    |        |
| red01  | True    |        |
| red02  | True    |        |
+--------+---------+--------+
INFO: Mkdir /home/wendy/.ssh if not exist
+--------+---------+--------+
| host   | success | stdout |
+--------+---------+--------+
| red    | True    |        |
| red01  | True    |        |
| red02  | True    |        |
+--------+---------+--------+
INFO: Chown /home/wendy/.ssh to wendy
+--------+---------+--------+
| host   | success | stdout |
+--------+---------+--------+
| red    | True    |        |
| red01  | True    |        |
| red02  | True    |        |
+--------+---------+--------+
INFO: Chmod /home/wendy/.ssh to 700
+--------+---------+--------+
| host   | success | stdout |
+--------+---------+--------+
| red    | True    |        |
| red01  | True    |        |
| red02  | True    |        |
+--------+---------+--------+
INFO: Mv temp_authorized_keys_temp to /home/wendy/.ssh/authorized_keys
+--------+---------+--------+
| host   | success | stdout |
+--------+---------+--------+
| red    | True    |        |
| red01  | True    |        |
| red02  | True    |        |
+--------+---------+--------+
INFO: Chown /home/wendy/.ssh/authorized_keys to wendy
+--------+---------+--------+
| host   | success | stdout |
+--------+---------+--------+
| red    | True    |        |
| red01  | True    |        |
| red02  | True    |        |
+--------+---------+--------+
Let uss test logging in as wendy.
you@yourlaptop:~ $ ssh wendy@red.local
Linux red 5.10.17-v7l+ #1403 SMP Mon Feb 22 11:33:35 GMT 2021 armv7l

The programs included with the Debian GNU/Linux system are free software;
the exact distribution terms for each program are described in the
individual files in /usr/share/doc/*/copyright.

Debian GNU/Linux comes with ABSOLUTELY NO WARRANTY, to the extent
permitted by applicable law.
wendy@red:~ $
On red only.
-r removes the user’s home folder too.
pi@red:~ $ sudo userdel -r bob
On multiple cluster machines.
you@yourlaptop:~/$ cms host deluser localhost,red,red0[1-2] wendy
host deluser localhost,red,red0[1-2] wendy

Deleting user on localhost
userdel: wendy mail spool (/var/mail/wendy) not found

+--------+---------+--------+
| host   | success | stdout |
+--------+---------+--------+
| red    | True    |        |
| red01  | True    |        |
| red02  | True    |        |
+--------+---------+--------+